#ifndef _ITERATOR_HPP #define _ITERATOR_HPP #includestruct Player { int mPID; }; class PlayerManager { public: PlayerManager() :mBeginIter( &mPlayers ) {} ~PlayerManager() {} struct Iterator { Iterator() { mref = nullptr; mIndex = 0; } Iterator( std::vector< Player* > *ref ) { mref = ref; mIndex = 0; } Iterator( const Iterator &other ) { mref = other.mref; mIndex = other.mIndex; } Iterator& operator = ( const Iterator &other ) { if( this == &other ) { return *this; } mIndex = other.mIndex; mref = other.mref; } Iterator& operator ++(int idx) { return operator ++(); } Iterator& operator ++() { ++mIndex; return *this; } bool operator !=( const Iterator &other ) { return mIndex != other.mIndex; } Player* operator *() { return (*mref)[ mIndex ]; } Player** operator ->() { return &(*mref)[ mIndex ]; } int mIndex; std::vector< Player* > *mref; }; void AddPlayer( Player *pPlayer ) { mPlayers.push_back( pPlayer ); mEndIter.mIndex = mPlayers.size(); } Iterator Begin() { return mBeginIter; } Iterator End() { return mEndIter; } private: std::vector< Player* > mPlayers; Iterator mBeginIter; Iterator mEndIter; }; #endif
#include "Iterator.hpp"
//作用:封裝對內部復雜聚合類的元素訪問,並且可以豐富擴展自定義功能,典型例子stl容器的iterator
//例子簡單實現了部分功能理解iterator模式

int main()
{
	Player *p;
	PlayerManager* ppm = new PlayerManager;
	for( int i = 0; i < 3; ++i )
	{
		p = new Player;
		p->mPID = i;
		ppm->AddPlayer( p );
	}


	for( PlayerManager::Iterator i = ppm->Begin(); i != ppm->End(); ++i )
	{
		//迭代器訪問數據
		int id = (*i)->mPID;

		delete *i;
	}

	delete ppm;

	return 0;
}
#ifndef _TEMPLATE_HPP
#define _TEMPLATE_HPP

class TopFrame
{
public:
	TopFrame(){}
	virtual ~TopFrame(){}
	void FrameMethod()
	{
		//注意這裡,非虛方法封裝虛方法,凡是這種行為,即是template模式
		//目的明確,FrameMethod對外,SubMethod1和SubMethod2在頂層對內
		//當然有時候,我們無意中也會寫出設計模式來只不過我們不知道罷了
		SubMethod1();
		SubMethod2();
	}
protected:
	virtual void SubMethod1() = 0;
	virtual void SubMethod2() = 0;
};

class Sub1 : public TopFrame
{
public:
	Sub1(){}
	~Sub1(){}
	void SubMethod1(){}
	void SubMethod2(){}
};

class Sub2 : public TopFrame
{
public:
	Sub2(){}
	~Sub2(){}
	void SubMethod1(){}
	void SubMethod2(){}
};

#endif
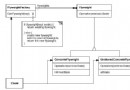
//作用:抽象頂層封裝邏輯方法或者通用放,具體算法細節延遲到子類實現
//客戶程序員只關心public的方法即本例子中的FrameMethod對外方法
//對外接口FrameMethod在頂層調用在該類中虛方法,封裝了具體過程而
//不在關心子類方法

int main()
{
	TopFrame *p1 = new Sub1;
	TopFrame *p2 = new Sub2;

	p1->FrameMethod();
	p2->FrameMethod();

	delete p1;
	delete p2;
	return 0;
}
#ifndef _STRATEGY_HPP
#define _STRATEGY_HPP

class Scene
{
public:
	virtual ~Scene(){}
	virtual void Init() = 0;
	virtual void Update() = 0;
	virtual void Render() = 0;
	virtual void Destroy() = 0;
};

class MenuScene : public Scene
{
public:
	MenuScene(){}
	~MenuScene(){}
	void Init(){}
	void Update(){}
	void Render(){}
	void Destroy(){}
};

class LoadingScene : public Scene
{
public:
	LoadingScene(){}
	~LoadingScene(){}
	void Init(){}
	void Update(){}
	void Render(){}
	void Destroy(){}
};

class GameScene : public Scene
{
public:
	GameScene(){}
	~GameScene(){}
	void Init(){}
	void Update(){}
	void Render(){}
	void Destroy(){}
};

class App
{
public:
	App()
	{
		mp = nullptr;
	}
	~App()
	{
		if( nullptr != mp )
		{
			delete mp;
		}
	}
	void SwitchScene( Scene *p )
	{
		if(mp == p)
		{
			return;
		}
		if( nullptr != mp )
		{
			mp->Destroy();
		}
		mp = p;
		mp->Init();
	}
	void Run()
	{
		if(nullptr == mp)
		{
			return;
		}
		mp->Update();
		mp->Render();
	}

private:
	Scene *mp;
};

#endif
//作用:重在策略,切換不同的方法行為
//對象行為相同,但實現不同,而且還有可能發送互相替換
//說白了就是對象之前切換然後調用行為方法
//典型例子為場景切換,或者有些游戲中的,武器切換

int main()
{
	Scene *p1 = new MenuScene;
	Scene *p2 = new LoadingScene;
	Scene *p3 = new GameScene;

	App *pa = new App;//簡單模擬場景管理

	//切換到菜單場景
	pa->SwitchScene( p1 );
	//調用菜單場景邏輯和渲染( 這裡只是簡單模擬場景切換 )
	pa->Run();

	//切換到資源加載場景
	pa->SwitchScene( p2 );
	pa->Run();

	//切換到游戲場景
	pa->SwitchScene( p3 );
	pa->Run();

	delete pa;
	delete p3;
	delete p2;
	delete p1;
	return 0;
}
#ifndef _STATE_HPP
#define _STATE_HPP

class M16_Rifle;
//抽象狀態
class M16_State
{
protected:
	M16_State(){}

public:
	virtual ~M16_State(){}

	//開火時的音效
	virtual void FireAudio() = 0;

	//調整影響槍的火力
	virtual void AdjustPower( M16_Rifle *pM16 ) = 0;
};


class M16_MufflerState : public M16_State
{
public:
	M16_MufflerState(){}
	~M16_MufflerState(){}
private:
	void FireAudio()
	{
		//播放消音開火音效
	}

	void AdjustPower( M16_Rifle *pM16 )
	{
		//消音狀態下火力減少
		//pM16->mPower -= 10;
	}
};

class M16_NormalState : public M16_State
{
public:
	M16_NormalState(){}
	~M16_NormalState(){}
private:
	void FireAudio()
	{
		//播放非消音開火音效
	}

	void AdjustPower( M16_Rifle *pM16 )
	{
		//非消音狀態下火力回復
		//pM16->mPower += 10;
	}
};

class M16_Rifle
{
public:

	friend class M16_MufflerState;
	friend class M16_NormalState;

	M16_Rifle()
	{
		mpMullfer = new M16_MufflerState;
		mpNormal = new M16_NormalState;
		mpCurr = mpNormal;
		mPower = 50;
	}

	~M16_Rifle()
	{
		delete mpMullfer;
		delete mpNormal;
	}

	void Fire()
	{
		mpCurr->FireAudio();
		//...

	}

	//消音和不消音來回切換
	void SwitchFireMode()
	{
		mpCurr = mpCurr == mpNormal ? mpMullfer : mpNormal;
		mpCurr->AdjustPower( this );
	}

private:

	M16_State *mpMullfer;
	M16_State *mpNormal;
	M16_State *mpCurr;
	int mPower;
};

#endif
//作用:從對象內部改變狀態,控制對象行為避免外部switch if else 嵌套結構

//CS游戲中警察M-16這種自動步槍就有兩種狀態
//普通狀態和消音器狀態
//有人說用bool值就行了,如果是3種以上且有嵌套的復雜狀態呢?

int main()
{
	M16_Rifle *pM16 = new M16_Rifle;
	//默認非消音
	pM16->Fire();

	//切換消音
	pM16->SwitchFireMode();
	pM16->Fire();

	//切換非消音
	pM16->SwitchFireMode();
	pM16->Fire();

	delete pM16;
	return 0;
}
#ifndef _OBSERVER_HPP #define _OBSERVER_HPP #includetypedef unsigned int u32; //以星際爭霸2游戲中人族科技建築為例 template class IObserver; //被觀察者 template< typename T > class IObservable { public: IObservable(){} virtual ~IObservable(){} virtual void AddObserver( IObserver< T > *pObserver ) = 0; virtual void DeleteObserver( IObserver< T > *pObserver ) = 0; virtual void NotifyObservers( T context ) = 0; }; //觀察者 template< typename T > class IObserver { public: IObserver(){} virtual ~IObserver(){} virtual void Update( T context ) = 0; }; //晶礦 class Crystal : public IObservable< u32 > { public: Crystal(){} ~Crystal(){} virtual void AddObserver( IObserver *pObserver ) { mObservers.insert( pObserver ); } virtual void DeleteObserver( IObserver *pObserver ) { mObservers.erase( pObserver ); } virtual void NotifyObservers( u32 context ) { for( auto i = mObservers.begin(); i != mObservers.end(); ++i ) { (*i)->Update( context ); } } private: std::set< IObserver * > mObservers; }; //重工廠 class Factory : public IObserver< u32 > { public: void Update( u32 context ) { if( context > 200 ) { //可建造重工廠 } } }; //兵營 class Barracks : public IObserver< u32 > { public: void Update( u32 content ) { if( content > 150 ) { //可建造兵營 } } }; #endif
#include "Observer.hpp"

//作用:被觀察者可以注冊可以觀察他的觀察者,被觀察者出發相應的事件或者狀態
//觀察者會收到相應的通知數據,根據數據做出不同的處理
//這個例子可能寫的比較特殊理解這種思想即可

int main()
{
	//晶礦
	Crystal *pCrystal = new Crystal;

	//重工
	Factory *pF = new Factory;

	//兵營
	Barracks *pB = new Barracks;

	pCrystal->AddObserver( pF );
	pCrystal->AddObserver( pB );

	u32 Count = 1000;

	//采礦1000
	pCrystal->NotifyObservers( Count );

	delete pB;
	delete pF;
	delete pCrystal;
	return 0;
}
#ifndef _COMMAND_HPP
#define _COMMAND_HPP

//Command模式使用的范圍就太多了
//例如星際爭霸中人族SCV的控制面板( 移動、攻擊、巡邏、采礦、停止... )
class Command
{
public:
	Command(){}
	virtual ~Command(){}
	virtual void Execute() = 0;
};

class SCV
{
public:
	SCV(){}
	~SCV(){}
	void Move( int x, int y ){}
	void Attack( int x, int y ){}
	void Round( int x, int y ){}
	void Mining( int x, int y ){}
	void Stop(){}
};

//將行為進行封裝
class MoveCommand : public Command
{
	public:
		MoveCommand(){}
		~MoveCommand(){}
		MoveCommand( SCV *p, int x, int y )
		{
			mp = p;
			mx = x;
			my = y;
		}

		void Execute()
		{
			mp->Move( mx, my );
		}

	private:

		SCV *mp;
		int mx;
		int my;
};

class AttackCommand : public Command
{
public:
	AttackCommand(){}
	~AttackCommand(){}
	AttackCommand( SCV *p, int x, int y )
	{
		mp = p;
		mx = x;
		my = y;
	}

	void Execute()
	{
		mp->Attack( mx, my );
	}

private:

	SCV *mp;
	int mx;
	int my;
};

class RoundCommand : public Command
{
public:
	RoundCommand(){}
	~RoundCommand(){}
	RoundCommand( SCV *p, int x, int y )
	{
		mp = p;
		mx = x;
		my = y;
	}

	void Execute()
	{
		mp->Round( mx, my );
	}

private:

	SCV *mp;
	int mx;
	int my;
};

class MiningCommand : public Command
{
public:
	MiningCommand(){}
	~MiningCommand(){}
	MiningCommand( SCV *p, int x, int y )
	{
		mp = p;
		mx = x;
		my = y;
	}

	void Execute()
	{
		mp->Mining( mx, my );
	}

private:

	SCV *mp;
	int mx;
	int my;
};

class StopCommand : public Command
{
public:
	StopCommand(){}
	~StopCommand(){}
	StopCommand( SCV *p )
	{
		mp = p;
	}

	void Execute()
	{
		mp->Stop();
	}

private:

	SCV *mp;
};


//命令者只知道接口,具體如何實現他不知道
class Commander
{
	public:
		Commander( Command *pCmdMove, Command *pCmdAttack, Command *pCmdRound, Command *pCmdMining, Command *pCmdStop  )
		{
			mpCmdMove = pCmdMove;
			mpCmdAttack = pCmdAttack;
			mpCmdRound = pCmdRound;
			mpCmdMining = pCmdMining;
			mpCmdStop = pCmdStop;
		}

		~Commander()
		{}

		void Move()
		{
			mpCmdMove->Execute();
		}

		void Attack()
		{
			mpCmdAttack->Execute();
		}

		void Round()
		{
			mpCmdRound->Execute();
		}

		void Mining()
		{
			mpCmdMining->Execute();
		}

		void Stop()
		{
			mpCmdStop->Execute();
		}

	private:
		Command *mpCmdMove;
		Command *mpCmdAttack;
		Command *mpCmdRound;
		Command *mpCmdMining;
		Command *mpCmdStop;
};

#endif
#include "Command.hpp"

//作用:將高層命令與行為解耦,特別適合對象行為固定的情況下非常方便
//某些情況下特別適合undo 和 redo 因為Command模式會儲存行為的數據
//將他們放入棧內....push pop...本例不討論
//例子只是讓人更好理解而已,寫的不是太恰當
//不想舉一些跟程序無關的例子

int main()
{

    SCV *pScv = new SCV;

    //移動命令
    MoveCommand *pCmdMove = new MoveCommand( pScv, 0, 0 );

    //攻擊命令
    AttackCommand *pCmdAtt = new AttackCommand( pScv, 0, 0 );

    //巡邏命令
    RoundCommand *pCmdRound = new RoundCommand( pScv, 0, 0 );

    //采礦命令
    MiningCommand *pCmdMining = new MiningCommand( pScv, 0, 0 );

    //停止命令
    StopCommand *pCmdStop = new StopCommand( pScv );

    //指揮官面板
    Commander *pCmder = new Commander( pCmdMove, pCmdAtt, pCmdRound, pCmdMining, pCmdStop );

    pCmder->Move();

    pCmder->Attack();

    pCmder->Round();

    pCmder->Mining();

    pCmder->Stop();

    delete pCmder;
    delete pCmdStop;
    delete pCmdMining;
    delete pCmdRound;
    delete pCmdAtt;
    delete pCmdMove;

    delete pScv;

    return 0;
}
#ifndef _MEMENTO_HPP #define _MEMENTO_HPP #includetemplate< typename T > class Memento { public: Memento( T *pt ) { mpt = new T( *pt ); } ~Memento() { delete mpt; mpt = nullptr; } T* GetData() { return mpt; } private: T *mpt; }; class Setting { public: Setting() { mData1 = mData2 = mData3 = 0; mp = new char[ 32 ]; strcpy_s( mp, 32, "default" ); } Setting( const Setting &other ) { mData1 = other.mData1; mData2 = other.mData2; mData3 = other.mData3; mp = new char[ 32 ]; strcpy_s( mp, 32, other.mp ); } ~Setting() { delete mp; mp = nullptr; } Memento< Setting >* CreateRestore() { return new Memento< Setting >( this ); } void Restore( Memento< Setting > *p ) { auto px = p->GetData(); mData1 = px->mData1; mData2 = px->mData2; mData3 = px->mData3; strcpy_s( mp, 32, px->mp ); } void SetData( int d1, int d2, int d3, char *p ) { mData1 = d1; mData2 = d2; mData3 = d3; strcpy_s( mp, 32, p ); } void print() { printf( "%d\n", mData1 ); printf( "%d\n", mData2 ); printf( "%d\n", mData3 ); printf( "%s\n\n", mp ); } private: int mData1; int mData2; int mData3; char *mp; }; #endif
#include "Memento.hpp"
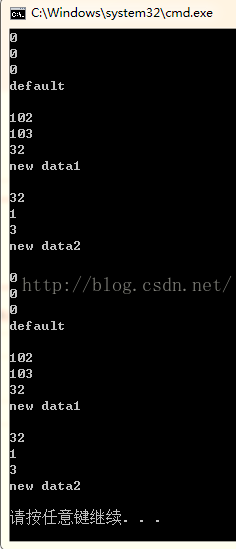
//作用:記錄對象數據的快照,在後續需要的情況下根據快照重新還原對象數據
//例如我們常用的一些設置面板,參數繁多,很容易設置錯誤,當設置錯誤時
//通過一種手段還原到最初的默認數據
int main()
{
auto *pSet = new Setting;
//打印一下默認的設置數據
pSet->print();
//記錄一下默認設置數據還原點
auto *pDefPoint = pSet->CreateRestore();
//設置新設置數據
pSet->SetData( 102, 103, 32, "new data1" );
pSet->print();
//創建記錄新的還原點
auto *pNewPoint = pSet->CreateRestore();
//設置新的設置數據
pSet->SetData( 32, 1, 3, "new data2" );
pSet->print();
//創建新的還原點2
auto *pNewPoint2 = pSet->CreateRestore();
//我後悔了想要恢復的默認數據
pSet->Restore( pDefPoint );
pSet->print();
//我後悔了想要恢復到第一次設置新數據哪裡
pSet->Restore( pNewPoint );
pSet->print();
//我後悔了還是恢復到最後一次的吧
pSet->Restore( pNewPoint2 );
pSet->print();
delete pNewPoint2;
delete pNewPoint;
delete pDefPoint;
delete pSet;
return 0;
}
未完待續...