在寫這篇文章之前我也在Google上找到了很多有關多附件上傳的文章,有用ASP.Net實現的,也有用JSP、PHP等其它技術實現的,但基本前提都是事先通過JS腳本來動態創建DOM,然後上傳的時候在服務端做一下處理,有點類似於163的郵件系統。文件上傳需要通過頁面的POST方法進行提交,這個我在一次MOSS開發中iFrame表單提交的古怪問題解決一問中已經闡述過,其中包括了如何使用頁面隱藏的iFrame來提交表單從而避免整個頁面提交到服務器而導致頁面的刷新。多附件上傳的原理與之類似,只不過需要事先通過腳本在頁面上動態創建多個input type='file'的標簽,當然,如果要想功能更加完美,你可能還需要通過腳本動態添加一些按鈕事件以讓用戶可以刪除他所添加的文件。下面是一個應用效果的截圖。
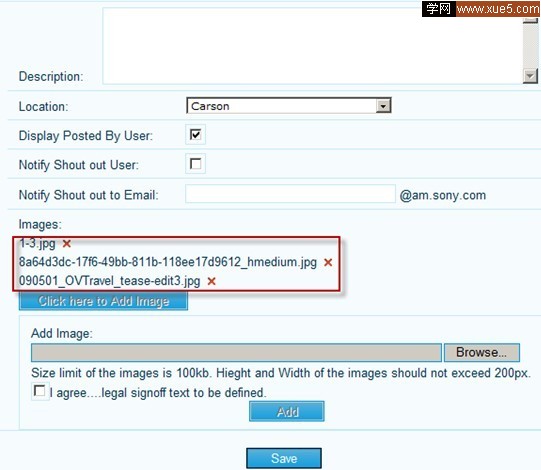
其中紅色方框內的內容是通過腳本在頁面上動態創建的,將用戶在客戶端所選文件的文件名動態添加到一個div裡,同時在這個div中放一個隱藏的input type=’file’的標簽,它的value為用戶所選文件的路徑,然後在div中放置一個img,添加onmouseover和onmouSEOut事件為圖片增加了一些鼠標滑動時的效果,onclick事件用來響應用戶點擊img時刪除對應的文件。看一下代碼中的具體實現。
以下為引用的內容:
<%@ Page Language="C#" AutoEventWireup="true" CodeBehind="Default.ASPx.cs" Inherits="WebApplication1._Default" %>
<!DOCTYPE html PUBLIC "-//W3C//DTD XHTML 1.0 Transitional//EN" "http://www.w3.org/TR/xhtml1/DTD/xHtml1-transitional.dtd">
<html XMLns="http://www.w3.org/1999/xHtml">
<head runat="server">
<title></title>
<script src="MultiAffix.JS" type="text/Javascript"></script>
<script type="text/Javascript">
var controlName = 1; // This variable is for the dynamic file controls's name.
function addImg(targetElement, savestatsElement, oldimgElement) {
var browseimgElement = $get("browseimg");
var arr = browseimgElement.getElementsByTagName('input');
if (arr.length == 0 || arr[0].value.length == 0) {
alert('No file inputs.');
return;
}
var oldbrowser = arr[0];
var filename = getfilename(oldbrowser.value);
if (!validateimgtype(oldbrowser.value)) return;
if (!validateimgcount(targetElement, 3)) return;
var imgtitles = savestatsElement.value + oldimgElement.value;
if (validateimgexist(filename, imgtitles)) { alert('You have already added this image!'); return; }
if (oldbrowser != undefined) {
var newbrowser = oldbrowser.cloneNode(true);
newbrowser.value = '';
var newfile = document.createElement('div');
newfile.innerHtml = filename + ' ';
// Create a button element for delete the image.
var newfileimgbutton = document.createElement('img');
newfileimgbutton.src = 'ShoutOut_Close.gif';
newfileimgbutton.alt = 'Delete';
newfileimgbutton.onclick = function() {
this.parentNode.parentNode.removeChild(this.parentNode);
savestatsElement.value = updatehiddenimgs(filename, savestatsElement.value);
}
newfileimgbutton.onmouSEOver = function() {
this.src = 'ShoutOut_Close_rollover.gif';
}
newfileimgbutton.onmouSEOut = function() {
this.src = 'ShoutOut_Close.gif';
}
browseimgElement.replaceChild(newbrowser, oldbrowser);
oldbrowser.name = ++controlName;
oldbrowser.style.display = 'none';
newfile.appendChild(oldbrowser);
newfile.appendChild(newfileimgbutton);
targetElement.appendChild(newfile);
$get("chkAgree").checked = false;
$get("btAdd").disabled = true;
savestatsElement.value += filename + '|';
}
}
</script>
</head>
<body>
<form id="form1" runat="server">
<ASP:ScriptManager ID="ScriptManager1" runat="server">
</ASP:ScriptManager>
<div>
<div>
Description:
<asp:TextBox ID="tbDescription" MaxLength="2000" runat="server" TextMode="MultiLine"></ASP:TextBox>
</div>
<div>
Location:
<ASP:DropDownList ID="ddlLocation" runat="server">
</ASP:DropDownList>
</div>
<div>
Display Posted By User:
<ASP:CheckBox ID="chkPostedByUser" Checked="true" runat="server" />
</div>
<div>
Notify Shout out User:
<ASP:CheckBox ID="chkNotifyUser" runat="server" />
</div>
<div>
Notify Shout out to Email:
<asp:TextBox ID="tbShoutoutToEmail" MaxLength="25" runat="server"></ASP:TextBox>
</div>
<div>
Images:
<div id="saveshoutoutimgs" runat="server">
</div>
<input id="btAddImage" type="button" onclick="$get('saveshoutoutaddimgs').style.display='block';this.disabled=true;"
value="Click here to Add Image" />
</div>
<div id="saveshoutoutdetailshowimg">
<div id="saveshoutoutaddimgs" >
<div>
Add Image:</div>
<div id="browseimg">
<input type="file" />
</div>
<div>
Size limit of the images is 100kb. HIEght and Width of the images should not exceed
200px.</div>
<div>
<input id="chkAgree" type="checkbox" onclick="$get('btAdd').disabled=!this.checked;" />I
agree .legal signoff text to be defined.
</div>
<div>
<input id="btAdd" disabled="disabled" type="button" value="Add" runat="server" />
</div>
</div>
</div>
</div>
<asp:TextBox ID="tbImgs" runat="server" Text="|" ></ASP:TextBox>
<asp:TextBox ID="tbOldImgs" runat="server" Text="|" ></ASP:TextBox>
</form>
</body>
</Html>
以下為引用的內容:
protected void Page_Load(object sender, EventArgs e)
{
string script = string.Format("addImg($get('{0}'), $get('{1}'), $get('{2}'));",
this.saveshoutoutimgs.ClIEntID,
this.tbImgs.ClIEntID,
this.tbOldImgs.ClIEntID);
this.btAdd.Attributes.Add("onclick", script);
}
代碼建立在AJax.Net基礎之上,環境是Visual Studio 2008 + Windows 2003,測試通過!
簡單做一下說明:
1. <div id="saveshoutoutimg" runat="server"/>用來存放動態添加的文件相關標簽。
2. btAddImage被點擊後自身將被disabled掉,然後顯示saveshoutoutaddimgs整個div。
3. 在saveshoutoutaddimgs中用戶可以完成文件的選取和確認操作,chkAgree用來enable btAdd按鈕。
4. 當用戶點擊btAdd時,觸發onclick事件,該事件在code-behind的Page_Load方法中注冊,因為腳本中涉及到使用服務端控件的ClIEntID屬性,這樣寫比較方便。
5. 客戶端函數addImg用來完成動態DOM的添加操作,它接收三個參數,第一個參數targetElement表示存放動態DOM的宿主DIV,第二個參數savestatsElement表示用於保存已添加文件信息的隱藏文本框,第三個參數oldimgElement表示用於保存在編輯狀態下用戶上一次上傳的文件信息隱藏文本框。基本思路是復制browseimg下的input type="file"標簽,然後將動態生成的DOM添加到saveshoutoutimgs下,並同時附加了一些事件。
6. tbImgs隱藏文本框用來保存用戶已選文件的信息,以"|文件名1|文件名2|文件名3|..."的格式存放;tbOldImgs隱藏文本框中的值在編輯狀態下才會得到,其中保存了用戶上一次所上傳文件的信息,存儲格式與tbImgs相同。
7. 在編輯狀態下,在服務端向saveshoutoutimgs標簽添加與addImg腳本函數所生成的動態DOM相同的標簽,並同時往tbOldImgs隱藏文本框中寫入文件信息。我在這裡寫了一個示例,讀者可以自己完善代碼用以驗證。在顯示文件時我在文件的名稱上添加了一個鏈接,這個鏈接所指向的頁面用於輸出圖片,如通過得到的圖片ID在數據庫中檢索圖片的二進制數據然後Write到頁面上。ImageEntity為自定義Image對象的實體類,用以存儲圖片文件的相關信息。
以下為引用的內容:
public void SetImages(List<ImageEntity> images)
{
if (images.Count > 0)
{
this.tbOldImgs.Text = "|";
foreach (ImageEntity image in images)
{
HtmlGenericControl imgDiv = new HtmlGenericControl("Div");
HtmlAnchor imgAnchor = new HtmlAnchor();
imgAnchor.HRef = string.Format("Thumbnail.ASPx?isthumbnail=false&basecommentid={0}&imagetitle={1}",
image.ID.ToString(), image.Title);
imgAnchor.Target = "_blank";
imgAnchor.Title = image.Title;
imgAnchor.InnerHtml = image.Title + " ";
HtmlImage imgButton = new HtmlImage();
imgButton.Src = "ShoutOut_Close.gif";
imgButton.Alt = "Delete";
imgButton.Attributes["onclick"] = string.Format("this.parentNode.parentNode.removeChild(this.parentNode);$get('{0}').value = updatehiddenimgs('{1}',$get('{0}').value);",
this.tbOldImgs.ClIEntID, image.Title);
imgButton.Attributes["onmouSEOver"] = "this.src='ShoutOut_Close_rollover.gif'";
imgButton.Attributes["onmouSEOut"] = "this.src='ShoutOut_Close.gif'";
imgDiv.Controls.Add(imgAnchor);
imgDiv.Controls.Add(imgButton);
this.saveshoutoutimgs.Controls.Add(imgDiv);
this.tbOldImgs.Text += image.Title + "|";
}
}
}
public class ImageEntity
有一個問題需要注意,當保存編輯狀態下的數據時,在服務端需要重新刪除原有圖片然後再重新添加圖片,對於用戶未在客戶端修改的圖片,則需要在保存數據前通過tbOldImgs隱藏域中的相關信息重新檢索得到圖片數據,然後重新保存圖片。例如編輯狀態下得到A、B、C三張圖片,用戶刪除了圖片C,添加了圖片D,則保存時在服務端這樣操作:先通過tbOldImgs隱藏域得到剩余的舊圖片信息(即圖片A和圖片B),從數據庫中檢索出這些圖片的數據,保存前先刪除與該條數據相關的所有已上傳圖片,然後與得到的新圖片(即圖片D)一並存入數據庫中。
還有一點就是,如果想要實現上傳圖片前判斷圖片文件的大小,必須通過C#代碼來實現,這個不能簡單地通過JS腳本來實現,因為涉及到浏覽器對客戶端文件訪問權限的限制。也就是說,需要將頁面預先提交到服務器,判斷完成後通知客戶端接下來的行為,為了避免頁面提交時客戶端原有的狀態丟失,可以采用隱藏iFrame的方式提交頁面,這個在文章的一開始我已經提到過了。
總之,在Web中實現多附件上傳必須借助於Javascript來動態創建DOM,編輯狀態下可以在服務端將事先處理好的DOM添加到頁面上,並同時附件腳本事件,在服務端代碼和客戶端代碼之間注意保存各個控件的狀態。
完整代碼下載:MultiAffix.rar