本項目利用了SIFT算法實現兩張圖片的拼接!
在python terminal窗口輸入以下命令,生成依賴文檔:
pip freeze > requirement.txt
對應的依賴文檔如下:
numpy==1.22.4
opencv-contrib-python==4.6.0.66
opencv-python==4.6.0.66
具體使用可參考我寫的這篇文章:python項目中使用requirement.txt依賴提高項目的移植效率
注意:opencv-contrib-python庫我們為什麼需要另外安裝,因為SIFT是一種專利算法,如果使用的話,一般環境下最好配置這個庫才能使用,要不會報錯提示!
由於為了後續使用和調試算法邏輯,我將常用的方法封裝成ConPic類中的方法,可在主調用腳本中,先實例化類,再調用類中方法!
import cv2
import numpy as np
class ConPic:
def cv_show(self,name, image):
cv2.imshow(name, image)
cv2.waitKey(0)
cv2.destroyAllWindows()
# SIFT方法檢測特征點
def detect(self,image):
# 建立SIFT生成器
descriptor = cv2.xfeatures2d.SIFT_create()
# 檢測SIFT特征點,並計算描述子
(kps, features) = descriptor.detectAndCompute(image, None)
# 將結果轉換成NumPy數組
kps = np.float32([kp.pt for kp in kps])#列表生成式
# 返回特征點集,及對應的描述特征
return (kps, features)
# 特征點匹配
def Keypoints(self,kpsA, kpsB, featuresA, featuresB, ratio=0.75, reprojThresh=4.0):
# 建立暴力匹配器
matcher = cv2.BFMatcher()
# 使用KNN檢測來自A、B圖的SIFT特征匹配對,K=2
rawMatches = matcher.knnMatch(featuresA, featuresB, 2)
matches = []
for m in rawMatches:
# 當最近距離跟次近距離的比值小於ratio值時,保留此匹配對
if len(m) == 2 and m[0].distance < m[1].distance * ratio:
# 存儲兩個點在featuresA, featuresB中的索引值
matches.append((m[0].trainIdx, m[0].queryIdx))
# 當篩選後的匹配對大於4時,計算視角變換矩陣
if len(matches) > 4:
# 獲取匹配對的點坐標
ptsA = np.float32([kpsA[i] for (_, i) in matches])
ptsB = np.float32([kpsB[i] for (i, _) in matches])
# 計算視角變換矩陣
(H, status) = cv2.findHomography(ptsA, ptsB, cv2.RANSAC, reprojThresh)
# 返回結果
return (matches, H, status)
# 如果匹配對小於4時,返回None
return None
#圖像拼接
def Matches(self,imageA, imageB, kpsA, kpsB, matches, status):
# 初始化可視化圖片,將A、B圖左右連接到一起
(hA, wA) = imageA.shape[:2]
(hB, wB) = imageB.shape[:2]
vis = np.zeros((max(hA, hB), wA + wB, 3), dtype="uint8")
vis[0:hA, 0:wA] = imageA
vis[0:hB, wA:] = imageB
# 聯合遍歷,畫出匹配對
for ((trainIdx, queryIdx), s) in zip(matches, status):
# 當點對匹配成功時,畫到可視化圖上
if s == 1:
# 畫出匹配對
ptA = (int(kpsA[queryIdx][0]), int(kpsA[queryIdx][1]))
ptB = (int(kpsB[trainIdx][0]) + wA, int(kpsB[trainIdx][1]))
cv2.line(vis, ptA, ptB, (0, 255, 0), 1)
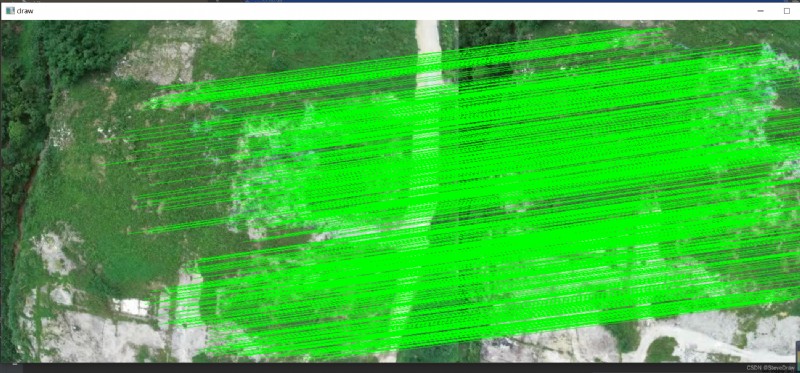
self.cv_show("draw", vis)
# 返回可視化結果
return vis
#進行拼接
def stitch(self,imageA, imageB, ratio=0.75, reprojThresh=4.0, showMatches=False):
# 檢測A、B圖片的SIFT關鍵特征點,並計算特征描述子
(kpsA, featuresA) = self.detect(imageA)
(kpsB, featuresB) = self.detect(imageB)
# 匹配兩張圖片的所有特征點,返回匹配結果
M = self.Keypoints(kpsA, kpsB, featuresA, featuresB, ratio, reprojThresh)
# 如果返回結果為空,沒有匹配成功的特征點,退出算法
if M is None:
return None
# 否則,提取匹配結果
# H是3x3視角變換矩陣
(matches, H, status) = M
# 將圖片A進行視角變換,result是變換後圖片
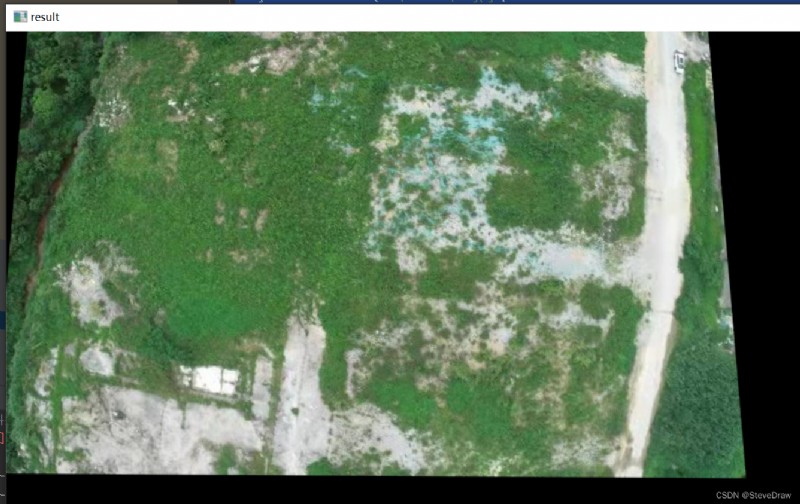
result = cv2.warpPerspective(imageA, H, (imageA.shape[1] + imageB.shape[1], imageA.shape[0]))
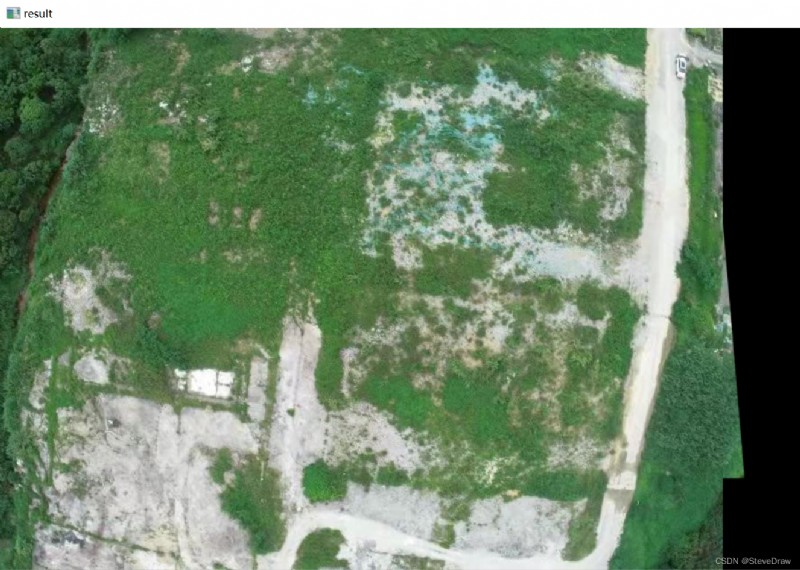
self.cv_show('result', result)
# 將圖片B傳入result圖片最左端
result[0:imageB.shape[0], 0:imageB.shape[1]] = imageB
self.cv_show('result', result)
# 檢測是否需要顯示圖片匹配
if showMatches:
# 生成匹配圖片
vis = self.drawMatches(imageA, imageB, kpsA, kpsB, matches, status)
# 返回結果
return (result, vis)
# 返回匹配結果
return result
import cv2
from ConPic import ConPic
pic=ConPic()
# 讀取圖像
imageA = cv2.imread('D:/W-File/1.jpg')
pic.cv_show("imageA", imageA)
imageB = cv2.imread('D:/W-File/2.jpg')
pic.cv_show("imageB", imageB)
# 計算SIFT特征點和特征向量
(kpsA, featuresA) = pic.detect(imageA)
(kpsB, featuresB) = pic.detect(imageB)
# 基於最近鄰和隨機取樣一致性得到一個單應性矩陣
(matches,H,status) = pic.Keypoints(kpsA, kpsB, featuresA, featuresB)
print("單應性矩:{0}",H)
# 繪制匹配結果
pic.Matches(imageA, imageB, kpsA, kpsB, matches, status)
# 拼接
pic.stitch(imageA, imageB)
單應性矩陣:{
0} [[ 9.30067818e-01 -7.68408000e-02 3.15693821e+01]
[ 7.03517944e-03 8.84141290e-01 -9.47559365e+01]
[ 2.27565291e-06 -1.94163643e-04 1.00000000e+00]]
最後文中若有不足,敬請批評指正!