簡介
Apache Tomcat 是一個 HTTP 服務器和 servlet 容器,常用於簡單的 Web 應用程序,以及使用不需要完整的 Java EE 服務器的框架的應用程序。然而,用戶經常會發現,當對 Apache Tomcat 有更多需求時,其最初的簡單性就會變得復雜且不實用。
例如,也許 Apache Tomcat 安裝的占用空間會變得太大,因為您需要添加第三方庫來提供所需的功能。或者,服務器的啟動時間也可能是一個問題,因為對 server.xml 文件的任何配置更改都需要重新啟動 Apache Tomcat 服務器。又或者,集成和維護第三方庫已經變得過於費時。
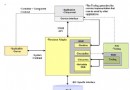
以上任何一種情況都足以讓您考慮將 Apache Tomcat 應用程序及其配置信息遷移到 IBM WebSphere Application Server V8.5.5 Liberty Profile。Liberty Profile 提供一個輕量級且簡單易用的應用程序服務器,其占用空間小,並且服務器的啟動也很快。它還包括許多 Apache Tomcat 所沒有的 Java EE 特性,因而減少了集成和維護第三方庫的需求。
利用 Liberty Profile:
用戶配置其應用程序所需要的組件,使服務器占用空間較小且服務器啟動時間更快。
配置變更不需要重新啟動服務器。它們是自動生效的。
WebSphere Application Server Developer Tools for Eclipse 使在 Liberty profile 上開發、測試和發布 Web 應用程序變得更容易。
配置通過一個簡單的 XML 文件完成。WebSphere Application Server Developer Tools for Eclipse 提供一個直觀的用戶界面來查看和修改該配置。
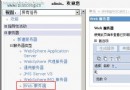
在 信息中心 和 WASdev 社區 中了解有關 WebSphere Application Server V8.5.5 Liberty Profile 的更多信息。
本文提供將應用程序及其配置信息從 Apache Tomcat 遷移到 IBM WebSphere Application Server V8.5.5 Liberty Profile 的說明。
但是,在遷移配置之前,您應該先遷移您的應用程序,以確保與 WebSphere Application Server V8.5 的最佳兼容性和性能。為了協助遷移,在 IBM WebSphere Application Server Migration Toolkit 中提供了 Application Migration Tool - Apache Tomcat to WebSphere,用於掃描應用程序代碼,以檢測所需的更新,並在可能的情況下提供快速修復。然後,在 WASdev 開發博客中作為一個 Tech Preview 提供的新配置遷移工具 Tomcat Config Migration,可以將服務器和應用程序配置的一個子集遷移到 Liberty Profile。當一起使用時,這些遷移工具提供了一個可靠且簡單的方法來從 Apache Tomcat 遷移到 Liberty Profile。
先決條件
本文假定您已經為 Apache Tomcat 配置了一個應用程序,希望將它遷移和發布到 WebSphere Application Server Liberty Profile 上。為了便於說明,本文引用一個在 IBM Redbook 出版物中已經發布的樣例應用程序 (IBM Redbooks Publications Sample Application)。本文的其余部分將它稱為樣例應用程序。
為了遵循本文中的說明,您將需要下載、正確安裝和操作在此處列出的軟件:
Eclipse 4.2.2 for Java EE Developers (Juno SR2)
IBM WebSphere Application Server V8.5.5 Liberty Profile
IBM WebSphere Application Server Developer Tools for Eclipse V8.5.5
Application Migration Tool – Apache Tomcat to WebSphere V3.5.1
Tomcat Config Migration Tech Preview V3.5.1
1. 遷移應用程序
第一步是使用 Application Migration Tool – Apache Tomcat to WebSphere 遷移應用程序本身。如果您的應用程序尚未在 Eclipse 工作區中,請按照下列步驟將其導入:
在 Eclipse 中,選中 File > Import...
選中 Web > WAR file。
單擊 Next。
單擊 Browse 導航到 WAR 文件。
將 Target runtime 設置為 WebSphere Application Server V8.5 Liberty Profile。
單擊 Next,然後單擊 Finish。
現在,您可以配置並運行 Application Migration Tool。遵循 WebSphere Application Server V8.5 Migration Guide 的第 9.4.5 章中的詳細說明。
完成應用程序的遷移後,就可以開始遷移配置。
2. 遷移 Apache Tomcat 服務器配置
在 Apache Tomcat 中,某個應用程序所需的特定配置元素位於 server.xml、context.xml 或 tomcat-users.xml 文件中,所有文件全都位於 Apache Tomcat conf 目錄中。若沒有遷移工具,就必須將配置信息手動遷移到 Liberty profile 服務器配置。
當出現以下服務器配置信息時,它們就已成功遷移:
Resources 位於 conf/server.xml 和 conf/context.xml 中,適用於 IBM DB2、Apache Derby、Apache ActiveMQ 和 IBM WebSphere MQ。
HTTP connectors 位於 conf/server.xml 中。
Session managers 位於 conf/context.xml 中。
Users and roles 位於 conf/tomcat-users.xml 中。
若還沒有為遷移創建一個 Liberty profile 服務器,則先完成以下步驟:
在 Eclipse 中,選中 File > New > Other。
選中 Server > Server 並單擊 Next。
選擇服務器類型:WebSphere Application Server V8.5 Liberty Profile。
設置服務器名稱:defaultServer。
單擊 Next。
在安裝文件夾下,輸入安裝 Liberty profile 運行時環境的位置。
單擊 Finish。
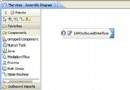
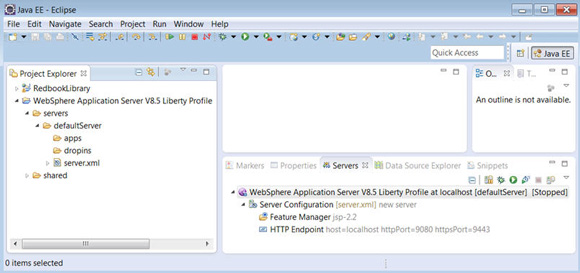
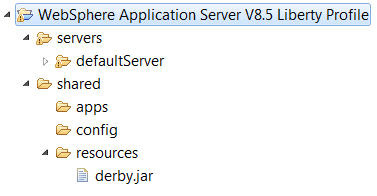
您的工作區現在應該包括 Liberty profile 服務器的一個實例(圖 1)。
圖 1. Eclipse 工作區中有 Liberty profile 服務器
現在,您可以將 Apache Tomcat 服務器配置遷移到 Liberty profile 服務器:
選中 Run > Tomcat Configuration Migration...(或者,如果 Apache Tomcat 服務器是在 Eclipse 中定義的,則可以在 Project Explorer 或 Servers 窗格中用鼠標右鍵單擊 Apache Tomcat 服務器,並選中 Migrate Tomcat Configuration...,然後繼續執行下面的步驟 j)。
浏覽到 Apache Tomcat 服務器安裝的位置。選中文件夾,並單擊 OK。
選中要遷移到的 Liberty profile 服務器,並單擊 OK。
單擊 OK 關閉完成對話框。
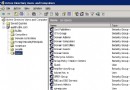
結果,Liberty profile 服務器現在包含一個新的 migratedConfig 目錄,其中有已遷移的 Apache Tomcat 服務器配置(圖 2)。
圖 2. 遷移 Apache Tomcat 服務器配置後的 Liberty profile 服務器
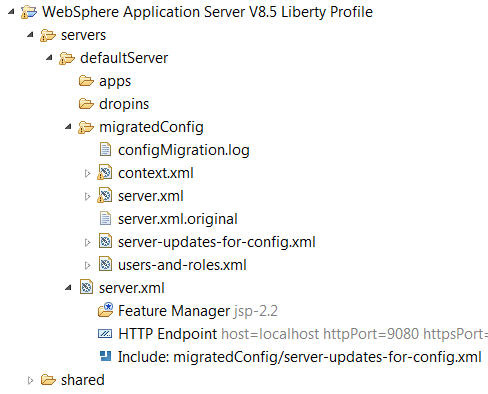
migratedConfig 目錄中已遷移文件的結構嚴格遵循 Apache Tomcat 服務器配置的結構:
server.xml 文件包含從 conf/server.xml 文件中遷移的配置子集。
context.xml 文件包含從 conf/context.xml 文件中遷移的配置子集。
users-and-roles.xml 文件包含從 conf/tomcat-users.xml 文件遷移的用戶和角色。
還有一個日志文件 (configMigration.log)、原始 Liberty server.xml 文件 (server.xml.orginal) 的一個副本,以及一個生成的配置文件 (server-updates-for-config.xml),該配置文件中包括 server.xml、context.xml 和 users-and-roles.xml 文件。server-updates-for-config.xml 文件包含在 Liberty server.xml 文件中。這就是將已遷移的配置添加到 Liberty 服務器配置的方法。
讓我們來看看作為特定遷移示例的樣例應用程序所需的服務器配置。樣例應用程序需要一個全局數據源,這個數據源必須在 Apache Tomcat 的 server.xml 中被配置為一個全局命名資源,還需要一個 HTTP 端口,以允許對應用程序的訪問(清單 1)。
清單 1. Apache Tomcat server.xml 示例配置
…
<Resource auth="Container"
      description="Derby database redbook sample"
      driverClassName="org.apache.derby.jdbc.EmbeddedDriver"
      maxActive="100" maxIdle="30" maxWait="10000"
      name="jdbc/globalStyleSettings" type="javax.sql.DataSource"
      url="jdbc:derby:/temp/TomcatDatabases/styles;create=true"
      username="" password="" />
…
<Connector port="8080" protocol="HTTP/1.1"
      maxThreads="150"
      socket.soReuseAddress="true"
      connectionTimeout="20000"
      redirectPort="8443" />
…
遷移如清單 1 所示的服務器配置後,migratedConfig/server.xml 文件中包含一個 httpEndpoint 和 dataSource(清單 2)。
清單 2. 遷移後的 server.xml 配置示例
…
<httpEndpoint host="localhost"
    httpPort="8080"
    httpsPort="8443"
    id="httpConnector-AbT0">
    <httpOptions maxKeepAliveRequests="150"
        persistTimeout="20s" />
    <tcpOptions soReuseAddr="true" />
</httpEndpoint>
…
<dataSource id="globalStyleSettingsDSDerby"
    jndiName="jdbc/globalStyleSettings">
    <jdbcDriver>
        <library>
            <fileset dir="${shared.resource.dir}"
                includes="derby.jar" />
        </library>
    </jdbcDriver>
    <properties.derby.embedded
        createDatabase="create"
        databaseName="/temp/TomcatDatabases/styles" />
    <connectionManager connectionTimeout="10s"
        maxPoolSize="100"
        minPoolSize="30" />
</dataSource>
…
樣例應用程序還需要一個 “test” 用戶和 “Test” 角色,這是在 conf 目錄下的 tomcat-users.xml 文件中定義的(清單 3)。
清單 3. Apache Tomcat tomcat-users.xml 示例配置
…
<role rolename="Test" />
<user username="test" password="test" roles="Test" />
…
遷移如清單 3 所示的服務器配置後,migratedConfig/users-and-roles.xml 文件中包含一個用戶和有一個成員的組(清單 4)。
清單 4. 遷移後的 tomcat-users.xml 配置示例
…
<user name="test"
  password="{hash}ATAAAAAIy/2zRjmVAXtAAAAAIF85OBJn2R/DyAPJi8suNDd/PV2liDswtmd2qgfvFQiZ" />
<group name="Test">
  <member name="test" />
</group>
…
在下一節中,您將遷移應用程序配置。
3. 遷移應用程序配置
某個應用程序所需要的特定配置數據可能位於該應用程序的 META-INF/context.xml 或 WEB-INF/web.xml 文件中。若沒有遷移工具,該配置就必須被手動遷移到 Liberty profile 服務器配置。
當出現以下配置信息時,它們已成功遷移:
Resources 位於 META-INF/context.xml 中,適用於 IBM DB2、Apache Derby、Apache ActiveMQ 和 IBM WebSphere MQ。
Application security constraints 位於 WEB-INF/web.xml 中.
如果應用程序依賴於任何 IBM DB2 或 Apache Derby 資源,那麼就必須首先將相關的數據庫 JAR 文件從 Apache Tomcat 安裝復制到 Liberty profile 安裝的 ${shared.resources.dir}:
將 derby.jar 從 Apache Tomcat 安裝的 lib 目錄復制到 Liberty profile 安裝的 usr/shared/resources 目錄。
將 db2jcc4.jar 和 db2jcc_license_cu.jar 從 Apache Tomcat 安裝的 lib 目錄復制到 Liberty profile 安裝的 usr/shared/resources 目錄。
若使用樣例應用程序,則需要 Apache Derby 數據庫。因此,需要復制 derby.jar 文件,如上所述(步驟 a)。如果目前在 Apache Tomcat 安裝的 lib 目錄中沒有一個 derby.jar 副本,則可以 下載所需的 Apache Derby 文件。(例如,針對 V10.8.2.2 要下載的特定文件是 "db-derby-10.8.2.2-bin.zip"。)
圖 3. 在 Liberty profile 安裝中的數據庫資源的位置
現在,您可以遷移應用程序配置:
右鍵單擊您的應用程序的項目,並選中 Migrate Tomcat Configuration...
選中要遷移到的 Liberty profile 服務器,並單擊 OK。
單擊 OK 關閉完成對話框。
現在,Liberty profile 服務器包含一個新的子目錄,其名稱為 migratedConfig 目錄下的應用程序名稱。對於樣例應用程序,新創建的 RedbookLibrary 目錄包含已遷移的應用程序配置(圖 4)。
圖 4. 遷移應用程序配置後的 Liberty profile 服務器
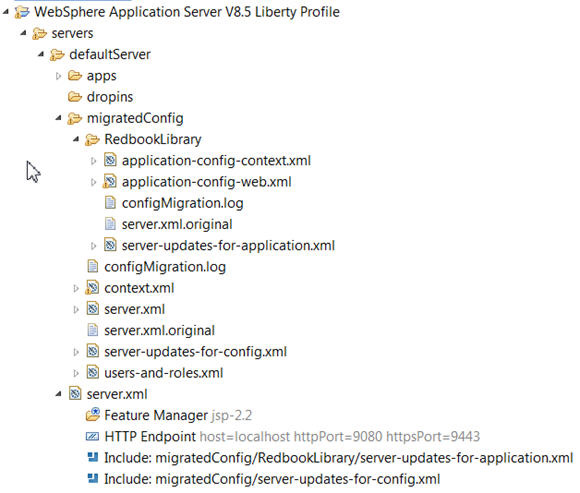
RedbookLibrary 目錄內已遷移的文件緊密映射到應用程序的相應文件:
application-config-context.xml 文件包含從 META-INF/context.xml 文件中遷移的配置子集。
application-config-web.xml 文件包含從 WEB-INF/web.xml 文件中遷移的配置子集。
還有一個日志文件 (configMigration.log)、原始 Liberty server.xml 文件 (server.xml.orginal) 的一個副本,以及一個生成的配置文件 (server-updates-for-application.xml),該配置文件中包括 application-config-context.xml 和 application-config-web.xml 文件。server-updates-for-application.xml 文件包含在 Liberty server.xml 文件中。這就是將已遷移的配置添加到 Liberty 服務器配置的方法。
讓我們來看看樣例應用程序所需的應用程序配置。樣例應用程序需要在 META-INF/context.xml 文件(清單 5)中進行配置的兩個本地數據源,還需要在 WEB-INF/web.xml 文件(清單 6)中的一個安全角色和安全約束。
清單 5. META-INF/context.xml 中的配置示例
…
<Resource auth="Container"
      description="Derby database Demo Tomcat Book App"
      driverClassName="org.apache.derby.jdbc.EmbeddedDriver"
      maxActive="100" maxIdle="30" maxWait="10000"
      name="DefaultDatasource" type="javax.sql.DataSource"
      url="jdbc:derby:/temp/TomcatDatabases/books;create=true"
      username="" password=""  />

<Resource auth="Container"
      description="Derby database for members"
      driverClassName="org.apache.derby.jdbc.EmbeddedDriver"
      maxActive="100" maxIdle="30" maxWait="10000"
      name="jdbc/Members" type="javax.sql.DataSource"
      url="jdbc:derby:/temp/TomcatDatabases/members;create=true"
      username="" password="" />
…
清單 6. WEB-INF/web.xml 中的配置示例
…
<security-constraint>
      <web-resource-collection>
            <web-resource-name>TestRole</web-resource-name>
                  <url-pattern>/test/*</url-pattern>
            </web-resource-collection>
            <auth-constraint>
                  <role-name>Test</role-name>
            </auth-constraint>
</security-constraint>
…
<security-role>
      <role-name>Test</role-name>
</security-role>
…
遷移如清單 5 所示的應用程序配置後,migratedConfig/RedbookLibrary 目錄中包含一個 application-config-context.xml 文件,其中配置了兩個 dataSources(清單 7)。
清單 7. 從 context.xml 遷移的應用程序配置示例
…
<dataSource id="DefaultDatasourceRedbookLibraryDSDerby"
    jndiName="DefaultDatasource">
    <jdbcDriver>
        <library>
            <fileset dir="${shared.resource.dir}"
                includes="derby.jar" />
        </library>
    </jdbcDriver>
    <properties.derby.embedded createDatabase="create"
        databaseName="/temp/TomcatDatabases/books" />
    <connectionManager minPoolSize="30"
        connectionTimeout="10s"
        maxPoolSize="100" />
</dataSource>
<dataSource id="MembersRedbookLibraryDSDerby"
    jndiName="jdbc/Members">
    <jdbcDriver>
        <library>
            <fileset dir="${shared.resource.dir}"
                includes="derby.jar" />
        </library>
    </jdbcDriver>
    <properties.derby.embedded createDatabase="create"
        databaseName="/temp/TomcatDatabases/members" />
    <connectionManager minPoolSize="30"
        connectionTimeout="10s"
        maxPoolSize="100" />
</dataSource>
…
遷移如清單 6 所示的應用程序配置後,migratedConfig/RedbookLibrary 目錄中包含一個 application-config-web.xml 文件,其中配置了一個應用程序和安全角色(清單 8)。
清單 8. 從 web.xml 遷移的應用程序配置示例
…
<application id="RedbookLibrary"
    location="RedbookLibrary.war"
    name="RedbookLibrary"
    type="war">
    <application-bnd>
        <security-role name="Test">
            <user name="test" />
        </security-role>
    </application-bnd>
</application>
…
要確定將哪些用戶添加到應用程序上的 “Test” 安全角色,需要對在 migratedConfig 目錄中的 users-and-roles.xml 文件進行檢查,以確定哪些用戶是 “Test” 組的成員。這一技巧使該配置可以被自動生成為遷移的一部分,而不必手動發布應用程序並在之後配置安全角色。
對於樣例應用程序,針對服務器配置和應用程序配置使用遷移工具,這就不需要執行在 WebSphere Application Server V8.5 Migration Guide 第 9.4.6 章和第 9.4.7 章中所記載的手動步驟。
接下來,您將在 Liberty profile 服務器上運行遷移的應用程序。
4. 在 Liberty profile 上運行應用程序
作為應用程序配置遷移的結果,應用程序現已被發布到 Liberty profile 服務器上。只需啟動服務器並訪問應用程序:
在 Eclipse 中,右鍵單擊 Liberty profile 服務器,並選中 Start。
在 Console 窗格中單擊應用程序 URL,或在您的首選 Web 浏覽器中輸入應用程序 URL。對於樣例應用程序,URL 是 http://localhost:8080/RedbookLibrary/。
圖 5. 在 Console 窗格中單擊應用程序 URL,以在 Eclipse 中運行應用程序
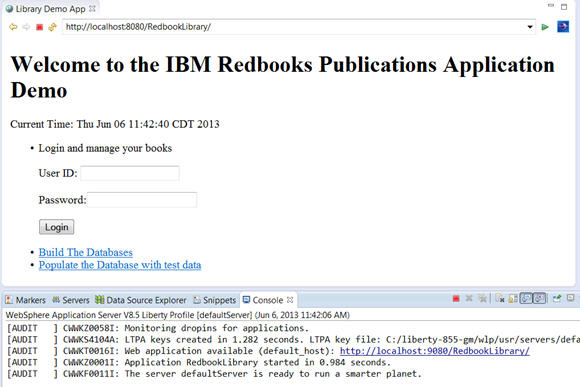
要測試樣例應用程序:
單擊 Build The Databases。
當提示輸入用戶名和密碼時,均輸入 test 。
返回主頁面並單擊 Populate the Database with test data。
返回主頁面並登錄,User ID 為 user1 ,Password 為 password1。
請注意,以上步驟 d 中利用了遷移的用戶和角色,以及遷移的應用程序安全約束,這就要求作為 “Test” 角色成員的用戶進行登錄,以創建測試數據。
結束語
本文介紹了如何使用 Application Migration Tool – Apache Tomcat to WebSphere(用於應用程序遷移)和 Tomcat Config Migration Tech Preview (用於配置遷移),將一個應用程序及其配置從 Apache Tomcat 遷移到 WebSphere Application Server Liberty Profile。使用這些實用程序,可讓遷移到 Liberty profile 服務器比以往任何時候都更容易且更可靠,從而簡化流程。