在某些時候,我們工程中使用的JDK 不一定就是1.5 以上,也就是說可能不支持Annotation 注解,這時自然也就不能使用@AspectJ 注解驅動的AOP 了,那麼如果我們仍然想使用AspectJ 靈活的切入點表達式,那麼該如何呢?Spring 為我們提供了基於xml schematic 的aop 命名空間,它的使用方式和@AspectJ 注解類似,不同的是配置信息從注解中轉移到了Spring 配置文件中。在這裡,我們將詳細介紹如何使用Spring 提供的<aop:config/> 標簽來配置Spring AOP 。
1 、一點准備工作和一個例子
使用<aop:config/> 標簽,需要給Spring 配置文件中引入基於xml schema 的Spring AOP 命名空間。完成後的Spring 配置文件如下(在該節,所有例程的配置文件中添加了Spring AOP 命名空間,除非特殊情況外,為了節約空間,這部分將在給出的代碼中省略),粗體內容即為我們需要添加的內容:
代碼
<?xml version="1.0" encoding="UTF-8"?>

<beans xmlns="http://www.springframework.org/schema/beans"

xmlns:xsi="http://www.w3.org/2001/XMLSchema-instance"

xmlns:aop="http://www.springframework.org/schema/aop"

xsi:schemaLocation="http://www.springframework.org/schema/beans

http://www.springframework.org/schema/beans/spring-beans-2.5.xsd

http://www.springframework.org/schema/aop

http://www.springframework.org/schema/aop/spring-aop-2.5.xsd >

………… Spring配置信息

</beans>
關於aop命名空間的標簽,我們前面使用過的有<aop:aspectj-autoproxy/>,在這一節,我們將以<aop:config/>標簽作為重點。事實上,我們在這一節介紹的所有標簽都是該標簽的子標簽。
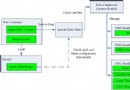
下面有一個例程來直觀的展示如何使用<aop:config/>標簽來配置Spring AOP(完整代碼見例程4.15)。在例子中,我們使用<aop:config/>配置一個切面並攔截目標對象Peoples的SayHello()方法,在它執行前輸出提示信息。
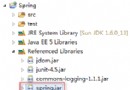
首先創建工程AOP_Test4.15,添加Spring IoC和Spring AOP庫後,創建aop.test包,新建目標類People,代碼如下:
代碼
package aop.test;

/**

* 該類將作為目標對象對應的類。

* @author zhangyong

* */

public class People{


public String SayHello(String str){

System.out.println(this.getClass().getName()+ "說:"+str);

return str;

}

}
修改Spring xml配置文件,將該類注冊為一個受管Bean:
代碼
<bean id="TestBean" class="aop.test.People" />
創建含有main()方法的測試類TestMain,從Spring IoC容器中獲取Peoples對象,並調用其SayHello()方法,代碼如下:
代碼
package aop.test;

// import省略

public class TestMain {

public static void main(String[] args) {

// 實例化Spring IoC容器

ApplicationContext ac = new ClassPathXmlApplicationContext(

"applicationContext.xml");

// 獲取受管Bean的實例

People p = (People) ac.getBean("TestBean");

p.SayHello("傳入的參數值");

}

}
創建MyAspect類,添加一個beforeAdvice()方法作為前置通知方法,代碼如下:
代碼
package aop.test;

import org.aspectj.lang.JoinPoint;

public class MyAspect {

public void beforeAdvice(JoinPoint point) {

System.out.println("前置通知被觸發:" +

point.getTarget().getClass().getName()+

"將要" + point.getSignature().getName());

}

}
修改xml配置文件,為其添加aop命名空間,並把MyAspect注冊為一個受管Bean,作為我們下面定義切面的backing bean。代碼如下:
代碼
<?xml version="1.0" encoding="UTF-8"?>

<beans xmlns="http://www.springframework.org/schema/beans"

xmlns:xsi="http://www.w3.org/2001/XMLSchema-instance"

xmlns:aop="http://www.springframework.org/schema/aop"

xsi:schemaLocation="http://www.springframework.org/schema/beans

http://www.springframework.org/schema/beans/spring-beans-2.5.xsd

http://www.springframework.org/schema/aop

http://www.springframework.org/schema/aop/spring-aop-2.5.xsd">

<bean id="MyAspect" class="aop.test.MyAspect" />

<bean id="TestBean" class="aop.test.People" />

<aop:config proxy-target-class="true">

<aop:aspect ref="MyAspect" order="0" id="Test">

<aop:pointcut id="testPointcut"

expression="execution(* aop..*(..))" />

<aop:before pointcut-ref="testPointcut"

method="beforeAdvice" />

</aop:aspect>

</aop:config>

</beans>
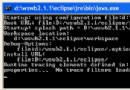
運行主類,輸出如下:

例程4.15輸出結果
本文地址:http://www.blogjava.net/cmzy/archive/2008/08/23/223870.html