簡介: 即使 Apache Geronimo 的功能集中缺少預先集成的門戶服務器支持, 您仍可以使用 Geronimo 作為門戶應用程序的測試和部署環境。本文將引導您逐步完成在 Geronimo 部署 Apache Pluto 驅動器和 容器的過程,為您的門戶應用程序提供百分之百的開放源碼環境。然後了解如何 在 Pluto 和 Geronimo 中開發、部署和測試樣例門戶應用程序。
Apache Pluto 和 Apache Geronimo:快速入門
Apache Pluto 是 Java™ Portlet Specification (JSR 168) 的參考實 現。Pluto 將提供 JSR 168 中指定的基本輕量級容器接口實現和帶有用於開發標准 portlet 的其他實用 程序的門戶驅動器。 Pluto 用作一個基本的 portlet 容器,用於實現 portlet API 並為開發人員提 供一個可以托管 portlet 的工作示例平台。Pluto 的簡單門戶組件只是基於 portlet 容器和 JSR 168 的 要求構建的。
Apache Geronimo 1.1 是 Java 2 Platform, Enterprise Edition (J2EE) 1.4 認證的開源應用 服務器。不同於其他 J2EE 應用服務器,Geronimo 預先集成了外部資源組件,例 如數據庫、消息傳遞服 務器和目錄服務器。Geronimo 是基於具有高定制性且模塊化的架構構建的。它用 作支持現有組件的框架 來構成包含 30 多個最優供給(best-of-breed)開源項目的完整 J2EE 應用服務 器包。Geronimo 預先集 成了 Apache Tomcat 或 Apache Jetty;本文使用的是配有 Tomcat 的 Geronimo 版本。
雖然 Apache Pluto 本身就是基於 J2EE 標准構建的 Web 應用程序,但是它 不能按原樣直接部署。此 外,開發的所有 Pluto 門戶應用程序都不能被直接安裝到 Pluto 門戶容器中。 開發人員通常把 Pluto 部署到 Apache Tomcat Web 容器中,但這並不是您的惟一選擇。Geronimo 也可 以托管 Pluto 應用程序 。本文將展示如何把 Pluto 門戶服務器與 Geronimo 結合使用,為後台配有功能 豐富的常用應用服務器 的門戶應用程序提供一個完整的開源測試和部署環境。
門戶、portlet 和 API
門戶是用作在 Internet 或內部網上獲得信息和應用程序的起點的 Web 站點 。它們通常提供個性化、 單點登錄、來自多個資源的內容聚合以及托管信息系統的表示層。為了適應聚合 並顯示各種內容,門戶服 務器提供了一種把不同的門戶組件劃分為 portlet 的框架。
portlet 是門戶中的一個窗口,用於提供一項特定的服務或信息。portlet 負 責從它自己的資源訪問 內容(例如,Web 站點、數據庫或電子郵件服務器)並對內容進行轉換,以便呈 現給客戶機。JSR 168 是 用於創建 portlet 的標准 API。它將在應用程序與門戶之間提供集成組件,該集 成組件將允許通過門戶 交付應用程序。如果沒有這項標准,每個應用程序都可能需要自己的 portlet API。
在 Geronimo 中部署和執行 Web 應用程序的過程與在 Tomcat 中部署和執行 Web 應用程序的過程不 同。本文的其余部分將向您展示如何通過以下步驟在托管在 Geronimo 上的 Pluto 中部署和執行樣例門 戶應用程序:
通過 sharedlib 模塊共享 Pluto 庫和屬性。
為 Pluto 容器和驅動器創建 Geronimo 部署計劃。
在 Geronimo 中部署 Pluto。
開發樣例門戶應用程序。
為樣例門戶應用程序創建必需的部署計劃。
在 Geronimo 上部署和測試樣例門戶應用程序。
開始時,需要先下載、安裝並解壓縮 Geronimo 和 Pluto。我將把 Geronimo 的安裝目錄引用為 GERONIMO_HOME。您可以下載源代碼版本或二進制版本的 Pluto。根據 Pluto 安 裝指南中的說明:“安裝 源代碼版本要求完成更多工作,並且僅建議那些有興趣修改容器的個人安裝”, 我將已下載的二進制版本 的位置引用為 PLUTO_HOME 並將源代碼版本位置引用為 PLUTO_SRC(當我向您指 出 PLUTO_HOME 中的文件 位置時,如果您已經構建了源文件版本,則可以定位相同的文件)。
共享 Pluto 庫和屬性
在 Tomcat 中,Pluto 將把門戶應用程序作為 Pluto 容器 Web 應用程序的子 部分進行部署。這種方 法在 Geronimo 並中不可行。部署新應用程序意味著創建新的 Web 應用程序和 Geronimo 部署計劃。但 是,沒有一種方法能夠在部署應用程序後動態更新計劃和部署配置。解決這個問 題的一種方法是把所有門 戶應用程序作為外部應用程序來部署,並且在 Pluto 中,配置新門戶應用程序並 被重定向到外部應用程 序。配置包括在 Pluto 注冊庫中定義 portlet 和門戶。這將解決最初遇到的問 題,但是也會帶來一大堆 新問題。
一個主要的問題是,由於應用程序都是分別部署的,因此它們全都使用不同的 類裝入程序。這意味著 Portlet API 類、Pluto 容器類和常用服務類都是裝入到 Pluto 應用程序和門戶 應用程序的獨立類裝入 程序中,導致出現很多 ClassNotFoundException。
要解決此問題,需要把所有常用 Pluto 文件裝入到同一個類裝入程序中。 Geronimo 1.1 中名為 sharedlib 的服務使您可以完成此操作。使用此項服務,您可以把常見類文件和 庫存儲到共享文件夾中。 需要使用共享文件的應用程序可以把自身配置為依賴於 sharedlib 服務來使用它 。
要在 Pluto 中使用 sharedlib,請把以下文件從 PLUTO_HOME\webapps\pluto\WEB-INF\classes 復制 到 GERONIMO_HOME\var\shared\classes 文件夾:
pluto-admin.properties
castor.properties
logging.properties
並把以下文件從 PLUTO_HOME\shared\lib 和 PLUTO_HOME\webapps\pluto\WEB-INF\lib 文件夾復制到 GERONIMO_HOME\var\shared\lib 文件夾:
pluto-1.0.1.jar
pluto-deploy-1.0.1.jar
pluto-descriptors-1.0.1.jar
pluto-portal-1.0.1.jar
portlet-api-1.0.jar
castor-0.9.5.3.jar
commons-fileupload-1.1.jar
commons-io-1.1.jar
確保當 Geronimo 服務器啟動時 geronimo/sharedlib/1.1.1/car 服務已處於 啟動狀態。
為 Pluto 創建 Geronimo 部署計劃
如果 Geronimo 中的所有應用程序使用外部資源引用(例如安全配置或依賴性 因素),則需要使用 Geronimo 部署計劃。正如您剛剛學到的那樣,Pluto 容器和驅動器應用程序必須 部署到 Geronimo 中, 並且必須與 sharedlib 服務具有依賴性。Pluto 容器和驅動器應用程序以及 Pluto 服務器應用程序都是 Web 應用程序,因此它們的部署計劃都將是 Geronimo Web 部署計劃。
Geronimo 部署計劃與 J2EE 部署描述符有些相像;不同之處在於 Geronimo 部署計劃包含特定於服務 器的信息。清單 1 顯示的是常用 Pluto 服務器應用程序的 Geronimo Web 部署 計劃。
清單 1. Geronimo 的 Pluto 部署計劃 —— geronimo-web-pluto.xml
<?xml version="1.0"?>

<web-app xmlns="http://geronimo.apache.org/xml/ns/web"

  xmlns:naming="http://geronimo.apache.org/xml/ns/naming"

  xmlns:tomcat="http://geronimo.apache.org/xml/ns/web/tomcat/config -1.0"

  xmlns:sys="http://geronimo.apache.org/xml/ns/deployment- 1.1">


<sys:environment>

  <dependencies>

   <dependency>

    <artifactId>sharedlib</artifactId>

   </dependency>

  </dependencies>

</sys:environment>


<security-realm-name>pluto-properties-file-realm</security- realm-name>


<security>

  <default-principal realm-name="pluto-properties-file-realm">

   <principal class=

     "org.apache.geronimo.security.realm.providers.GeronimoGroupPrincipal"  name="user"/>

  </default-principal>

  <role-mappings>

   <role role-name="tomcat">

    <realm realm-name="pluto-properties-file-realm">

     <principal class=

      "org.apache.geronimo.security.realm.providers.GeronimoGroupPrincipal"       name="admin"/>

     <principal class=

      "org.apache.geronimo.security.realm.providers.GeronimoUserPrincipal"

      name="system"/>

    </realm>

   </role>

  </role-mappings>

</security>


<tomcat:cross-context/>

</web-app>
您可以看到清單 1 中的部署計劃有三個主要配置:
依賴性: <dependency> 元素用於指定 Web 應用程序與任何其他模塊 、應用程序或服務之間的 依賴性。它還可以指明與位於 Geronimo 存儲庫中的第三方庫之間的依賴性。在 清單 1 中, <dependency> 元素內的 <artifactId>sharedlib</artifactId> 將指定與 sharedlib 服務之間的依賴性。
安全性:Pluto Web 應用程序要求配置安全性。特別是,它要求使用 <security-realm> 驗證 用戶登錄和主要角色,並使用 <role-mappings> 映射在 Pluto 的 Web 部 署描述符 (web.xml) 中 定義的角色。在 清單 1 中,pluto-properties-file-realm 安全領域被配置為 強制執行特定於應用程序 的驗證策略,它用作登錄域的入口點。它被配置為使用 org.apache.geronimo.security.realm.providers.GeronimoGroupPrincipal。在 Pluto 應用程序的 web.xml 文件中定義的 tomcat 角色被映射為使用這個 security-realm。
跨上下文:Pluto 服務器要求使用的一項重要功能是能夠調用部署在 Geronimo 服務器上的其他 Web 應用程序中提供的 portlet。默認情況下,這個功能 —— 允許一個 Web 應用程 序把請求分派給其他 Web 應用程序 —— 是禁用狀態。您可以通過在部署計劃中指定 <cross- context> 元素來啟用它 。清單 1 中出現的 <tomcat:cross-context/> 將為 Pluto 服務器應用程 序激活此功能。
在 Geronimo 中部署 Pluto
如果已下載的是 Pluto 源代碼版本,您可以將其構建為獲得 Pluto Web 應用 程序 PLUTO_SRC\pluto\portal\target\pluto.war。如果使用的是 Pluto 的二進制版 本,請使用以下命令從 PLUTO_HOME\webapps\pluto 文件夾創建 pluto.war(其中 pluto_xxx 是您選定 的文件夾):
c:\pluto_xxx>jar cvf pluto.war
擁有 pluto.war 之後,請使用 Web 控制台或命令行部署工具(在一行中鍵入 以下命令)部署它:
c:\geronimo-1.1.1\bin>deploy --user system deploy

c:\pluto_xxx\pluto.war c:\pluto_xxx\geronimo-web-pluto.xml
開發樣例門戶應用程序
作為一個演示門戶應用程序的開發及部署的樣例場景,您將開發一個購票應用 程序。由於要開發的是 基於 JSR 168 和 J2EE 的應用程序,因此對於部署在 Geronimo 中的 Pluto 的 門戶應用程序的服務器設 置與所有其他服務器設置完全相同。要創建樣例門戶應用程序,需要創建四個文 件:
Portlet 類
Portlet 描述符
Web 應用程序描述符
Portlet 視圖頁面
這些文件內容的詳細說明不在本文討論范圍內。有關更多信息,請閱讀 “使 用 Apache Pluto 構建和 測試 JSR 168 兼容的 portlets”(developerWorks,2006 年 4 月)。
portlet 類
門戶類中的每個 portlet 都有一個用於實現 javax.portlet.Portlet 接口的 portlet 類。為了便於 操作,JSR 168 為 javax.portlet.Portlet 定義了一個默認實現 —— javax.portlet.GenericPortlet 類。清單 2 顯示了 org.sample.geronimo.buyticket.BuyTicketPortlet 類,它 將擴展 BuyTicket portlet 的 GenericPortlet。同樣地,本文的樣例代碼將包括 org.sample.geronimo.buyticket.TShirtPortlet(請參閱 下載 部分)。
清單 2. portlet 類 —— org.sample.geronimo.buyticket.BuyTicketPortlet
package org.sample.geronimo.buyticket;


import java.io.*;

import javax.portlet.*;


import  org.apache.pluto.portlet.admin.util.PlutoAdminContext;


public class BuyTicketPortlet extends GenericPortlet {

   private static String VIEW_JSP = "/view.jsp";


   protected void doView(RenderRequest request,  RenderResponse response)

    throws PortletException, IOException {

   response.setContentType(request.getResponseContentType ());

   PortletContext context = getPortletConfig ().getPortletContext();

   context.getRequestDispatcher(VIEW_JSP).include(request,  response);

   }

   public void processAction(ActionRequest request,  ActionResponse response)

    throws PortletException, java.io.IOException {

   String game = request.getParameter("game");

   String name = request.getParameter("name");

   String card = request.getParameter("card");

    String errorMessage = null;

   if(game != null && name != null &&  card != null

     && !game.equals("") && !name.equals("")

     && !card.equals("")){

    response.setRenderParameter("game", game);

    response.setRenderParameter("name", name);

   }else

    response.setRenderParameter("errorMessage",

    "You entered invalid data, please check the name and  credit information");

   }

}
portlet 描述符
清單 3 中顯示的 portlet.xml 文件將為門戶應用程序中包含的所有 portlet 提供諸如 portlet 名 稱、標題、類和模式之類的信息。
清單 3. portlet 描述符 —— portlet.xml
<?xml version="1.0" encoding="UTF-8"?>

<portlet-app

   xmlns="http://java.sun.com/xml/ns/portlet/portlet- app_1_0.xsd"

   version="1.0" xmlns:xsi="http://www.w3.org/2001/XMLSchema- instance"

   xsi:schemaLocation="http://java.sun.com/xml/ns/portlet/portlet- app_1_0.xsd

   http://java.sun.com/xml/ns/portlet/portlet-app_1_0.xsd"

   id="org.sample.geronimo.buyticket.BuyTicketPortlet">

   <portlet>

    <portlet-name>BuyTicket</portlet-name>

    <display-name>Buy Ticket Portlet</display-name>

    <portlet-class>

      org.sample.geronimo.buyticket.BuyTicketPortlet

    </portlet-class>

    <supports>

      <mime-type>text/html</mime-type>

      <portlet-mode>view</portlet-mode>

    </supports>

    <portlet-info>

      <title>Buy Ticket Title</title>

    </portlet-info>

   </portlet>

   <portlet>

    <portlet-name>TShirt</portlet-name>

    <display-name>TShirt Portlet</display-name>

    <portlet-class>

      org.sample.geronimo.buyticket.TShirtPortlet

    </portlet-class>

    <supports>

      <mime-type>text/html</mime-type>

      <portlet-mode>view</portlet-mode>

    </supports>

    <portlet-info>

      <title>TShirt</title>

    </portlet-info>

   </portlet>

</portlet-app>
Web 應用程序描述符
web.xml 是用於提供關於 Web 應用程序組件信息(例如 servlet 和 taglib )的 J2EE 指定的標准 XML 描述符。清單 4 將顯示 buyticket 門戶應用程序的 WEB-INF\web.xml 文件 。
清單 4. Web 應用程序描述符 —— WEB-INF\web.xml
<?xml version="1.0" encoding="UTF-8"?>

<!DOCTYPE web-app PUBLIC "-//Sun Microsystems, Inc.//DTD Web  Application  2.3//EN"

  "http://java.sun.com/dtd/web-app_2_3.dtd">

<web-app>

   <display-name>GetPortlet</display-name>

   <servlet>

    <servlet-name>BuyTicket</servlet-name>

    <display-name>BuyTicket Wrapper</display-name>

    <description>Automated generated Portlet  Wrapper</description>

    <servlet-class>org.apache.pluto.core.PortletServlet</servlet- class>

    <init-param>

     <param-name>portlet-guid</param-name>

     <param-value>buyticket.BuyTicket</param-value>

    </init-param>

    <init-param>

     <param-name>portlet-class</param-name>

     <param- value>org.sample.geronimo.buyticket.BuyTicketPortlet</param- value>

    </init-param>

   </servlet>

   <servlet-mapping>

    <servlet-name>BuyTicket</servlet-name>

    <url-pattern>/BuyTicket/*</url-pattern>

   </servlet-mapping>

   <servlet>

    <servlet-name>TShirt</servlet-name>

    <display-name>TShirt Wrapper</display-name>

    <description>Automated generated Portlet  Wrapper</description>

    <servlet-class>org.apache.pluto.core.PortletServlet</servlet- class>

    <init-param>

     <param-name>portlet-guid</param-name>

     <param-value>buyticket.TShirt</param-value>

    </init-param>

    <init-param>

     <param-name>portlet-class</param-name>

     <param- value>org.sample.geronimo.buyticket.TShirtPortlet</param- value>

    </init-param>

   </servlet>

   <servlet-mapping>

    <servlet-name>TShirt</servlet-name>

    <url-pattern>/TShirt/*</url-pattern>

   </servlet-mapping>


   <welcome-file-list>

    <welcome-file>index.html</welcome-file>

   </welcome-file-list>

   <taglib>

    <taglib-uri>http://java.sun.com/portlet</taglib-uri>

    <taglib-location>tld/portlet.tld</taglib-location>

   </taglib>

   <taglib id="PortletTLD">

    <taglib-uri>http://java.sun.com/portlet</taglib-uri>

    <taglib-location>/WEB-INF/tld/portlet.tld</taglib- location>

   </taglib>

</web-app>
portlet 視圖頁面
BuyTicketPortlet 包括一個視圖頁面以通過調用 context.getRequestDispatcher ("view.jsp").include(request, response); 來解除視圖部分與 portlet 代碼 之間的耦合。清單 5 中 顯示的 view.jsp 文件用於呈現實際的 HTML 頁面。
清單 5. 初始頁面 —— view.jsp
<%@ taglib uri="http://java.sun.com/portlet"  prefix="portlet"%>

<%@ page language="java" contentType="text/html; charset=ISO- 8859-1"

   pageEncoding="ISO-8859-1" session="false"%>

<portlet:defineObjects />

   <%

    String game = renderRequest.getParameter("game");

    if (game == null) game = "";

    String name = renderRequest.getParameter("name");

    if (name == null) name = "";

    String errorMessage = renderRequest.getParameter ("errorMessage");

    if (errorMessage != null) {

   %>

   <p><%=errorMessage%></p>

   <%

    }else if (name != null && !name.equals("")  && game !=  null && !game.equals("") ) {

   %>

   <p><b> Thank you <%= name %>, you purchased  ticket for <%=  game %></b></p>

   <%

    }

   %>

   <FORM name="<portlet:namespace/>ticketform"  action="<portlet:actionURL/>">

   <table border="0">

   <tr><td>

    Select Game/Event

    </td><td>

    <select name="game">

   <%

    java.util.ArrayList  map=org.sample.geronimo.buyticket.GameConstants.map;

    java.util.Iterator itr=map.listIterator();

    while(itr.hasNext())

    {

     String gamelist=(String)itr.next();

   %>

   <option value=<%= gamelist %> selected="true"><%=  gamelist % ></option>

   <%

    }

   %>

    </select>

    </td></tr>

    <tr><td>Name</td><td><INPUT type="text"  name="name"  size="20"/></td></tr>

    <tr><td>Card</td><td><INPUT type="text"  name="card"  size="20"/></td></tr>

    <tr><td>Exp. Date</td><td><INPUT  type="text" name="date"  size="20"></td></tr>

    </table>

   <INPUT type="submit" name="<portlet:namespace/>submitTicket"   value="Buy"/>

   <INPUT type="submit" value="Cancel"/>

    </FORM>
現在把 portlet.tld 文件從 PLUTO_HOME\webapps\pluto\WEB-INF\tld 復制 到 WEB-INF\tld 文件夾 中。編譯 WEB-INF\classes 文件夾中的 Java 文件,並把以上所有文件打包成一 個 WAR 文件,如下所示 :
c:\buyticket>jar -cvf buyticket.war
為樣例應用程序創建部署計劃
當 Pluto 被部署到 Geronimo 上時,必須把將要部署到 Pluto 中的所有門戶 應用程序作為 Web 應用 程序部署到 Geronimo 服務器中。您需要有一個 buyticket 門戶應用程序的 Geronimo Web 部署計劃, 就像需要有一個 Pluto 服務器應用程序 Web 部署計劃一樣。清單 6 中顯示了 buyticket 的部署計劃 —— geronimo-web-app.xml。
清單 6. 門戶應用程序部署計劃 —— geronimo-web-app.xml
<?xml version="1.0"?>

<web-app xmlns="http://geronimo.apache.org/xml/ns/web"

   xmlns:naming="http://geronimo.apache.org/xml/ns/naming"

   xmlns:tomcat="http://geronimo.apache.org/xml/ns/web/tomcat/config- 1.0"

   xmlns:sys="http://geronimo.apache.org/xml/ns/deployment- 1.1">

<sys:environment>

   <dependencies>

     <dependency>

       <artifactId>sharedlib</artifactId>

     </dependency>

   </dependencies>

</sys:environment>

</web-app>
Pluto 門戶應用程序要求使用常見的 Pluto 文件,這些文件都是通過 Geronimo 中的 sharedlib 服 務共享的。門戶應用程序與 sharedlib 服務的依賴性是在清單 6 所示的門戶應 用程序部署計劃中指定的 。
在 Geronimo 上部署和測試樣例應用程序
門戶應用程序必須執行兩級部署。在第一級中,它將作為 Web 應用程序被部 署到 Geronimo 中。您可 以通過使用 Geronimo 部署工具輕松完成此操作:
在一行中鍵入以下命令:
c:\geronimo-1.1.1\bin>deploy --user system deploy c:\buyticket\buyticket.war

c:\buyticket\geronimo-web-app.xml
此命令將把應用程序作為 Web 應用程序部署到 Geronimo 中,但是要使用 Pluto 服務和功能,必須 通過 Pluto 把應用程序重定向(第二個部署級別)。
為此,您必須把應用程序配置信息存儲到 Pluto 注冊庫中。您可以手動更新 pluto\WEB- INF\data\pageregistry.xml、pluto\WEB-INF\data \portletcontexts.txt 和 pluto\WEB- INF\data\portletentityregistry.xml 文件,也可以執行下一步使用 Pluto admin 應用程序。
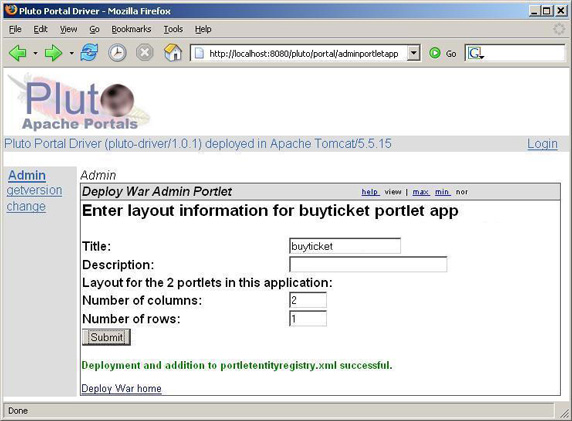
打開 http://localhost:8080/pluto/portal,並單擊 Admin 鏈接。此操作將 打開圖 1 中所示的 http://localhost:8080/pluto/portal/adminportletapp 應用程序。
圖 1. Pluto admin 應用程序 —— 部署 buyticket portlet 應用程序
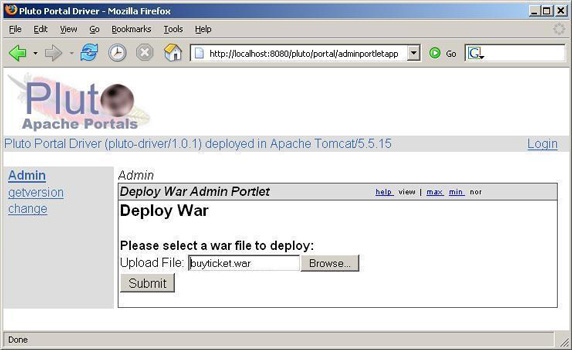
在此應用程序中,浏覽到 buyticket.war 文件,並單擊 Submit。此操作將部 署 buyticket 應用程序 並把門戶應用程序的具體配置添加到 portletentityregistry.xml 中。
在 admin 部署的下一個頁面中,請為新部署的門戶應用程序提供標題、描述 和布局信息(參見圖 2) 。
圖 2. Pluto admin 應用程序 —— 門戶布局
把行數和列數更改為顯示門戶應用程序所包含的行數和列數。
接下來,選擇顯示在每行每列的 portlet,如圖 3 所示。
圖 3. Pluto admin 應用程序 —— 定義頁面布局
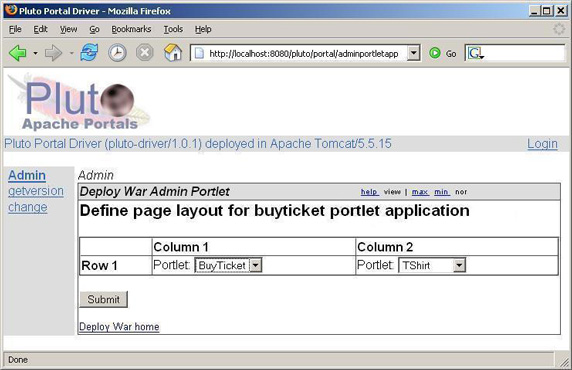
在此步驟中,使用門戶應用程序中進行 portlet 定位的布局設置更新 pageregistry.xml。執行完此 步驟就完成了把門戶應用程序部署到在 Geronimo 上運行的 Pluto 服務器中的任 務。
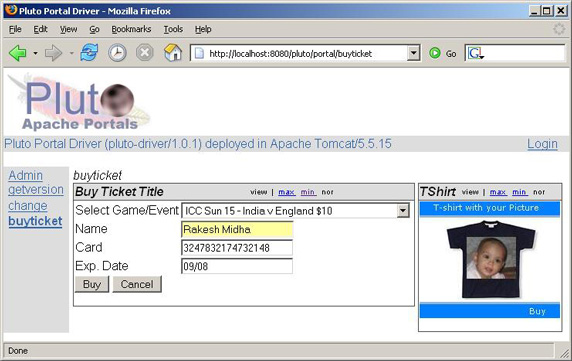
現在可以開始通過單擊 buyticket 鏈接來測試和使用應用程序。圖 4 將顯示 已部署到 Pluto 服務器 中並且正在運行的 buyticket 應用程序。
圖 4. buyticket 門戶應用程序
結束語
Apache Pluto 是用於 JSR 168 兼容性測試的易於使用的小型門戶測試環境。 門戶服務器支持並未預 先集成到 Geronimo 中,但是任何門戶服務器 —— 例如 Pluto、Jetspeed 或 Liferay —— 都可以作 為插件或外部應用程序安裝到 Geronimo 中。即使您引入了重量級的 Jetspeed 或 Liferay 作為部署環 境,也只有 Pluto 能夠滿足輕量級開發和測試的要求。通過把 Pluto 和 Geronimo 集成到一起,您將獲 得結合了開源門戶服務器與應用服務器的精華的門戶環境。
本文配套源碼