用編程代碼編寫 GUI 常常導致混亂的設計,這反過來導致業務邏輯和 UI 代碼之間的混淆。本文探討如何創建帶有配套 Java™ 框架的聲明性 XML UI 標記集合,以便在運行時解析、構造並最終將已聲明的GUI 組件綁定到業務邏輯。
簡介
GUI 開發可能是令人畏懼的任務。GUI 框架並不是總是擁有良好的文檔,需要的代碼量可能迅速增長,拖慢開發工作流。特別是支持這些 GUI 框架的拖放工具和 IDE 通常誘使 GUI 軟件開發人員創建難以管理和閱讀的代碼。這可能會進一步混淆業務邏輯和 GUI 描述代碼之間的界限,從而使軟件維護更加困難。
常用縮略詞
API:應用程序編程接口
DOM:文檔對象模型
GUI:圖形用戶界面
HTML:超文本標記語言
IDE:集成開發環境
JAR:Java 壓縮文檔
UI:用戶界面
URI:統一資源標識符
XML:可擴展標記語言
XSD:XML 模式信息集模型
W3C:萬維網聯盟
這就是聲明性 UI 語言之所以方便的原因。UI 語言描述 “是什麼”,而不是 “該如何”。例如, HTML 描述顯示的內容,而不是描述用於呈現內容的呈現函數。聲明性語言並不指定 “該如何”,從而省略了控制流。盡管這種省略聽起來好像一種限制,但它實際上是一種優點,因為控制流的副作用 — 如修改全局狀態(比如變量)或調用其它函數或方法 — 被消除了。選擇聲明性語言還有利於將 UI 代碼和應用程序代碼分隔開來。這種分離將來還能提供一些好處,比如明確區分項目和團隊角色,這甚至有可能降低業務邏輯和多個視圖或視圖技術之間的集成成本。
目前正在使用的聲明性 XML UI 的例子不在少數。使用 GNOME 桌面環境的Linux® 和 UNIX® 操作系統有 Glade。Microsoft® Windows® 用戶擁有 Extensible Application Markup Language (XAML),該語言支持豐富的功能,包括在 XML 中插入代碼。Adobe® Flex® Framework 的MXML 格式為 Adobe Shockwave (SWF) 播放器描述 GUI 並包含代碼插入。參閱 參考資料 中的鏈接了解更多信息。
Java 技術中的基本聲明性 UI 框架的必要組件可能包括:
驗證:使用 XML Schema
一個 DOM:處理具體事宜的自定義 DOM,比如同步 GUI 組件狀態和 XML 節點狀態
持久性: GUI 的編組(marshalling)和解組(unmarshalling)
圖像數據:存儲為 Base64 數據
Swing 組件:GUI 開發常用的Swing 組件的表示
下面可以創建聲明性 XML 了,創建過程中要謹記上述必要組件。
聲明性 XML
第一個 XML 格式示例(見 清單 1)展示了一個簡單的窗口、一個面板和一個按鈕。清單 1 包含基本的必要屬性,比如坐標、大小和引用單獨內存組件的惟一標識符。
清單 1. 聲明性 XML 概念
<?xml version="1.0" encoding="UTF-8"?>

<xui:XUI>

 <xui:Window id="window_0" name="Hello World" width="300" height="300" x="426"

  y="282" visible="true">

  <xui:GridLayout height="1" width="1"></xui:GridLayout>

  <xui:Panel id="panel_0" x="0" y="0" name="Hello Panel"

   width="1" height="1">

   <xui:GridLayout height="1" width="1"></xui:GridLayout>

    <xui:Button x="0" y="0" width="1" height="1" id="button_0"

     label="Press Me" enabled="true" selected="true" orientation="horizontal"/>

  </xui:Panel>

 </xui:Window>

 <xui:Resource type="java" class="ButtonModel" uri="model.jar"/>

</xui:XUI>
XML 模式
這個聲明性 XML UI 將把 XML 元素映射到 Java Swing 框架,由於 Swing 可用於所有現有 Java 運行時環境,該框架提供了極大的可移植性。許多 Swing 組件將在 XML 格式中擁有相應的XML 元素。
這個框架使用一個 XML 模式。XML 模式允許在一個模式實例中使用指定順序、基數(cardinality)和數據類型。這一點很重要,該框架將要求一個具有指定類型和特定順序的XML 元素集。清單 2 展示了一個 XML 模式實例中的初始元素和屬性的層次結構。
清單 2. 聲明性 XML UI 模式:初始元素
<?xml version="1.0" encoding="UTF-8"?>

<xs:schema elementFormDefault="qualified"

  targetNamespace="http://xml.bcit.ca/PurnamaProject/2003/xui"

  xmlns:xs="http://www.w3.org/2001/XMLSchema"

  xmlns:xui="http://xml.bcit.ca/PurnamaProject/2003/xui">


  <xs:element name="XUI">

   <xs:complexType>

    <xs:sequence>

     <xs:element minOccurs="0" maxOccurs="128" ref="xui:Window"/>

     <xs:element minOccurs="0" maxOccurs="1" ref="xui:Resource"/>

    </xs:sequence>

    <xs:attribute name="id" type="xs:anyURI" use="required"/>

   </xs:complexType>

  </xs:element>


  <xs:element name="Resource">

   <xs:complexType>

    <xs:sequence>

    </xs:sequence>

    <xs:attribute name="uri" type="xs:anyURI" use="required"/>

    <xs:attribute name="class" type="xs:token" use="required"/>

    <xs:attribute name="type" use="required">

     <xs:simpleType>

      <xs:restriction base="xs:token">

       <xs:enumeration value="java"/>

       <xs:enumeration value="groovy"/>

      </xs:restriction>

     </xs:simpleType>

    </xs:attribute>

   </xs:complexType>

  </xs:element>


  <xs:element name="Window">

   <xs:complexType>

    <xs:sequence>

     <xs:element ref="xui:GridLayout"/>

     <xs:choice minOccurs="0" maxOccurs="unbounded">

      <xs:element ref="xui:BasicDialog"/>

      <xs:element ref="xui:OpenFileDialog"/>

      <xs:element ref="xui:SaveFileDialog"/>

      <xs:element ref="xui:CustomDialog"/>

      <xs:element ref="xui:Panel"/>

      <xs:element ref="xui:SplitPanel"/>

      <xs:element ref="xui:TabbedPanel"/>

     </xs:choice>

     <xs:element minOccurs="0" maxOccurs="1" ref="xui:MenuBar"/>

    </xs:sequence>

    <xs:attribute name="id" type="xs:ID" use="required"/>

    <xs:attribute name="x" type="xs:short" use="required"/>

    <xs:attribute name="y" type="xs:short" use="required"/>

    <xs:attribute name="width" type="xs:unsignedShort" use="required"/>

    <xs:attribute name="height" type="xs:unsignedShort" use="required"/>

    <xs:attribute name="name" type="xs:string" use="required"/>

    <xs:attribute name="visible" type="xs:boolean" use="required"/>

   </xs:complexType>

  </xs:element>


  <xs:element name="GridLayout">

   <xs:complexType>

    <xs:attribute name="width" type="xs:unsignedShort" use="required"/>

    <xs:attribute name="height" type="xs:unsignedShort" use="required"/>

   </xs:complexType>

  </xs:element>


</xs:schema>
下面詳細檢查一下這個模式。首先,根據 XML Recommendation 的建議,XML 聲明必須出現在最前面 — 甚至在空格和注釋前面。其次,schema 元素包含其他元素:
elementFormDefault="qualified" 表明所有元素必須有一個名稱空間 — 可以是前綴,也可以是默認名稱空間。
targetNamespace="http://xml.bcit.ca/PurnamaProject/2003/xui" 規定了目標名稱空間 URI。
模式實例使用 W3C XML Schema Recommendation 和其中的所有元素(xmlns:xs="http://www.w3.org/2001/XMLSchema")。
xmlns:xui="http://xml.bcit.ca/PurnamaProject/2003/xui" 識別另一個名稱空間和它的對應前綴。
在 XSD 中使用名稱空間很重要,這樣就能消除名稱空間沖突。當來自兩個或多個 XML 格式的兩個或多個元素的名稱相同時,名稱空間沖突 就會出現。這種沖突使對它的對應標記集感興趣的應用程序感到困惑。通過使用名稱空間和對應的名稱空間前綴,您可以徹底避免這個問題。
再次,根級別(root-level)數據類型元素 XUI 表明:
它允許一個由 0 個到 128 個 Window 元素組成的序列,序列末尾是一個 Resource 元素。稍後您將發現,這兩個元素將在模式實例中被引用。
它有一個 id 元素,該元素是必需的且其類型必須為 anyURI。
XUI 元素可能包含許多 Window 元素,它也可能沒有任何 Window 元素(如果 minOccurs 元素的值為 0)。至於 Resource 元素:
它有一個空的內容模型,因為它的xs:sequence 元素為空。
它有 3 個屬性,它們都是必需的。
最後的type 屬性創建了一個從 XSD 的已定義類型(token)派生而來的簡單類型,其中 restriction 片段是 enumeration,允許列舉 java 和 groovy 的字面文本值。
Resource 元素的目的是向這個 Java 框架提供一個資源(本例中是一個 JAR)的URI,該資源包含運行時可以加載並綁定的已編譯 Java 類。這個資源依賴於將被調用的一個特殊類(class 屬性的值),該類主要用於提供一個已公開的類,以便響應從 GUI 生成的所有事件。
Window 元素:
包含一個 GridLayout 序列,該序列可以包括 GridLayout,BasicDialog、OpenFileDialog、SaveFileDialog、CustomDialog、Panel、SplitPane 和 TabbedPane 元素,以及 0 個或一個 MenuBar。
擁有 7 個屬性 — 都是必需的— 它們使用 XML Schema Recommendation 中的各種已定義數據類型(注意 xs 前綴)。
Window 可以包含多個不同的頂級和中級容器。Window 元素引用了一個 GridLayout 元素。GridLayout 指定了由一個單元網格組成的維度,用於容納組件。GridLayout 提供的布局特性類似於 Java 環境中的java.awt.GridBagLayout,但沒有後者復雜。
如果不深入檢查,這個 XML 模式的描述性似乎已經足夠了。清單 3 展示了另外幾個元素。
清單 3. 聲明性 XML UI 模式:更多元素
...

<xs:element name="CustomDialog">

  <xs:complexType>

   <xs:sequence>

    <xs:element ref="xui:GridLayout"/>

    <xs:element minOccurs="0" maxOccurs="unbounded" ref="xui:Panel"/>

   </xs:sequence>

   <xs:attribute name="modal" type="xs:boolean" use="required"/>

   <xs:attribute name="idref" type="xs:IDREF" use="optional"/>

   <xs:attribute name="name" type="xs:string" use="required"/>

   <xs:attribute name="id" type="xs:ID" use="required"/>

   <xs:attribute name="x" type="xs:short" use="required"/>

   <xs:attribute name="y" type="xs:short" use="required"/>

   <xs:attribute name="width" type="xs:unsignedShort" use="required"/>

   <xs:attribute name="height" type="xs:unsignedShort" use="required"/>

   <xs:attribute name="visible" type="xs:boolean" use="required"/>

  </xs:complexType>

</xs:element>


<xs:element name="Panel">

  <xs:complexType>

   <xs:sequence>

    <xs:element maxOccurs="1" minOccurs="1" ref="xui:GridLayout"/>

    <xs:choice minOccurs="0" maxOccurs="unbounded">

     <xs:element minOccurs="0" maxOccurs="unbounded" ref="xui:Button"/>

     <xs:element minOccurs="0" maxOccurs="unbounded" ref="xui:Calendar"/>

     <xs:element minOccurs="0" maxOccurs="unbounded" ref="xui:CheckBox"/>

     <xs:element minOccurs="0" maxOccurs="unbounded" ref="xui:ComboBox"/>

     <xs:element minOccurs="0" maxOccurs="unbounded" ref="xui:HypertextPane"/>

     <xs:element minOccurs="0" maxOccurs="unbounded" ref="xui:Image"/>

     <xs:element minOccurs="0" maxOccurs="unbounded" ref="xui:Label"/>

     <xs:element minOccurs="0" maxOccurs="unbounded" ref="xui:List"/>

     <xs:element minOccurs="0" maxOccurs="unbounded" ref="xui:PasswordField"/>

     <xs:element minOccurs="0" maxOccurs="unbounded" ref="xui:ProgressBar"/>

     <xs:element minOccurs="0" maxOccurs="unbounded" ref="xui:RadioButton"/>

     <xs:element minOccurs="0" maxOccurs="unbounded" ref="xui:SliderBar"/>

     <xs:element minOccurs="0" maxOccurs="unbounded" ref="xui:Table"/>

     <xs:element minOccurs="0" maxOccurs="unbounded" ref="xui:TextArea"/>

     <xs:element minOccurs="0" maxOccurs="unbounded" ref="xui:TextField"/>

     <xs:element minOccurs="0" maxOccurs="unbounded" ref="xui:Tree"/>

    </xs:choice>

   </xs:sequence>

   <xs:attribute name="x" type="xs:unsignedShort" use="required"/>

   <xs:attribute name="y" type="xs:unsignedShort" use="required"/>

   <xs:attribute name="width" type="xs:unsignedShort" use="required"/>

   <xs:attribute name="height" type="xs:unsignedShort" use="required"/>

   <xs:attribute name="name" type="xs:string" use="required"/>

   <xs:attribute name="id" type="xs:ID" use="required"/>

   <xs:attribute name="idref" type="xs:IDREF" use="optional"/>

  </xs:complexType>

</xs:element>


<xs:element name="RadioButton">

  <xs:complexType>

   <xs:sequence>

    <xs:element maxOccurs="3" minOccurs="0" ref="xui:Image"/>

   </xs:sequence>

   <xs:attribute name="label" type="xs:string" use="required"/>

   <xs:attribute name="x" type="xs:unsignedShort" use="required"/>

   <xs:attribute name="y" type="xs:unsignedShort" use="required"/>

   <xs:attribute name="width" type="xs:unsignedShort" use="required"/>

   <xs:attribute name="height" type="xs:unsignedShort" use="required"/>

   <xs:attribute name="enabled" type="xs:boolean" use="required"/>

   <xs:attribute name="selected" type="xs:boolean" use="required"/>

   <xs:attribute name="id" type="xs:ID" use="required"/>

   <xs:attribute name="orientation" use="required">

    <xs:simpleType>

     <xs:restriction base="xs:token">

      <xs:enumeration value="horizontal"/>

      <xs:enumeration value="vertical"/>

     </xs:restriction>

    </xs:simpleType>

   </xs:attribute>

  </xs:complexType>

</xs:element>

...
注意,清單中沒有存儲任何易變的狀態信息 — 只保護可能有助於 GUI 組件重建的狀態信息。其中一個例子是 CustomDialog 元素的狀態信息:
對話框中允許的Panel 元素的數量
對話框是否是模式對話框(模式對話框直到用戶關閉對話框時才捕捉焦點)
桌面中的坐標(x 和 y,以像素為單位)
大小(寬度和高度,以像素為單位)
窗口的可見性
Panel 是一個中級容器,可以包含相當多的原子組件。再看一下 清單 3,Panel 擁有一個 GridLayout,可以選擇在 Panel 內不放置原子組件,也可以根據需要放置任意數量的原子組件。Panel 本身具有 x 和 y 坐標。Panel 使用 x 和 y 坐標引用父容器的GridLayout 中的定位,而不是引用桌面中的像素(就像 CustomDialog 一樣)。就像俄羅斯玩偶一樣,這種嵌套構造法非常類似於 Swing 的布局規則。了解上述基本知識後,現在可以解決軟件實現問題了。
支持的Java 框架
我們首先簡要介紹建議的Java 框架。清單 4 展示了程序員創建應用程序時必須遵循的步驟:
清單 4. Java API 調用概念
try {

   // Gain access to a XUI builder through factory

   // In this framework the term XUI is going to represent the custom DOM

   XUIBuilder builder = XUIBuilderFactory.getInstance().getXUIBuilder(); // (1)


   // Validate and parse (unmarshal) the XML document

   builder.parse("browser.xml"); // (2)


   // Build a custom DOM

   XUI xui = builder.getXUIDocument(); // (3)


   // Create 1:1 GUI component mapping to custom DOM

   xui.visualize(); // (4) (5)


   // Create bindings to data model (i.e. JAR file from Resource element)

   xui.bind(); // (6)


   // Get root node from the XUI document

   XUINode root = xui.getRoot();


   // Save a copy of the DOM to file (marshal)

   xui.marshalXUI("browser-marshalled.xml");


} catch (XUIParseException xpe) {

   xpe.printStackTrace();


} catch (XUIBindingException xbe) {

   xbe.printStackTrace();


} catch (IOException ioe) {

   ioe.printStackTrace();

}
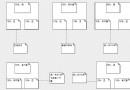
清單 4 清晰地定義了功能的分離,允許進一步優化框架的組件。圖 1 試圖可視化這個工作流。圖 1 中的每個圈起來的數字對應 清單 4 中每個加注釋的數字,但代碼展示了兩個額外步驟(檢索對 XUI 根節點的引用和將 DOM 編組到文件)。這些步驟是:
文檔對象模型(Document Object Model)是什麼?
文檔對象模型(簡稱 DOM)是 XML 元素到內存對象(由 API 提供)的映射,這種映射允許程序員將 XML 數據讀入內存對象(稱為解組),操作數據,然後將數據寫回到 XML(稱為編組)。最著名的常用 DOM 是 W3C DOM。
圖 1 展示了以下步驟:
從 BuilderFactory 檢索一個 Builder。
在允許檢索一個 XUI 文檔之前,Builder 首先確保 XML 文檔已經被驗證和解析。如果解析或驗證失敗,將出現一個 XUIParseException,框架將停止文檔加載。
Builder 創建 DOM,其中的對象反映讀入的XML 元素。
Realizer 對象(在內部由 XUI 對象調用)被實例化並准備執行下一步。
Realizing 是框架根據預先創建的XML 節點層級(框架引擎的真正核心)創建 GUI 組件層級的地方。
使用 Java 環境中的power of reflection,模型邏輯(應用程序中驅動 UI 的部分)被綁定到剛才實現的GUI 組件。
圖 1. XUI API 用於構建 GUI 的框架流和詳細步驟視圖
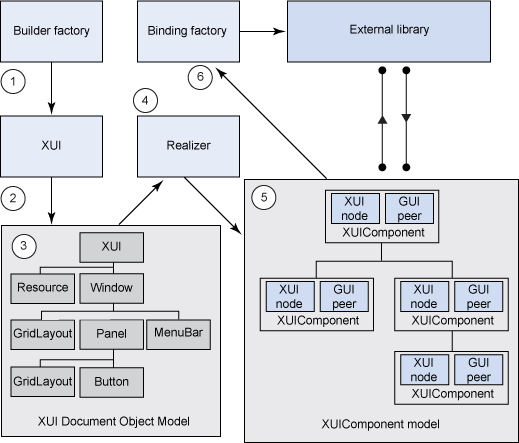
這個共包含 6 個步驟的調用流易於使用,但其中包含大量信息和對象實例化,值得仔細研究。這個框架的核心位於步驟 5 和步驟 6。
GUI 組件 & XML 節點構成
在 圖 1 中,步驟 5 創建了一個組件模型,支持將這個 XML 節點(現在是內存對象)和一個 GUI 組件組成一對。這種配對需要非常嚴格地同步以下事件:
對於框架讀入的每個 XUINode(表示任意 XML 元素的內存對象),必須創建一個 XUIComponent 來包圍 XUINode。
對於在內存中創建的每個 XUIComponent,必須創建一個 GUI 對等物,比如 javax.swing.JFrame。
每當一個 XUIComponent 實例 — 或它的一個子類型(比如 XUIButton)— 被修改時(比如修改大小),XUIComponent 必須確保 XUINode 和 GUI 對等物同時、同等地更新。
通過滿足上述要求,這個框架允許程序員將多個 XML 文檔讀入內存(解組),修改 DOM,然後將更改保存回一個 XML 文檔(編組)。程序員甚至可以以編程方式創建幾個新的DOM 並對它們進行編組。
DOM 節點編組
這個框架提供了一個 toString 方法(見 清單 5),以便 XUINode 將自身編組為 XML。根節點可以包含多個子節點,子節點可以包含自己的子節點,依次類推。通過調用根級別節點的toString 方法,這個框架可以輕松編組整個 XML 文檔。名稱空間被添加進來,以便每個元素知道自己在層級中的級別(通過 level 變量)。這樣,當 toString 方法被調用時,它可以實現縮進,以使這些文檔更易於閱讀。
清單 5. XUINode toString 方法實現
@Override

public String toString() {

   StringBuffer sb = new StringBuffer();

   String namespacePrefix = "";

   // insert indenting ... 2 spaces for now.

   if(isRoot) {

     sb.append(XMLPI + "\n");

     sb.append(API_COMMENT + "\n");

   } else {

     sb.append("\n");

     for(int s = 0; s < level; s++) {

       sb.append(" ");

     }

   }

   sb.append("<");

   // get namespaces for this node

   Enumeration keys = nameSpaces.keys();


   String names = "";

   while(keys.hasMoreElements()) {

     String uri = (String)keys.nextElement();

     String prefix = (String)nameSpaces.get(uri);

     /* if its the xsi namespace (XML Schema Instance),

      * ignore it, this isn't part of that namespace but it is

      * needed for the XML Schema validator to work. */

     if(!(prefix.equals("xsi"))) {

       sb.append(prefix + ":");

       namespacePrefix = prefix;

     }

     names += (" " + "xmlns:" + prefix + "=\"" + uri + "\"");

   }

   if(beginOfNamespace) {

     sb.append(name + names);

   } else {

     sb.append(name);

   }


   // do attributes if there are any

   if(attributes.getLength() > 0) {

     int length = attributes.getLength();

     for(int i = 0; i < length; i++) {

       String attributeValue = attributes.getValue(i);

       String attributeQName = attributes.getQName(i);

       sb.append(" " + attributeQName + "=\"" + attributeValue + "\"");

     }

   }

   sb.append(">");

   sb.append(cdata);

   int size = childNodes.size();

   for(int i = 0; i < size; i++) {

     XUINode e = (XUINode)childNodes.get(i);

     sb.append(e.toString());

   }

   if(size > 0) {

     sb.append("\n");

     for(int s = 0; s < (level); s++)

       sb.append(" ");

   }

   if(namespacePrefix.length() > 0) {

     sb.append("</" + namespacePrefix + ":" + name + ">");

   } else {

     sb.append("</" + name + ">");

   }


   return sb.toString();

}
添加到一個容器組件
另一個值得探討的部分是容器類型 XUIWindow,它是 XUIComponent 的間接子類型。XUIWindow 實現表示一個 javax.swing.JFrame 組件,因此它必須允許將子元素添加到布局中。清單 6 展示了它的實現。首先必須確保只有某些類型的子元素可以添加到 XUIWindow 中。這樣,XUIComponent 的DOM 節點表示(XUINode)將被檢索以便訪問該元素的屬性。注意,這要求所有 XUIComponent 的構造器初始化這些值。
下面進一步檢查以確保以下兩點:該組件是一個中級容器(比如 XUIPanel);這個中級容器能夠包含在 XUIWindow 的行列網格中。最後,將組件添加到 XUIWindow 要確保以下兩點:組件已啟用並在布局網格中設置了正確的位置;XUIWindow 的XUINode(win 變量)獲得了一個引用 —— 引用新的子組件的XUINode,即 addChildNode() 調用。
清單 6. XUIWindow addComponent 方法實現
public void addComponent(XUIComponent component) throws XUITypeFormatException {

   if(component instanceof XUIBasicDialog

     || component instanceof XUIOpenFileDialog

     || component instanceof XUICustomDialog

     || component instanceof XUIMenuBar

     || component instanceof XUIPanel

     || component instanceof XUISplitPanel

     || component instanceof XUITabbedPanel

     || component instanceof XUISaveFileDialog) {

     // get the node

     XUINode node = component.getNodeRepresentation();


     if(!(component instanceof XUIMenuBar)) {

       int x = Integer.parseInt(node.getAttributeValue("x"));

       int y = Integer.parseInt(node.getAttributeValue("y"));

       int width = Integer.parseInt(node.getAttributeValue("width"));

       int height = Integer.parseInt(node.getAttributeValue("height"));


       // can't add dialogs so need to check for type here.

       if(component instanceof XUIBasicDialog

         || component instanceof XUIOpenFileDialog

         || component instanceof XUICustomDialog

         || component instanceof XUISaveFileDialog) ; // nothing

       else {

         // check to make sure it fits within the grid.

         Dimension localGrid = this.getGrid();

         if(width > localGrid.getWidth() || height >

           localGrid.getHeight()) {

           throw new XUITypeFormatException(node.getName()

             + " (id: " + node.getAttributeID()

             + ") must be within this window's grid width and"

             + "height (w: " + localGrid.getWidth()

             + " + h: " + localGrid.getHeight() + ")");

         }

         Rectangle rect = new Rectangle(y, x, width, height);


         component.getPeer().setEnabled(true);

         frame.getContentPane().add(component.getPeer(), rect);

         // for mapping components to the regions they occupy

         childComponentMappings.put(component, rect);

       }

       component.setComponentLocation(x, y);


     } else {

       // do specifics for a menubar

       frame.setJMenuBar((JMenuBar)component.getPeer());

     }


     frame.invalidate();

     frame.validate();


     // add the component's node

     int level = win.getLevel();

     node.setLevel(++level);


     if(win.getParent() == null)

       win.addChildNode(node);


   } else {

     StringBuffer sb = new StringBuffer();

     sb.append("Type not supported in XUIWindow. ");

     sb.appen("The following types are supported:\n");


     for(int i = 0; i < supportedComponents.size(); i++) {

       String s = (String)supportedComponents.get(i);

       sb.append("- " + s + "\n");

     }

     throw new XUITypeFormatException(sb.toString());

   }

}
綁定
最後一個需要研究的代碼部分是處理運行時綁定。調用 XUI 對象的bind 方法時,BindingFactory 的一個實例將被調用。
要將模型代碼綁定到已構造的GUI,BindingFactory 的doBinding 方法(見 清單 7)必須執行以下操作:
捕獲 URL,無論在本地、Internet 上或相對位置。
通過 JarURLConnection 類檢查 JAR 並使用一個單獨的自定義類加載器加載類。
從加載的XML 文檔查找一個類,它匹配 Resource 元素的class 屬性的名稱。這個類是模型的入口點。
使用 Java 反射框架實例化這個充當入口點的類並調用它的init 方法。init 方法在概念上類似於一個典型 Java 類的main 方法,因為它們都是入口點。
如果 JAR 文件包含圖像,還需要將圖像載入內存。
清單 7. BindingFactory 的doBinding 方法
public void doBinding(XUINode resource, XUI xui) throws XUIBindingException,

   MalformedURLException, IOException {

   if(resource.getAttributeValue("type").equals("java")) {

     String className = resource.getAttributeValue("class");

     String aURLString = resource.getAttributeValue("uri");

     URL url = null;

     // get the url ... if it's not a valid URL, then try and grab

     // it as a relative URL (i.e. java.io.File). If that fails

     // re-throw the exception, it's toast

     try {

       url = new URL("jar:" + aURLString + "!/");

     } catch (MalformedURLException mue) {

       String s = "jar:file://" + new File(aURLString)

         .getAbsolutePath().replace("\\", "/") + "!/";

       url = new URL(s);

       if(url == null) {

         // it really was malformed after all

         throw new

           MalformedURLException("Couldn't bind to: "

           + aURLString);

       }

     }

     // get a jar connection

     JarURLConnection jarConnection = (JarURLConnection)url.openConnection();

     // get the jar file

     JarFile jarFile = jarConnection.getJarFile();

     // jar files have entries. Cycle through the entries until finding

     // the class sought after.

     Enumeration entries = jarFile.entries();

     // the class that will be the entry point into the model

     JarEntry modelClassEntry = null;

     Class modelClass = null;

     XUIClassLoader xuiLoader =

       new XUIClassLoader(this.getClass().getClassLoader());

     while(entries.hasMoreElements()) {

       JarEntry remoteClass = (JarEntry)entries.nextElement();

       // load the classes

       if(remoteClass.getName().endsWith(".class")) {

         // have to get the second last word between period marks. This

         // is because the convention allows for:

         // org.purnamaproject.xui.XUI

         // that is, the periods can represent packages.

         StringTokenizer st =

           new StringTokenizer(remoteClass.getName(), ".");

         String previousToken = st.nextToken();

         String currentToken = "";

         String nameOfClassToLoad = previousToken;

         while(st.hasMoreTokens()) {

           currentToken = st.nextToken();

           if(currentToken.equals("class"))

             nameOfClassToLoad = previousToken;

           else {

             nameOfClassToLoad += currentToken;

           }

         }

         // get an output stream (byte based) attach it to the

         //inputstream from the jar file based on the jar entry.

         ByteArrayOutputStream baos = new ByteArrayOutputStream();

         InputStream is = jarFile.getInputStream(remoteClass);

         final byte[] bytes = new byte[1024];

         int read = 0;

         while ((read = is.read(bytes)) >= 0) {

           baos.write(bytes, 0, read);

         }

         Class c = xuiLoader.getXUIClass(nameOfClassToLoad, baos);

         // check for the class that has the init method.

         if(remoteClass.getName().equals(className + ".class")) {

           modelClassEntry = remoteClass;

           modelClass = c;

         }

       } else {

         String imageNameLowerCase = remoteClass.getName().toLowerCase();

         if(imageNameLowerCase.endsWith(".jpeg")

           || imageNameLowerCase.endsWith(".jpg")

           || imageNameLowerCase.endsWith(".gif")

           || imageNameLowerCase.endsWith(".png")) {

           // add resources (images)

           XUIResources.getInstance().addResource(remoteClass, jarFile);

         }

       }

     }

     // now instantiate the model.

     try {

       // create a new instance of this class

       Object o = modelClass.newInstance();

       // get the method called 'init'. This is part of the API

       // requirement

       Method m = modelClass.getMethod("init", new Class[] {XUI.class});

       // at last, call the method up.

       m.invoke(o, new Object[] {xui});


     } catch(InstantiationException ie) {

       ie.printStackTrace();


     } catch(IllegalAccessException iae) {

       iae.printStackTrace();


     } catch(NoSuchMethodException nsm) {

       nsm.printStackTrace();


     } catch(InvocationTargetException ite) {

       System.out.println(ite.getTargetException());

       ite.printStackTrace();

     }

   } else {

     throw new XUIBindingException(

       "This platform/API requires Java libraries.");

   }

}
檢查這個框架的機制後,現在讓我們測試一下這個框架並展示一個應用程序示例。
框架應用示例
項目框架(見 下載)包含幾個示例,其中 Web 浏覽器示例的內容非常詳盡。
Web 浏覽器 XML UI 文檔
這個示例是一個相對真實的示例,您可能會打算將它放進一個聲明性 XML UI 文檔中。查看 清單 8,這個主 Window 指定了 x 和 y 坐標以及一個 id 值。所有元素必須擁有惟一的ID 值,以便業務邏輯能夠引用這些元素。
Window 元素包含以下幾個子元素:
Panel:提供主要布局
OpenFileDialog:打開新的Web 頁面
SaveFileDialog:保存當前查看的Web 頁面
CustomDialog:顯示一個 yes 或 no 退出對話框
CustomDialog:顯示 Web 書簽
MenuBar:顯示在 Window 的頂部,並提供菜單項功能
Resource:引用驅動這個 UI 的Java 模型代碼
所含組件(比如 Button)的所有坐標用於表示在網格內的位置。所含組件的全部大小是指每個組件在網格內的寬度和高度的單元數量。元素的定義是高度聲明性的,因為它們定義的是屬性,而不是關於如何使用和創建那些屬性的邏輯。本文的其他幾個相關知識點包括:
MenuItem 可能有快捷鍵,比如 Ctrl-X 用於退出應用程序。
Window 擁有多個對話框,但默認情況下這些對話框不會顯示,除非用戶調用它們。
所有容器(比如 Panel)必須擁有布局,而且必須指定布局中的行數和列數。
清單 8. Web 浏覽器 XML UI
<?xml version="1.0" encoding="UTF-8"?>

<!-- Generated by The Purnama Project XUI API version 0.5 -->

<xui:XUI xmlns:xui="http://xml.bcit.ca/PurnamaProject/2003/xui"

  xmlns:xsi="http://www.w3.org/2001/XMLSchema-instance"

  xsi:schemaLocation="http://xml.bcit.ca/PurnamaProject/2003/xui ../../xui.xsd"

  id="http://xml.bcit.ca/PurnamaProject/examples/XUIWebBrowser">

  <xui:Window id="window_0" name="XUI Web Browser" x="200" y="20" width="800"

   height="600" visible="true">

   <xui:GridLayout width="1" height="1"></xui:GridLayout>

   <xui:Panel x="0" y="0" width="1" height="1" id="panel_0" name="main panel"

    idref="window_0">

    <xui:GridLayout width="8" height="8"></xui:GridLayout>

    <xui:HypertextPane x="1" y="0" width="8" height="7" id="hyper_0"

     uri="http://www.w3c.org"></xui:HypertextPane>

    <xui:Button x="0" y="0" width="1" height="1" id="button_0" label="Back"

     enabled="true" orientation="horizontal"></xui:Button>

    <xui:Button x="0" y="3" width="1" height="1" id="button_1" label="Home"

     enabled="true" orientation="horizontal"></xui:Button>

    <xui:Button x="0" y="7" width="1" height="1" id="button_2"

     label="Forward" enabled="true" orientation="horizontal"></xui:Button>

   </xui:Panel>


   <!-- For opening files. Only want to see html files -->

   <xui:OpenFileDialog x="10" y="10" width="400" height="300"

    id="filedialog_0" idref="window_0" visible="false">

    <xui:Filter>html</xui:Filter>

    <xui:Filter>htm</xui:Filter>

   </xui:OpenFileDialog>


   <!-- For saving files. Only want to save html files -->

   <xui:SaveFileDialog x="10" y="10" width="400" height="300"

    id="savedialog_0" idref="window_0" visible="false">

    <xui:Filter>html</xui:Filter>

    <xui:Filter>htm</xui:Filter>

   </xui:SaveFileDialog>


   <!-- Ask the user if they really want to quit -->

   <xui:CustomDialog x="200" y="200" width="320" height="160"

    id="customdialog_1" idref="window_0" name="Exit Purnama Browser"

     modal="true" visible="false">

    <xui:GridLayout width="1" height="1"></xui:GridLayout>

    <xui:Panel x="0" y="0" width="1" height="1" id="panel_2"

     name="Quit Panel" idref="customdialog_0">

     <xui:GridLayout width="5" height="4"></xui:GridLayout>

     <xui:Label id="label_0" x="1" y="1" width="3" height="1"

      justified="center" text="Do you really want to exit?"></xui:Label>

     <xui:Button x="2" y="1" width="1" height="1" id="button_3"label="Yes"

      enabled="true" orientation="horizontal"></xui:Button>

     <xui:Button x="2" y="3" width="1" height="1" id="button_4" label="No"

      enabled="true" orientation="horizontal"></xui:Button>

    </xui:Panel>

   </xui:CustomDialog>


   <!-- For displaying the bookmarks -->

   <xui:CustomDialog x="100" y="100" width="300" height="300"

    id="customdialog_0" idref="window_0" name="Bookmarks" modal="false"

     visible="false">

    <xui:GridLayout width="1" height="1"></xui:GridLayout>

    <xui:Panel x="0" y="0" width="1" height="1" id="panel_1"

     name="bookmarks panel" idref="customdialog_0">

     <xui:GridLayout width="1" height="1"></xui:GridLayout>

     <xui:List x="0" y="0" width="1" height="1" id="list_0" enabled="true"

      itemSelected="0" scrolling="vertical">

      <xui:ListItem>http://www.w3c.org</xui:ListItem>

      <xui:ListItem>http://www.agentcities.org</xui:ListItem>

      <xui:ListItem>http://www.apache.org</xui:ListItem>

      <xui:ListItem>http://www.gnu.org</xui:ListItem>

     </xui:List>

    </xui:Panel>

   </xui:CustomDialog>


   <!-- The menu bar with pop-up menu items too -->

   <xui:MenuBar id="menuBar_0" idref="window_0">

    <xui:Menu id="menu_0" idref="menuBar_0" enabled="true"

     isPopupMenu="false" isSubMenu="false" label="File">

     <xui:MenuItem id="mi_1" idref="menu_0" enabled="true" label="Open URL">

      <xui:Shortcut keyCode="F" keyModifier1="ALT"></xui:Shortcut>

     </xui:MenuItem>

     <xui:MenuItem id="mi_0" idref="menu_0" enabled="true" label="Save">

      <xui:Shortcut keyCode="F" keyModifier1="ALT"></xui:Shortcut>

     </xui:MenuItem>

     <xui:MenuItem id="mi_2" idref="menu_0" enabled="true" label="Exit">

      <xui:Shortcut keyCode="X" keyModifier1="CTRL"></xui:Shortcut>

     </xui:MenuItem>

    </xui:Menu>

    <xui:Menu id="menu_1" idref="menuBar_0" enabled="true"

     isPopupMenu="false" isSubMenu="false" label="Bookmarks">

     <xui:MenuItem id="mi_3" idref="menu_1" enabled="true"

      label="Add Bookmark">

      <xui:Shortcut keyCode="D" keyModifier1="CTRL"></xui:Shortcut>

     </xui:MenuItem>

     <xui:MenuItem id="mi_4" idref="menu_0" enabled="true"

      label="Manage Bookmarks">

      <xui:Shortcut keyCode="M" keyModifier1="CTRL"></xui:Shortcut>

     </xui:MenuItem>

    </xui:Menu>

    <xui:Menu id="menu_2" idref="hyper_0" enabled="true" isPopupMenu="true"

     isSubMenu="false" label="">

     <xui:MenuItem id="mi_5" idref="menu_2" enabled="true"

      label="Save As ..."></xui:MenuItem>

     <xui:MenuItem id="mi_6" idref="menu_2" enabled="true" label="Previous"></xui:MenuItem>

     <xui:MenuItem id="mi_7" idref="menu_2" enabled="true" label="Next"></xui:MenuItem>

     <xui:MenuItem id="mi_8" idref="menu_2" enabled="true" label="Home"></xui:MenuItem>

     <xui:MenuItem id="mi_9" idref="menu_2" enabled="true" label="Bookmark"></xui:MenuItem>

    </xui:Menu>

   </xui:MenuBar>

  </xui:Window>


  <!-- The library (model) code that drives the user interface -->

  <xui:Resource type="java" class="BrowserModel" uri="BrowserModel.jar"/>

</xui:XUI>
當然,如果沒有用戶交互,這個 UI 沒有任何價值。下面就介紹如何進行用戶交互。
Web 浏覽器 Java 代碼模型邏輯
在 清單 8 中,Resource 元素包含一個類名,該類充當進入應用程序模型的入口點。清單中給出的類名是 BrowserModel,因此,在 Java 端,已編譯的類名必須與之匹配。類名包括名稱空間,本例中為默認名稱空間。
因此,任何類都可以充當進入應用程序的模型部分的入口點,只要它的名稱與 Resource 元素的class 屬性值相同。要讓用戶交互在運行時能夠正確連接,實現類必須遵循以下幾個規則:
使一個方法帶有以下簽名:public void init(XUI document)。
實現適當的事件處理接口以監聽事件(比如用於 XUIButton 實現的ActionModel)。
使用 XML 元素的id 值引用 GUI 組件(這可以通過使用 XUI 中的幾個方法實現)。
將自身作為監聽器添加到適當的組件。這個框架中的所有事件生成組件(比如 XUIButton 類實現)都實現 XUIEventSource,因此都生成 UI 事件。
在 清單 9 中,BrowserModel 類在 init 方法中執行自己的初始化。初始化過程包括通過 id 值引用組件,創建包含 Web URL 書簽的菜單項,通過 addEventListener 方法將自身作為一個監聽器添加到多個組件。BrowserModel 可以將自身添加為一個監聽器,因為它是一個 XUIModel(ActionModel 是 XUIModel 的子類型)。還有一點值得一提:XUIComponentFactory 類提供多種創建 XUI 組件的方法。
清單 9. 部分代碼清單:初始化
...

import org.purnamaproject.xui.binding.ActionModel;

...


public class BrowserModel implements ActionModel, TextModel, WindowModel,

   ListActionModel {

   ...


   private XUI xui;

   ...

   public void init(XUI document) {

     xui = document;

     ...

     bookmarksList = (XUIList)xui.getXUIComponent("list_0");

     homeButton = (XUIButton)xui.getXUIComponent("button_1");

     ...

     List bookmarks = bookmarksList.getItems();

     for(int i = 0; i < bookmarks.size(); i++) {

       String url = (String)bookmarks.get(i);

       XUIMenuItem aMenuItem = XUIComponentFactory.makeMenuItem(url);

       bookmarksMenu.addMenuItem(aMenuItem);

       linkModel.addSource(aMenuItem);

       aMenuItem.addEventListener(linkModel);

     }

     ...

     homeButton.addEventListener(this);

     ...

   }

...

}
清單 10 顯示了針對各種組件的事件處理代碼,例如:
openMenuItem 將導致一個 fileDialog 出現(一個模式對話框將打開一個本地存儲的Web 網頁)。
homeButton 和 popuphomeMenuItem(在窗口中通過單擊右鍵訪問)都會調用 doHome 方法,該方法將浏覽器導向 HypertextPane 元素(參見 清單 8)的uri 屬性值。
fileDialog 將加載一個新文件,然後遞增 index 變量,應用程序的queue 使用該變量跟蹤此前訪問過的Web 頁面。
清單 10. 部分代碼清單:事件處理
public void action(XUIComponent component)

   {

     if(component == openMenuItem) {

       fileDialog.setVisible(true);


     } else if(component == homeButton || component == popuphomeMenuItem) {

       doHome();


     } else if(component == prevButton || component == popupprevMenuItem) {

       doPrevious();


     } else if(component == nextButton || component == popupnextMenuItem) {

       doNext();


     } else if(component == fileDialog) {

       if(fileDialog.getSelectedFile() !=null)

         hyperTextPane.setURL(fileDialog.getSelectedFileAsURL());


       index++;

       if(index != queue.size()) {

         nextButton.setEnabled(false);

         popupnextMenuItem.setEnabled(false);

         for(int i = index; i < queue.size(); i++) {

           queue.remove(i);

         }

       }

       queue.add(hyperTextPane.getURL());


       prevButton.setEnabled(true);

       popupprevMenuItem.setEnabled(true);


     } else if(component == saveDialog) {

       try {

         FileOutputStream fos = new FileOutputStream(saveDialog.getSelectedFile());

         hyperTextPane.getDocument().writeTo(fos);


       } catch (FileNotFoundException fnfe) {

         fnfe.printStackTrace();

       } catch (IOException ioe) {

         ioe.printStackTrace();

       }


     } else if(component == popupsaveasMenuItem || component == saveMenuItem) {

       saveDialog.setVisible(true);


     } else if(component == popupbookmarkMenuItem || component == bookmarkMenuItem) {

       doBookmark(hyperTextPane.getURL());


     } else if(component == notDontExit) {

       exitDialog.setVisible(false);

       browserWindow.setVisible(true);


     } else if(component == yesExit) {

       System.exit(0);

     } else if(component == exitMenuItem) {

       exitDialog.setVisible(true);


     } else if(component == manageBookmarksMenuItem) {

       bookmarksDialog.setVisible(true);

     }

   }
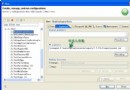
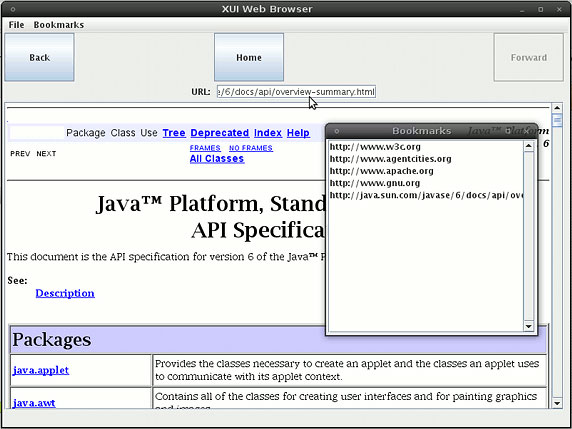
圖 2 中最後的應用程序展示了一個基本的Web 浏覽器,它允許顯示本地頁面、基於 Web 的頁面和此前訪問過的Web 頁面,並提供書簽管理功能。
圖 2. Web 浏覽器的屏幕截圖
本文的下載 部分包含其他幾個示例應用程序。
問題和挑戰
盡管這個解決方案很精彩,但這種方法是相當理想化的:框架中的安全問題被忽略了。回想一下這個 API 是如何隨意地從任何 URI 加載 JAR 文件的。回顧一下 清單 8 中的Resource 元素。其類型實際上是 anyURI,這意味著本地文件、網絡上的文件和 Internet 上的文件。一個應用程序應該信任來自任何地方的業務邏輯嗎?顯然,您需要考慮某種安全模型以限制不可信資源的加載。解決這個問題的一種方法是通過引用一個查找表來限制 URI。另一種更干淨的方法是使用數字證書。
最後要注意一點,在這個聲明性 XML UI 格式中可以加載其他 XML 格式。由於需要使用名稱空間,這個 XML 模式支持這個功能。作為一個示例,您可以在 XML 文檔中嵌入一個單獨的XML 格式來表示可伸縮的矢量圖形。
結束語
本文介紹了聲明性 XML UI 語言的定義和外觀,一個配套 Java 框架和一個示例應用程序 — 一個 Web 浏覽器。最後,本文提出了潛在的安全問題和其他應該關注的問題。
創建聲明性 XML UI 並不是什麼新技術,它是一個日漸成熟和應用廣泛的軟件開發領域。這種技術的好處之一是有助於促進軟件重用和模塊化。
本文配套源碼