提供一篇關於java中使用Struts 2框架上傳文件代碼哦,動態文件上傳,有需要的朋友可以參考一下。
HTML表單默認值:
代碼如下 復制代碼<form action="" enctype="application/x-www-form-urlencoded" method="get">要使用HTML表單上傳文件,需要將HTML表單的enctype屬性設置為"multipart/form-data",還需要將表單的method屬性設置為"post"
...
</form>
代碼如下 復制代碼<form action="" enctype="multipart/form-data" method="post">為了能使用戶能夠選擇文件上傳,表單中至少應該提供一個<input type="file">字段:
...
</form>
代碼如下 復制代碼<form action="multi_upload.action" enctype="multipart/form-data" method="post" id="uploadForm">在浏覽器顯示的效果:
Choose a file to Upload:<input type="file" name="file"/><br />
<input type="submit" value="submit"/>
</form>

使用Struts 2框架上傳文件的准備工作
第一步、在JSP頁面中使用Struts 2標簽庫中的file標簽,給它取一個容易理解的名字,若要上傳多個文件就必須使用多個file標簽,但它們的名字必須相同:
代碼如下 復制代碼<s:form action="multi_upload" method="post" enctype="multipart/form-data">Struts 2的file標簽,在浏覽器中會被映射為<input type="file" name="attachment">。
<s:file name="attachment" label="Attachment 1"/>
<s:file name="attachment" label="Attachment 2"/>
<s:file name="attachment" label="Attachment 3"/>
<s:submit value="submit"/>
</s:form>
第二步、創建接收上傳文件信息的動作類。該動作類被約定為必須帶有3個屬性,並且這三個屬性的命名必須符合是下面的規定
這裡的[inputName]是表單上file標簽的名字,例如,file標簽的name="attachment",你的這三個屬性的名字必須命名為attachmentFile、attachmentFileName和attachmentContentType。
若只是上傳單個文件,則[inputName]File屬性的類型為 Java.io.File,它代表的是上傳的文件,第二個和第三個屬性都為String類型,他們分別代表被上傳文件的文件名和內容類型。若要上傳多個文件,則可以使用數組或Java.util.List。
代碼如下 復制代碼private File[] attachmentFile;
private String[] attachmentFileName;
private String[] attachmentContentType;或
private List<File> attachmentFile;
private List<String> attachmentFileName;
private List<String> attachmentContentType;
第三步、將上傳的文件保存到一個指定的文件夾下或數據庫中。
示例:Struts 2單文件上傳
接收上傳文件的動作類:
代碼如下 復制代碼public class SingleFileUploadAction extends ActionSupport
{
private static final long serialVersionUID = 742220866388022377L;
private File attachment; // 用戶上傳的文件
private String attachmentFileName; // 上傳文件的文件名
private String attachmentContentType; // 上傳文件的類型
private String description; // 用戶的描述
/*
* SingleFileUploadAction的屬性的getter和setter方法
*/
public File getAttachment()
{
return attachment;
}
public void setAttachment(File attachment)
{
this.attachment = attachment;
}
public String getAttachmentFileName()
{
return attachmentFileName;
}
public void setAttachmentFileName(String attachmentFileName)
{
this.attachmentFileName = attachmentFileName;
}
public String getAttachmentContentType()
{
return attachmentContentType;
}
public void setAttachmentContentType(String attachmentContentType)
{
this.attachmentContentType = attachmentContentType;
}
public String getDescription()
{
return description;
}
public void setDescription(String description)
{
this.description = description;
}
public String execute() throws Exception
{
if (attachment != null)
{
String dataDir = "d:\images";// 上傳文件存放的目錄
File savedFile = new File(dataDir, attachmentFileName);// 上傳文件在服務器具體的位置
attachment.renameTo(savedFile);// 將上傳文件從臨時文件復制到指定文件
}
else
{
return INPUT;
}
return SUCCESS;
}
}上傳文件的表單:
<s:form action="single_upload" method="post" enctype="multipart/form-data">
<s:textfield name="description" label="description"></s:textfield>
<s:file name="attachment" label="Choose a File to Upload"></s:file>
<s:submit value="submit"></s:submit>
</s:form>
struts.xml的配置信息:
代碼如下 復制代碼<action name="single_upload" class="struts2.suxiaolei.fileupload.action.SingleFileUploadAction">測試:
<result name="success">/success_single_upload.jsp</result>
<result name="input">/single_upload.jsp</result>
<interceptor-ref name="defaultStack">
<param name="fileUpload.maximumSize">100000</param>
<param name="fileUpload.allowedTypesSet">image/gif,image/jpeg,image/png</param>
</interceptor-ref>
</action>
浏覽器輸入http://localhost:8081/Struts2/single_upload.jsp,得到如下頁面:
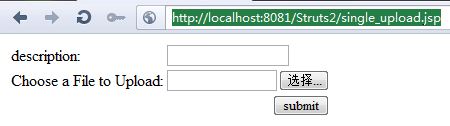
填寫信息和選擇一個需要上傳的文件
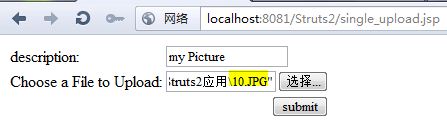
點擊"submit"按鈕上傳文件,查看D盤下images文件夾下的文件:
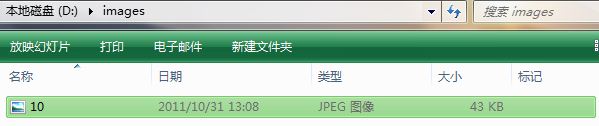
上傳單個文件成功!
示例:動態多文件上傳
創建HTML表單
代碼如下 復制代碼<form action="multi_upload.action" enctype="multipart/form-data" method="post">
<table>
<tr>
<td>
Choose a file to Upload:
</td>
<td id="more">
<input type="file" name="file"/><input type="button" value="Add More..."onclick="addMore();"/>
</td>
</tr>
<tr>
<td>
</td>
<td>
<input type="submit" value="submit"/>
</td>
</tr>
</table>
</form>創建JavaScript代碼,使表單能動態增減上傳文件的個數
<script type="text/javascript">
function addMore()
{
var td = document.getElementById("more");//獲取id="more"的元素,該元素用於容納動態增減的上傳文件元素
var br = document.createElement("br");//創建<br />元素
var input = document.createElement("input");//創建<input>元素,設置該元素的屬性為<input type="file" name="file" />,用於選擇上傳的文件
var button = document.createElement("input");//創建<input>元素,設置該元素的屬性為<input type="button" value="remove" />,用於移除上傳標簽
input.type = "file";
input.name = "file";
button.type = "button";
button.value = "remove";
//移除上傳標簽
button.onclick = function()
{
td.removeChild(br);
td.removeChild(input);
td.removeChild(button);
};
/*
* 添加上傳標簽
*/
td.appendChild(br);
td.appendChild(input);
td.appendChild(button);
}
</script>接收多個上傳文件的動作類:
public class MultiFileUploadAction extends ActionSupport
{
private static final long serialVersionUID = -5056971793538814980L;
private List<File> fileFile;
private List<String> fileFileName;
private List<String> fileContentType;
public List<File> getFileFile()
{
return fileFile;
}
public void setFileFile(List<File> fileFile)
{
this.fileFile = fileFile;
}
public List<String> getFileFileName()
{
return fileFileName;
}
public void setFileFileName(List<String> fileFileName)
{
this.fileFileName = fileFileName;
}
public List<String> getFileContentType()
{
return fileContentType;
}
public void setFileContentType(List<String> fileContentType)
{
this.fileContentType = fileContentType;
}
@Override
public String execute()
{
if (fileFile.size() == 0)
{
return INPUT;
}
else
{
for (int index = 0; index < fileFile.size(); index++)
{
String targetDir = "d:\images";
File savedFile = new File(targetDir, fileFileName.get(index));
fileFile.get(index).renameTo(savedFile);
}
}
return SUCCESS;
}
}struts.xml配置信息:
<action name="multi_upload" class="struts2.suxiaolei.fileupload.action.MultiFileUploadAction">
<result name="success">/success_multi_upload.jsp</result>
<result name="input">/multi_upload.jsp</result>
<interceptor-ref name="defaultStack">
<param name="fileUpload.maximumSize">100000</param>
<param name="fileUpload.allowedTypesSet">image/gif,image/jpeg,image/png</param>
</interceptor-ref>
</action>
success_multi_upload.jsp:
<s:property value="fileFileName"/> Upload Successfully!
測試:
浏覽器中輸入:http://localhost:8081/Struts2/multi_upload.jsp,獲得如下界面:

點擊"Add More..."按鈕,我們要上傳10個文件:
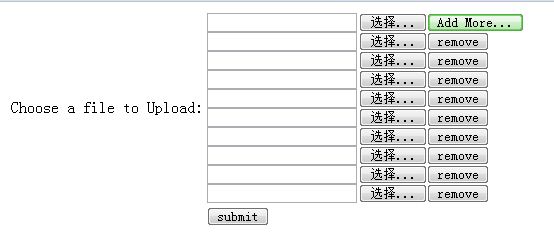
可以看到現在頁面動態的增加了上傳文件的個數,我們還可以點擊"remove"按鈕動態減少上傳文件的個數,下面選擇上傳文件:
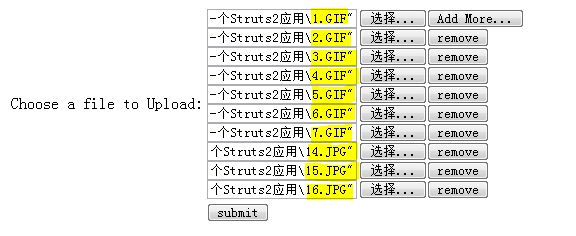
點擊"submit"按鈕上傳文件:

查看D盤下images文件夾:
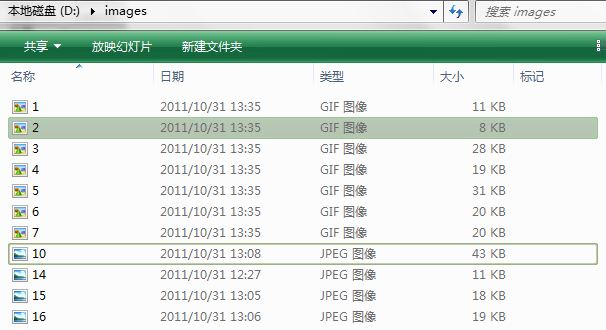
可以看到我們選擇的文件都上傳成功了!