最近項目中需要用到圖片的一些特殊處理——比如:根據用戶請求生成任意尺寸的圖像。經過一些資料的查找,最終選用了php_imagick。 利用ImageMagick,你可以根據web應用程序的需要動態生成圖片, 還可以對一個(或一組)圖片進行改變大小、旋轉、銳化、減色或增加特效等操作,並將操作的結果以相同格式或其它格式保存。接下來吾愛編程為大家介紹一下如何在 windows下安裝php_imagick拓展。
#下載頁面:
http://www.imagemagick.org/script/binary-releases.php#windows
#直接下載:
http://www.imagemagick.org/download/binaries/ImageMagick-6.6.3-0-Q16-windows-dll.exe
安裝路徑隨意,我的安裝是:
D:\WampServer\bin\ImageMagick-6.6.3-Q16
如果不加入環境變量的話,可以先下面方式測試:
Open the command prompt (Run->”CMD”->ENTER) and type in convert and press enter. You should see the help parameters of convert
cd D:\WampServer\bin\ImageMagick-6.6.3-Q16 # 回車
D:\WampServer\bin\ImageMagick-6.6.3-Q16>convert
Version: ImageMagick 6.6.3-0 2010-07-01 Q16 http://www.imagemagick.org
Copyright: Copyright (C) 1999-2010 ImageMagick Studio LLC
Features: OpenMP
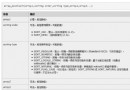
Usage: Magick [options ...] file [ [options ...] file ...] [options ...] file
Image Settings:
-adjoin join images into a single multi-image file
-affine matrix affine transform matrix
-alpha option activate, deactivate, reset, or set the alpha channel
-antialias remove pixel-aliasing
-authenticate password
decipher image with this password
-attenuate value lessen (or intensify) when adding noise to an image
-background color background color
-bias value add bias when convolving an image
-black-point-compensation
use black point compensation
-blue-primary point chromaticity blue primary point
-bordercolor color border color
-caption string assign a caption to an image
.......
......
......
加入環境變量,方便以後使用(我的是WIndows7 系統):
我的電腦-》右鍵屬性-》高級系統設置-》高級-》環境變量-》系統變量-》
-》找到Path, 點擊編輯加入:
D:\WampServer\bin\ImageMagick-6.6.3-Q16;
加入完成之後,可以直接在命令行(CMD)使用convert了。
Again the version problem, well if you are using PHP 5.2.x this is where you will get your dll.
我使用的是 (php5.2.9-2):php_imagick_dyn-Q16.dll
dyn = dynamic, st = static, q16 = 16 bit, q8= 8 bit. This should match your downloaded version of course. If you downloaded q16 dynamic library, your file will be php_imagick_dyn-Q16.dll
If you are using PHP 5.3.x, this is your location to download.
下載的php_imagick_dyn-Q16.dll保存到
D:\WampServer\bin\php\php5.2.9-2\ext\
然後編輯 PHP.ini
找到dll這裡,加入下面的最後一行:
;extension=php_sybase_ct.dll
;extension=php_tidy.dll
;extension=php_xmlrpc.dll
;extension=php_xsl.dll
;extension=php_zip.dll
extension=php_imagick.dll
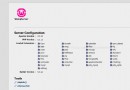
如果有imagick項應該成功了
$im = new imagick( 'a.jpg' );
// resize by 200 width and keep the ratio
$im->thumbnailImage( 200, 0);
// write to disk
$im->writeImage( 'a_thumbnail.jpg' );
好了,完成了。
*