本文講解如何快速打包和安裝MySQL, MySQL AB復制,MySQL AB雙向復制,MySQL多級主從復制,解決AB雙向復制主鍵沖突。
首先我們先介紹什麼是MySQL AB復制。
AB復制又稱主從復制,實現的是數據同步。如果要做MySQL AB復制,數據庫版本盡量保持一致。如果版本不一致,從服務器版本高於主服務器,但是版本不一致不能做雙向復制。MySQL AB復制有什麼好處呢?有兩點,第一是解決宕機帶來的數據不一致,因為MySQL AB復制可以實時備份數據;第二點是減輕數據庫服務器壓力,這點很容易想到,多台服務器的性能一般比單台要好。但是MySQL AB復制不適用於大數據量,如果是大數據環境,推薦使用集群。
然後我們來看看MySQL復制的 3 個主要步驟:
1)主服務器把數據更改記錄到二進制日志中,這個操作叫做二進制日志事件;
2)從服務器把主服務器的二進制日志事件拷貝到自己的中繼日志(relay log)中;
3)從服務器執行中繼日志中的事件,把更改應用到自己的數據上。
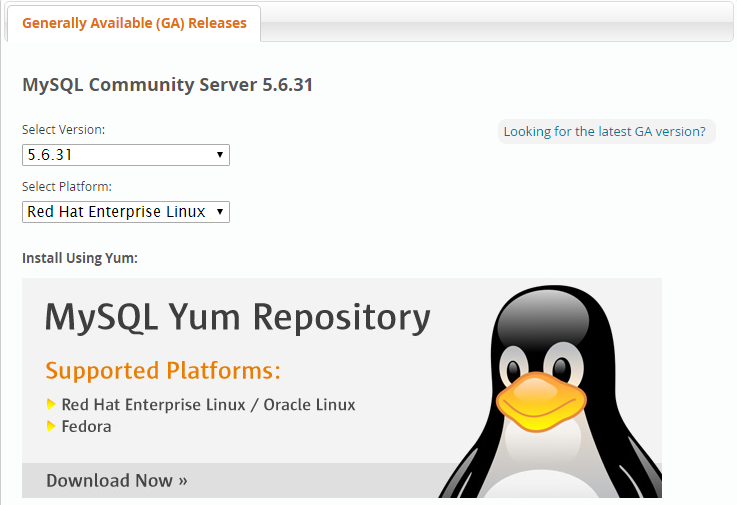
在正式介紹MySQL AB復制之前,介紹怎樣打包MySQL和快速安裝MySQL。
第一步,制作文件。
find /usr/local/mysql/ /etc/my.cnf /etc/init.d/mysqld > mysql第二步,打包。
tar -cPvzf mysql-5.5.29-linux2.6-x86_64.tar.gz -T mysql
ll -h
第三步,拷貝文件到實體機。
scp mysql-5.5.29-linux2.6-x86_64.tar.gz 192.168.1.1:/home/Wentasy/software/第四步,拷貝文件到serv01。
yum install /usr/bin/scp -y
scp /home/Wentasy/software/mysql-5.5.29-linux2.6-x86_64.tar.gz 192.168.1.11:/opt
第五步,解壓。
tar -xPvf mysql-5.5.29-linux2.6-x86_64.tar.gz第六步,創建組和用戶,注意編號和安裝好數據庫的機器上的用戶一致。
groupadd -g 500 mysql
useradd -u 500 -g 500 -r -M -s /sbin/nologin mysql
id mysql
第七步,改變MySQL安裝目錄的擁有者和所屬組。
chown mysql.mysql /usr/local/mysql/ -R第八步,啟動MySQL,做測試。
/etc/init.d/mysqld start
Starting MySQL.. SUCCESS!

# 將mysql命令加入到profile。
vim ~/.bash_profile
. !$
mysql
Type 'help;' or '\h' for help. Type '\c' to clear the current input statement.

mysql>好了,相信讀者已經學會怎樣打包MySQL和快速安裝MySQL,接下來正式進入主題,我們先來看看一主多從架構的拓撲圖:
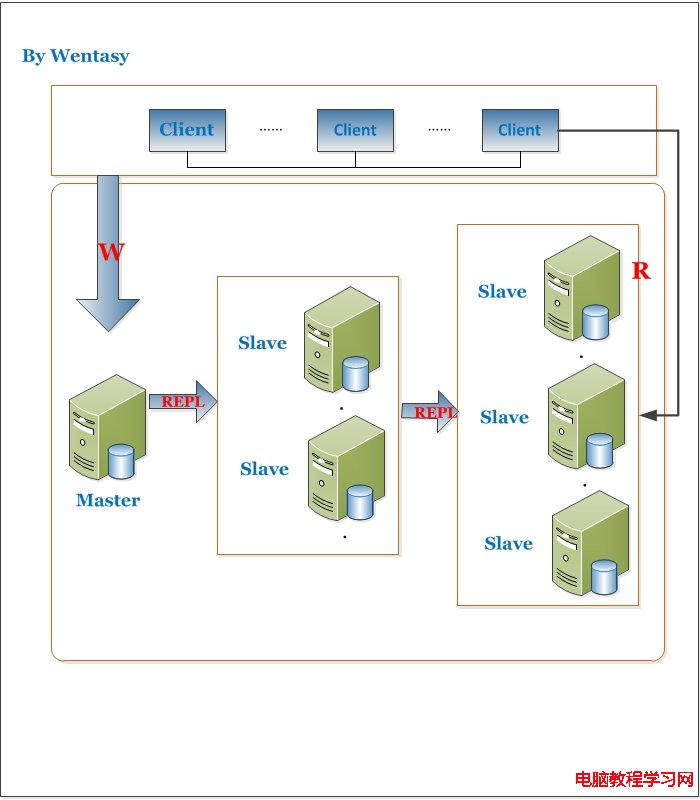
圖一 一主多從架構
該圖展示了一個 master 復制多個 slave 的架構,多個 slave 和單個 slave 的實施並沒有實質性的區別,在 master 端並不在乎有多少個 slave 連接自己,只要有 slave 的 IO 線程通過了連接認證,向他請求指定位置之後的 binary log 信息,他就會按照該 IO 線程的要球,讀取自己的binary log 信息,返回給 slave的 IO 線程。
既然對拓撲圖和原理有所了解,我們做一個實驗,介紹如何使用MySQL AB復制:
實驗環境介紹
主機
IP地址
主機名
備注
serv01:
192.168.1.11
serv01.host.com
master
serv08:
192.168.1.18
serv08.host.com
slave01
操作系統版本:rhel server 6.1
所需要的軟件包:mysql-5.5.29-linux2.6-x86_64.tar.gz
第一步,主服務器創建用戶並清空日志。
mysql> show privileges;
mysql> grant replication client, \
replication slave on *.* to 'larry'@'192.168.1.%' \
identified by 'larry';
Query OK, 0 rows affected (0.00 sec)

mysql> show binary logs;
+------------------+-----------+
| Log_name         | File_size |
+------------------+-----------+
| mysql-bin.000001 |     27320 |
| mysql-bin.000002 |   1035309 |
| mysql-bin.000003 |       126 |
| mysql-bin.000004 |       279 |
+------------------+-----------+
4 rows in set (0.00 sec)

mysql> show databases;
+--------------------+
| Database           |
+--------------------+
| information_schema |
| mysql              |
| performance_schema |
| test               |
+--------------------+
4 rows in set (0.01 sec)

mysql> reset master;
Query OK, 0 rows affected (0.02 sec)

mysql> show binary logs;
+------------------+-----------+
| Log_name         | File_size |
+------------------+-----------+
| mysql-bin.000001 |       107 |
+------------------+-----------+
1 row in set (0.00 sec)
第二步,修改從服務器的server-id。
cat /etc/my.cnf | grep server-id
server-id = 1
#server-id       = 2

vim /etc/my.cnf
cat /etc/my.cnf | grep server-id
server-id = 2
#server-id       = 2

/etc/init.d/mysqld restart
Shutting down MySQL... SUCCESS!
Starting MySQL.. SUCCESS!

#可以查看從服務器中的數據文件
cd /usr/local/mysql/data/
ll
第三步,從服務器清空日志。
mysql> show binary logs;
ERROR 2006 (HY000): MySQL server has gone away
No connection. Trying to reconnect...
Connection id:    1
Current database: *** NONE ***

+------------------+-----------+
| Log_name         | File_size |
+------------------+-----------+
| mysql-bin.000001 |     27320 |
| mysql-bin.000002 |   1035309 |
| mysql-bin.000003 |       126 |
| mysql-bin.000004 |       126 |
| mysql-bin.000005 |       107 |
+------------------+-----------+
5 rows in set (0.00 sec)

mysql> reset master;
Query OK, 0 rows affected (0.02 sec)

mysql> show binary logs;
+------------------+-----------+
| Log_name         | File_size |
+------------------+-----------+
| mysql-bin.000001 |       107 |
+------------------+-----------+
1 row in set (0.00 sec)

mysql> show slave status;
Empty set (0.00 sec)
第四步,從服務器通過change master to命令修改設置。
mysql> change master to
    -> master_host='192.168.1.11',
    -> master_user='larry',
    -> master_password='larry',
    -> master_port=3306,
    -> master_log_file='mysql-bin.000001',
    -> master_log_pos=107;
Query OK, 0 rows affected (0.01 sec)
第五步,開啟slave。
mysql> show slave status \G;
*************************** 1. row ***************************
               Slave_IO_State:
                  Master_Host: 192.168.1.11
                  Master_User: larry
                  Master_Port: 3306
                Connect_Retry: 60
              Master_Log_File: mysql-bin.000001
          Read_Master_Log_Pos: 107
               Relay_Log_File: serv08-relay-bin.000001
                Relay_Log_Pos: 4
        Relay_Master_Log_File: mysql-bin.000001
             **Slave_IO_Running: No**
            **Slave_SQL_Running: No**
              Replicate_Do_DB:
          Replicate_Ignore_DB:
           Replicate_Do_Table:
       Replicate_Ignore_Table:
      Replicate_Wild_Do_Table:
  Replicate_Wild_Ignore_Table:
                   Last_Errno: 0
                   Last_Error:
                 Skip_Counter: 0
          Exec_Master_Log_Pos: 107
              Relay_Log_Space: 107
              Until_Condition: None
               Until_Log_File:
                Until_Log_Pos: 0
           Master_SSL_Allowed: No
           Master_SSL_CA_File:
           Master_SSL_CA_Path:
              Master_SSL_Cert:
            Master_SSL_Cipher:
               Master_SSL_Key:
        Seconds_Behind_Master: NULL
Master_SSL_Verify_Server_Cert: No
                Last_IO_Errno: 0
                Last_IO_Error:
               Last_SQL_Errno: 0
               Last_SQL_Error:
  Replicate_Ignore_Server_Ids:
             Master_Server_Id: 0
1 row in set (0.00 sec)

ERROR:
No query specified

mysql> start slave;
Query OK, 0 rows affected (0.01 sec)
第六步,從服務器查看是否和主服務器通信成功。如果出現 Slave_IO_Running和Slave_SQL_Running都是yes,則證明配置成功。
*************************** 1. row ***************************
               Slave_IO_State: Waiting for master to send event
                  Master_Host: 192.168.1.11
                  Master_User: larry
                  Master_Port: 3306
                Connect_Retry: 60
              Master_Log_File: mysql-bin.000001
          Read_Master_Log_Pos: 107
               Relay_Log_File: serv08-relay-bin.000002
                Relay_Log_Pos: 253
        Relay_Master_Log_File: mysql-bin.000001
             **Slave_IO_Running: Yes**
            **Slave_SQL_Running: Yes**
              Replicate_Do_DB:
          Replicate_Ignore_DB:
           Replicate_Do_Table:
       Replicate_Ignore_Table:
      Replicate_Wild_Do_Table:
  Replicate_Wild_Ignore_Table:
                   Last_Errno: 0
                   Last_Error:
                 Skip_Counter: 0
          Exec_Master_Log_Pos: 107
              Relay_Log_Space: 410
              Until_Condition: None
               Until_Log_File:
                Until_Log_Pos: 0
           Master_SSL_Allowed: No
           Master_SSL_CA_File:
           Master_SSL_CA_Path:
              Master_SSL_Cert:
            Master_SSL_Cipher:
               Master_SSL_Key:
        Seconds_Behind_Master: 0
Master_SSL_Verify_Server_Cert: No
                Last_IO_Errno: 0
                Last_IO_Error:
               Last_SQL_Errno: 0
               Last_SQL_Error:
  Replicate_Ignore_Server_Ids:
             Master_Server_Id: 1
1 row in set (0.00 sec)

ERROR:
No query specified
mysql> show slave status \G;
第七步,從服務器查看數據文件的更改.
ll
total 28724
-rw-rw----. 1 mysql mysql 18874368 Oct  5 19:45 ibdata1
-rw-rw----. 1 mysql mysql  5242880 Oct  5 19:45 ib_logfile0
-rw-rw----. 1 mysql mysql  5242880 Oct  5 18:16 ib_logfile1
-rw-rw----. 1 mysql mysql       78 Oct  5 19:49 master.info
drwxr-xr-x. 2 mysql mysql     4096 Oct  5 18:15 mysql
-rw-rw----. 1 mysql mysql      107 Oct  5 19:45 mysql-bin.000001
-rw-rw----. 1 mysql mysql       19 Oct  5 19:45 mysql-bin.index
drwx------. 2 mysql mysql     4096 Oct  5 18:15 performance_schema
-rw-rw----. 1 mysql mysql       51 Oct  5 19:49 relay-log.info
-rw-r-----. 1 mysql root      5589 Oct  5 19:49 serv08.host.com.err
-rw-rw----. 1 mysql mysql        5 Oct  5 19:45 serv08.host.com.pid
-rw-rw----. 1 mysql mysql      157 Oct  5 19:49 serv08-relay-bin.000001
-rw-rw----. 1 mysql mysql      253 Oct  5 19:49 serv08-relay-bin.000002
-rw-rw----. 1 mysql mysql       52 Oct  5 19:49 serv08-relay-bin.index
drwxr-xr-x. 2 mysql mysql     4096 Oct  5 18:12 test

cat relay-log.info
./serv08-relay-bin.000002
253
mysql-bin.000001
107

cat master.info
18
mysql-bin.000001
107
192.168.1.11
larry
larry
3306
第八步,測試。
--serv08查看數據庫
mysql> show databases;
+--------------------+
| Database           |
+--------------------+
| information_schema |
| mysql              |
| performance_schema |
| test               |
+--------------------+
4 rows in set (0.02 sec)

--serv01創建數據庫
mysql> create database larrydb;
Query OK, 1 row affected (0.00 sec)
--serv01查看數據庫
mysql> show databases;
+--------------------+
| Database           |
+--------------------+
| information_schema |
| larrydb            |
| mysql              |
| performance_schema |
| test               |
+--------------------+
5 rows in set (0.01 sec)

--serv08查看數據庫,發現已經同步
mysql> show databases;
+--------------------+
| Database           |
+--------------------+
| information_schema |
| larrydb            |
| mysql              |
| performance_schema |
| test               |
+--------------------+
5 rows in set (0.00 sec)

--serv01創建表 插入數據
mysql> use larrydb;
Database changed
mysql> create table test(id int(11));
Query OK, 0 rows affected (0.00 sec)

mysql> insert into test values(1);
Query OK, 1 row affected (0.00 sec)

--serv08查看數據是否同步成功,發現數據已經同步
mysql> use larrydb;
Database changed
mysql> show tables;
+-------------------+
| Tables_in_larrydb |
+-------------------+
| test              |
+-------------------+
1 row in set (0.00 sec)

mysql> select * from test;
+------+
| id   |
+------+
|    1 |
+------+
1 row in set (0.00 sec)
第九步,查看進程狀態。
--serv01查看進程狀態
mysql> show processlist;
+----+-------+--------------------+---------+-------------+------+-----------------------------------------------------------------------+------------------+
| Id | User  | Host               | db      | Command     | Time | State                                                                 | Info             |
+----+-------+--------------------+---------+-------------+------+-----------------------------------------------------------------------+------------------+
|  1 | root  | localhost          | larrydb | Query       |    0 | NULL                                                                  | show processlist |
|  2 | larry | 192.168.1.18:41393 | NULL    | Binlog Dump |  854 | Master has sent all binlog to slave; waiting for binlog to be updated | NULL             |
+----+-------+--------------------+---------+-------------+------+-----------------------------------------------------------------------+------------------+
2 rows in set (0.00 sec)

--serv08查看進程狀態
mysql> show processlist;
+----+-------------+-----------+---------+---------+------+-----------------------------------------------------------------------------+------------------+
| Id | User        | Host      | db      | Command | Time | State                                                                       | Info             |
+----+-------------+-----------+---------+---------+------+-----------------------------------------------------------------------------+------------------+
|  1 | root        | localhost | larrydb | Query   |    0 | NULL                                                                        | show processlist |
|  2 | system user |           | NULL    | Connect |  880 | Waiting for master to send event                                            | NULL             |
|  3 | system user |           | NULL    | Connect |   65 | Slave has read all relay log; waiting for the slave I/O thread to update it | NULL             |
+----+-------------+-----------+---------+---------+------+-----------------------------------------------------------------------------+------------------+
3 rows in set (0.00 sec)好了,MySQL AB單向復制介紹完畢。接下來想想,會有這樣的應用場景。比如Master和Slave之間都要進行數據同步,那麼單向復制是無法完成的,因為一個是Master,一個是Slave,只能單向操作,這就像網絡裡的半雙工一樣。既然一方可以向另一方同步數據,那麼兩方都做成Master 不就可以實現互相同步數據了。這就是接下來要介紹的MySQL AB雙向復制。同樣我們來看看MySQL AB雙向復制的拓撲圖。
圖二 MySQL AB雙向復制
既然對拓撲圖和原理有所了解,我們做一個實驗,介紹如何使用MySQL AB雙向復制,注意該實驗是在MySQL單級復制的基礎上做的。
實驗環境介紹
主機
IP地址
主機名
備注
serv01:
192.168.1.11
serv01.host.com
master
serv08:
192.168.1.18
serv08.host.com
slave01
操作系統版本:rhel server 6.1
所需要的軟件包:mysql-5.5.29-linux2.6-x86_64.tar.gz
第一步,serv08創建授權用戶。
mysql> grant replication client, \
replication slave on *.* to 'larry'@'192.168.1.%' \
identified by 'larry';
Query OK, 0 rows affected (0.01 sec)
第二步,serv08清空日志。
mysql> show binary logs;
+------------------+-----------+
| Log_name         | File_size |
+------------------+-----------+
| mysql-bin.000001 |       286 |
+------------------+-----------+
1 row in set (0.00 sec)

mysql> reset master;
Query OK, 0 rows affected (0.00 sec)

mysql> show binary logs;
+------------------+-----------+
| Log_name         | File_size |
+------------------+-----------+
| mysql-bin.000001 |       107 |
+------------------+-----------+
1 row in set (0.00 sec)
第三步,serv01使用change master to命令修改從服務器設置。
mysql> show slave status;
Empty set (0.00 sec)

mysql> change master to
    -> master_host='192.168.1.18',
    -> master_user='larry',
    -> master_password='larry',
    -> master_port=3306,
    -> master_log_file='mysql-bin.000001',
    -> master_log_pos=107;
Query OK, 0 rows affected (0.01 sec)
第四步,serv01開啟slave。
mysql> start slave;
Query OK, 0 rows affected (0.01 sec)

mysql> show slave status \G;
*************************** 1. row ***************************
               Slave_IO_State: Waiting for master to send event
                  Master_Host: 192.168.1.18
                  Master_User: larry
                  Master_Port: 3306
                Connect_Retry: 60
              Master_Log_File: mysql-bin.000001
          Read_Master_Log_Pos: 107
               Relay_Log_File: serv01-relay-bin.000002
                Relay_Log_Pos: 253
        Relay_Master_Log_File: mysql-bin.000001
             **Slave_IO_Running: Yes**
            **Slave_SQL_Running: Yes**
              Replicate_Do_DB:
          Replicate_Ignore_DB:
           Replicate_Do_Table:
       Replicate_Ignore_Table:
      Replicate_Wild_Do_Table:
  Replicate_Wild_Ignore_Table:
                   Last_Errno: 0
                   Last_Error:
                 Skip_Counter: 0
          Exec_Master_Log_Pos: 107
              Relay_Log_Space: 410
              Until_Condition: None
               Until_Log_File:
                Until_Log_Pos: 0
           Master_SSL_Allowed: No
           Master_SSL_CA_File:
           Master_SSL_CA_Path:
              Master_SSL_Cert:
            Master_SSL_Cipher:
               Master_SSL_Key:
        Seconds_Behind_Master: 0
Master_SSL_Verify_Server_Cert: No
                Last_IO_Errno: 0
                Last_IO_Error:
               Last_SQL_Errno: 0
               Last_SQL_Error:
  Replicate_Ignore_Server_Ids:
             Master_Server_Id: 2
1 row in set (0.00 sec)

ERROR:
No query specified
第五步,測試。
--serv01查看數據
mysql> use larrydb;
Database changed
mysql> select * from test;
+------+
| id   |
+------+
|    1 |
+------+
1 row in set (0.00 sec)

--serv08插入數據
mysql> use larrydb;
Database changed
mysql> select * from test;
+------+
| id   |
+------+
|    1 |
+------+
1 row in set (0.00 sec)

mysql> insert into test values(2);
Query OK, 1 row affected (0.00 sec)

--serv01查看數據,數據更新
mysql> select * from test;
+------+
| id   |
+------+
|    1 |
|    2 |
+------+
2 rows in set (0.00 sec)

--serv01插入數據
mysql> insert into test values(3);
Query OK, 1 row affected (0.01 sec)

--serv01查詢數據
mysql> select * from test;
+------+
| id   |
+------+
|    1 |
|    2 |
|    3 |
+------+
3 rows in set (0.00 sec)

--serv08查詢數據,數據已更新
mysql> select * from test;
+------+
| id   |
+------+
|    1 |
|    2 |
|    3 |
+------+
3 rows in set (0.00 sec)好了,MySQL AB雙向復制介紹完畢,我們又想了,不管是MySQL AB單向復制,還是MySQL 雙向復制,都是雙方的關系。MySQL AB單向復制可以是一對一,也就是一個Master對應一個Slave,或者一對多,也就是一個Master對應多個Slave;MySQL雙向復制是一對一的關系。我們可不可以這樣,實現多級關系,一個Master,接下來Slave,Slave下面還有Slave。這樣做有什麼好處呢?這樣可以緩解數據庫壓力。這就是接下來要介紹的MySQL多級主從復制。多級也就是A—->B—->C,A作為主服務器,B是從服務器,B跟A建立主從關系;而且B是主服務器,C作為從服務器,B跟C建立主從關系。這樣:A是主服務器,B既是主服務器,又是從服務器,C是從服務器。同樣,我們來看看MySQL 多級主從復制的拓撲圖: