一、下載軟件
從這裡download Oracle10g for AIX5L的軟件:
http://otn.oracle.com/software/products/database/oracle10g/htdocs/aix5lsoft.html
然後上傳到server上。並使用gunzip和cpio解包解壓:
$gunzip ship.db.aix.disk1.cpio.gz
$gunzip ship.db.aix.disk2.cpio.gz
$cpio -idcmv <ship.db.aix.disk1.cpio
$cpio -idcmv <ship.db.aix.disk2.cpio
二、確認系統硬件環境
Oracle10g最低安裝要求:
512M物理內存、MIN(RAM*2,2G) SWAP空間、400M /TMP空間、4G Oracle目錄空間、64位體系結構
下面是確認過程:
1、確認內存大小(1G)
localhost> /usr/sbin/lsattr -E -l sys0 -a realmem
realmem 1048576 Amount of usable physical memory in Kbytes False
這裡oracle10g安裝文檔創砹耍皊ys0(數字0)”寫成了“sysO(字母O)”。
2、確認SWAP空間,512M太小了,加到2G。
localhost> /usr/sbin/lsps -a
Page Space Physical Volume Volume Group Size %Used Active Auto Type
hd6 hdisk0 rootvg 512MB 12 yes yes lv
3、確認/TMP和Oracle目錄空間(其中Oracle10g放在/data1下):
localhost> df -k
Filesystem 1024-blocks Free %Used Iused %Iused Mounted on
/dev/hd4 32768 14676 56% 2176 14% /
/dev/hd2 1933312 516400 74% 35398 8% /usr
/dev/hd9var 65536 43496 34% 623 4% /var
/dev/hd3 917504 691884 25% 1034 1% /tmp
/dev/hd1 10911744 4097144 63% 18636 1% /home
/proc - - - - - /proc
/dev/hd10opt 32768 23328 29% 362 5% /opt
/dev/lv00 2097152 937572 56% 708 1% /ptf
/dev/data1lv 13107200 10559980 20% 2735 1% /data1
4、確認系統結構
localhost> /usr/bin/getconf HARDWARE_BITMODE
64
5、我們可以通過下面的命令來確認系統CPU個數和主頻:
# lsdev -C |grep proc
proc0 Available 00-00 Processor
proc1 Available 00-01 Processor
# lsattr -E -l proc0
frequency 752010000 Processor Speed False
state enable Processor state False
type PowerPC_RS64-III Processor type False
# lsattr -E -l proc1
frequency 752010000 Processor Speed False
state enable Processor state False
type PowerPC_RS64-III Processor type False
三、確認系統軟件環境
1、要求AIX必須是5.2 LEVEL 1以上(含LEVEL 1):
localhost> oslevel -r
5200-01
2、要求安裝了這些FILESETS:
localhost> lslpp -l bos.adt.base bos.adt.lib bos.adt.libm bos.perf.perfstat
bos.perf.libperfstat bos.perf.proctools
Fileset Level State Description
----------------------------------------------------------------------------
Path: /usr/lib/objrepos
bos.adt.base 5.2.0.11 APPLIED Base Application Development
Toolkit
bos.adt.lib 5.2.0.10 APPLIED Base Application Development
Libraries
bos.adt.libm 5.2.0.13 APPLIED Base Application Development
Math Library
bos.perf.libperfstat 5.2.0.12 APPLIED Performance Statistics Library
Interface
bos.perf.perfstat 5.2.0.12 APPLIED Performance Statistics
Interface
Path: /etc/objrepos
bos.perf.perfstat 5.2.0.0 COMMITTED Performance Statistics
Interface
lslpp: 0504-132 Fileset bos.perf.proctools not installed.
可以看到bos.perf.proctools沒有安裝,用smitty安裝上即可。現在查看確認:
localhost> lslpp -l bos.perf.proctools
Fileset Level State Description
----------------------------------------------------------------------------
Path: /usr/lib/objrepos
bos.perf.proctools 5.2.0.11 APPLIED Proc Filesystem Tools
3、要求安裝了APARs(Authorized Problem Analysis Reports):
localhost> /usr/sbin/instfix -i -k "IY43980 IY44810 IY45462 IY45707 IY46214
IY46605 IY48525 IY51801"
All filesets for IY43980 were found.
All filesets for IY44810 were found.
All filesets for IY45462 were found.
All filesets for IY45707 were found.
All filesets for IY46214 were found.
All filesets for IY46605 were found.
There was no data for IY48525 in the fix database.
There was no data for IY51801 in the fix database.
可以看到IY48525和IY51801沒有安裝,我們可以從網上下載它們然後安裝上,這裡是下載地址:
https://techsupport.services.ibm.com/server/aix.fdc
但實際上,這兩個補丁是針對SDK1.4的, 如果不用1.4完全可以不理。
4、創建Oracle10g用戶和組,並創建相關目錄
過程省略,下面是確認信息:
localhost> id
uid=203(ora10) gid=202(dba) groups=1(staff)
localhost> pwd
/data1/ora10
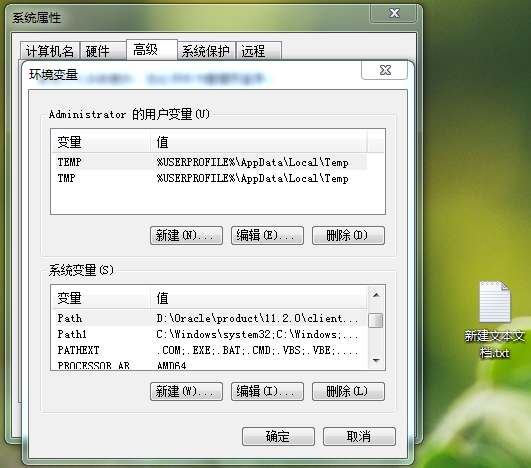
localhost> env|grep ORA
ORACLE_BASE=/data1/app/ora10g
ORACLE_PATH=/data1/app/ora10g/product/10.1.0/dbs
ORA_DB=/data1/app/ora10g/product/10.1.0/dbs
ORACLE_SID=ora10g
ORACLE_TERM=vt100
ORA_NLS33=/data1/app/ora10g/product/10.1.0/ocommon/nls/admin/data
ORACLE_HOME=/data1/app/ora10g/product/10.1.0
5、配置SHELL LIMITS和系統 配置參數
5.1、使用smitty chuser修改ora10用戶的SHELL LIMITS
Soft FILE size -1 (Unlimited)
Soft CPU time -1 (Unlimited)
Note: This is the default value.
Soft DATA segment -1 (Unlimited)
Soft STACK size -1 (Unlimited)
5.2、使用smitty chgsys修改“Maximum number of PROCESSES allowed per user”最小2048。
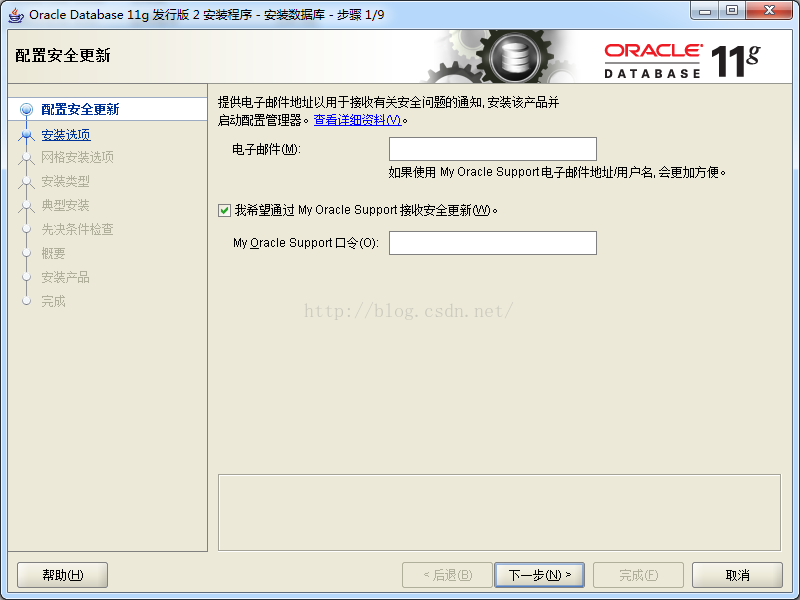
四、安裝過程
1、以root執行# ./rootpre.sh
2、用xmanager以ora10用戶登錄圖形界面,執行:
localhost> pwd
/data1/ora10/Disk1
localhost> ls
doc response runInstaller welcome.htm
install rootpre stage
$xhost +
$export DISPLAY=10.16.98.26:0.0
$./runI*