VB.NET中運用種子填充算法完成給圖片著色的例子。本站提示廣大學習愛好者:(VB.NET中運用種子填充算法完成給圖片著色的例子)文章只能為提供參考,不一定能成為您想要的結果。以下是VB.NET中運用種子填充算法完成給圖片著色的例子正文
某人最近在運用C#寫一個相似Windows的畫圖工具,在填色的局部卡住了。勞資要他運用種子填充算法著色(不要調用Windows提供的API,否則還錘煉個毛線),如今我把這個功用完成了,順序的效率很高。如今在這裡大約寫一下完成辦法。
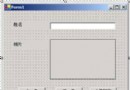
順序是用VB.NET寫的,C#寫法相似(而且還不需求運用Marshal類訪問非托管資源,愈加方便)。順序的運轉後果如下:
種子填充算法說白了就是寬度優先搜索算法(BFS),假如你不知道這是什麼東西,那闡明你數據構造基本就沒有學,請自行補充相應的知識。
第一步:完成“鉛筆”工具
我們定義如下的全局變量(窗體類的公有成員),作用是啥一看名字就知道:
Private Enum DrawStyle
Drawing = 0
Fill = 1
DrawDragging = 2
End Enum
Private _fillColor() As Color = {Color.Blue, Color.Green, Color.Red, Color.LightGray, Color.LightPink, Color.LightSkyBlue, _
Color.GreenYellow, Color.Gold, Color.LightSeaGreen}
Private _drawStyle As DrawStyle = DrawStyle.Drawing
Private _imgMain As Bitmap
Private _g As Graphics
Private _lastPosition As Point
Private _drawingPen As Pen
這個順序中填充的顏色是隨機決議的(都懶得做一個選顏色的功用了),可以填充的顏色在_fillColor數組中。_drawStyle定義以後的繪圖形式(Drawing表示運用鉛筆工具,但未按下,Fill表示預備填充,DrawDragging表示鼠標正按下並拖拽)。
_imgMain是繪制的圖片,_g是創立在這個Bitmap上的Graphics對象。
需求留意的是,Drawing和Drawing2D類不提供畫點的辦法,我們需求經過畫直線或畫矩形來模仿。至於_lastPosition的作用,由於鼠標拖拽進程中,假如速渡過快,那麼MouseMove事情中的坐標點(每次MouseMove事情被觸發)並不是延續的,所以我們需求在以後點和上一次的鼠標地位之間畫一條直線,否則畫出來的線是連續的。
MouseDown、MouseMove和MouseUp完成鉛筆工具的根本功用,代碼如下:
Private Sub PictureBox1_MouseDown(sender As Object, e As MouseEventArgs) Handles PictureBox1.MouseDown
If CheckBox1.Checked Then _drawStyle = DrawStyle.Fill Else _drawStyle = DrawStyle.Drawing
If _drawStyle = DrawStyle.Fill Then
Call FillRegion(e.Location, _fillColor(New Random().Next(_fillColor.Count)))
Else
_drawStyle = DrawStyle.DrawDragging
_lastPosition = e.Location
End If
End Sub
Private Sub PictureBox1_MouseMove(sender As Object, e As MouseEventArgs) Handles PictureBox1.MouseMove
If _drawStyle = DrawStyle.DrawDragging Then
_g.DrawLine(_drawingPen, _lastPosition, e.Location)
_lastPosition = e.Location
PictureBox1.Image = _imgMain
End If
End Sub
Private Sub PictureBox1_MouseUp(sender As Object, e As MouseEventArgs) Handles PictureBox1.MouseUp
_drawStyle = DrawStyle.Drawing
End Sub
二、正題——種子填充算法的完成
下面說了一堆廢話,如今終於可以開端完成填充的算法了。
當用戶點擊圖片中某一個點後,需求填充與這個點相鄰的、顏色相反的其他點。為什麼要叫“種子填充”呢?大約是這樣:你在點中的那個點中播下一顆種子,它開花後果(顏色變成目的顏色),然後它又收獲出新的種子(與它上下左右相鄰且顏色等於原來顏色的點);新種子再開花後果(變顏色),收獲新種子…… 如此往復,直到沒有中央收獲了為止,算法完畢。
依照BFS通常的完成方式,可以運用循環隊列作為數據構造。關於BFS算法來說,需求的存儲空間較大,詳細需求多少還真不好預算。這裡給大家一個參考,我的這個順序圖片框大小是832*450,大約是37萬像素,循環隊列的容量設置為1600可以滿足需求(全部著色)。假如你的圖片框比擬大,可以先取一個較大的數值(比方8000),再逐步減少,重復嘗試。
完成這個循環隊列直接定義成一個一維數組就可以了,沒有必要運用ConcurrentQueue類,否則功能會下降,也沒有這個必要。
首先,由於要向四個方向填充,為了防止相似的代碼重復寫招致順序漂亮無比,我們可以定義一個fill_direction數組:
Dim fill_direction() As Point = {New Point(-1, 0), New Point(1, 0), New Point(0, -1), New Point(0, 1)}
這樣,運用一個For循環就可以完成四個方向的操作了。
依照首先說的思緒,順序的完成就很復雜了:首先將點擊的那個點入隊,記載這個點的顏色。然後運用一個循環,取出隊首元素,並向四個方向撒種子(顏色相反,且沒有越出圖片框邊界),將每一個種子的顏色改動成目的顏色並入隊。如此往復直到隊列為空為止。代碼如下:
Private Sub FillRegion2(sourcePoint As Point, destinationColor As Color)
Dim new_bitmap As Bitmap = DirectCast(PictureBox1.Image, Bitmap)
Dim source_color As Color = new_bitmap.GetPixel(sourcePoint.X, sourcePoint.Y)
Dim MIN_X As Integer = 0, MIN_Y As Integer = 0
Dim MAX_X As Integer = PictureBox1.Width - 1, MAX_Y As Integer = PictureBox1.Height - 1
Dim fill_queue(MAX_FILL_QUEUE) As Point
Dim fill_direction() As Point = {New Point(-1, 0), New Point(1, 0), New Point(0, -1), New Point(0, 1)}
Dim queue_head As Integer = 0
Dim queue_tail As Integer = 1
fill_queue(queue_tail) = sourcePoint
Do While queue_head <> queue_tail
queue_head = (queue_head + 1) Mod MAX_FILL_QUEUE
Dim current_point As Point = fill_queue(queue_head)
For i As Integer = 0 To 3
Dim new_point_x As Integer = current_point.X + fill_direction(i).X
Dim new_point_y As Integer = current_point.Y + fill_direction(i).Y
If new_point_x < MIN_X OrElse new_point_y < MIN_Y OrElse new_point_x > MAX_X OrElse new_point_y > MAX_Y Then Continue For
If new_bitmap.GetPixel(new_point_x, new_point_y) = source_color Then
new_bitmap.SetPixel(new_point_x, new_point_y, destinationColor)
queue_tail = (queue_tail + 1) Mod MAX_FILL_QUEUE
fill_queue(queue_tail) = New Point(new_point_x, new_point_y)
End If
Next
Loop
PictureBox1.Image = new_bitmap
End Sub
能夠會有一個問題,就是第一個點在入隊前應該要先改成目的顏色,但我這裡沒有改。效果其實是一樣的,由於它旁邊的點在撒種子的時分發現這個點顏色沒變,還是會將它入隊(留意:假如只要一個點需求填充,即起始點沒有相鄰的點,那麼會招致這個點不被填充成目的顏色,請自行改良算法)。我們在這裡疏忽這個小問題。
運轉順序,可以發現曾經可以完成填充的功用了。
備注:假如目的顏色和起始點的顏色相反,且起始點有相鄰的、相反顏色的點,那麼會招致相反的點重復入隊,最終招致隊列溢出。此時隊首指針等於隊尾指針,順序會以為隊列為空而終止填充,因而最終後果沒有變化(假如不是采用循環隊列,會招致順序死循環)。為了防止這種狀況,應該在停止填充前判別目的顏色能否和原點顏色相反,相反時直接完畢。在這裡我沒有停止這樣的判別。
三、提升效率
在運轉順序時發現了一個問題,就是假如填色區域過大(比方直接填充整個圖片框),順序會很慢,大約需求2秒左右才干填充完。發生這個問題的次要緣由是GetPixel和SetPixel的功能不高,每次調用這兩個辦法時都會做很多額定的操作,在我以前運用匯編言語調用DOS中綴畫點時就有這個問題。
為此,M$提供了LockBits和UnlockBits辦法。LockBits辦法可以將圖片鎖定到內存中,以便經過訪問內存直接對這些數據停止修正。在C#中我們可以直接運用指針訪問這片數據,但關於VB是不行的,由於VB不允許運用指針,我們可以借助System.Runtime.InteropServices.Marshal類到達直接訪問內存的功用。
關於LockBits的詳細引見可以參考這篇日志:http://www.bobpowell.net/lockingbits.htm
其中很重要的一點就是要搞清楚如何計算圖片上某一點的內存地址。
如這張圖所示(圖片來自那篇博文),坐標為(X,Y)的點在內存中的地址就是Scan0 + (Y * Stride) + X * k。k與圖片中每個點占用的字節有關,我們這裡運用的是32位ARPG,每個像素占4個字節,因而k就是4。另外留意Stride並不一定是n*k(n表示每行存n個像素),由於末尾能夠有多余的位使數組對齊(與處置機的字長婚配)。無論如何,我們可以經過BitmapData對象的Stride屬性失掉。
由於一個ARGB值是4個字節,所以我們需求調用Marshal類的ReadInt32和WriteInt32辦法對每個像素點的顏色停止讀取和寫入。我們要操作的是顏色的ARGB值而不是Color對象。
那麼把下面的代碼稍加改造,就可以寫出如下順序:
Private Sub FillRegion(sourcePoint As Point, destinationColor As Color)
Dim new_bitmap As Bitmap = DirectCast(PictureBox1.Image, Bitmap)
Dim source_color_int As Integer = new_bitmap.GetPixel(sourcePoint.X, sourcePoint.Y).ToArgb
Dim bitmap_data As BitmapData = new_bitmap.LockBits(New Rectangle(0, 0, PictureBox1.Width, PictureBox1.Height), _
Imaging.ImageLockMode.ReadWrite, new_bitmap.PixelFormat)
Dim stride As Integer = Math.Abs(bitmap_data.Stride)
Dim scan0 As IntPtr = bitmap_data.Scan0
Dim bytes As Integer = stride * new_bitmap.Height
Dim MIN_X As Integer = 1, MIN_Y As Integer = 1
Dim MAX_X As Integer = PictureBox1.Width - 1, MAX_Y As Integer = PictureBox1.Height - 1
Dim fill_queue(MAX_FILL_QUEUE) As Point
Dim fill_direction() As Point = {New Point(-1, 0), New Point(1, 0), New Point(0, -1), New Point(0, 1)}
Dim destination_color_int As Integer = destinationColor.ToArgb
Dim queue_head As Integer = 0
Dim queue_tail As Integer = 1
fill_queue(queue_tail) = sourcePoint
Do While queue_head <> queue_tail
queue_head = (queue_head + 1) Mod MAX_FILL_QUEUE
Dim current_point As Point = fill_queue(queue_head)
For i As Integer = 0 To 3
Dim new_point_x As Integer = current_point.X + fill_direction(i).X
Dim new_point_y As Integer = current_point.Y + fill_direction(i).Y
If new_point_x < MIN_X OrElse new_point_y < MIN_Y OrElse new_point_x > MAX_X OrElse new_point_y > MAX_Y Then Continue For
Dim offset As Integer = (new_point_y * stride) + new_point_x * 4
Dim current_color_int As Integer = System.Runtime.InteropServices.Marshal.ReadInt32(scan0, offset)
If current_color_int = source_color_int Then
System.Runtime.InteropServices.Marshal.WriteInt32(scan0, offset, destination_color_int)
queue_tail = (queue_tail + 1) Mod MAX_FILL_QUEUE
fill_queue(queue_tail) = New Point(new_point_x, new_point_y)
End If
Next
Loop
new_bitmap.UnlockBits(bitmap_data)
PictureBox1.Image = new_bitmap
End Sub
當然,假如你還有其他更好的完成辦法,還請多多指教。(啊,不要通知我運用Windows的API。。。) 如今運轉一下順序,發現效率急劇上升。我測試了一下,在我的電腦上,填充37萬個像素大約只需求50~60毫秒左右,效率還是令人稱心的。