原先在B站上看到各式各樣拿Windows任務管理器播放動畫的視頻,感覺很新奇,也有人無私分享代碼。有些視頻中的動畫是後期加上的,也有些是實時渲染的。不管怎樣,像實時渲染這類程序就非常“奇特”,它是怎麼讓任務管理器播放視頻的呢?
自制高仿山寨視頻
工程源碼
如要完成一個程序,抑或是一個功能,不會寫,怎麼辦?拿來!
得到源碼,解讀ing,然後重寫,消化吸收,這是“高效”的學習方法。
剖析源碼,理解思路。
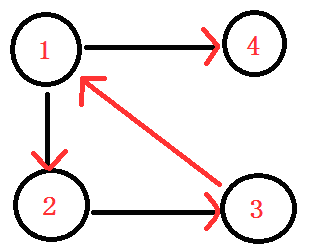
這個程序大致的工作流程如下:
常用的啟動進程無非是雙擊一下程序,但在C++中如何調用呢,用ShellExecute。
運行命令行:
ShellExecute(NULL, "open", "taskmgr", NULL, NULL, SW_SHOWNORMAL);
第三個參數相當於“開始-運行”中的命令。
由於taskmgr是子進程,那麼我們的父進程對它進行控制就有很高的權限。
網上常見的一段提權代碼:
HANDLE hToken;
if (!OpenProcessToken(::GetCurrentProcess(), TOKEN_ADJUST_PRIVILEGES, &hToken))
{
    return;//ERROR
}
TOKEN_PRIVILEGES tkp;
tkp.PrivilegeCount = 1;
if (!LookupPrivilegeValue(nullptr, SE_DEBUG_NAME, &tkp.Privileges[0].Luid))
{
    return;//ERROR
}
if (!AdjustTokenPrivileges(hToken, false, &tkp, sizeof(tkp), nullptr, nullptr))
{
    return;//ERROR
}
啟動子進程後,等待一段時間,開始注入。
“注入”的意思,比方說“注水豬肉”,將自己刻意編寫的代碼注入到目標進程中。
既然我們對taskmgr擁有最高權限,那麼注入也就不成問題。
首先,需要找到子進程(taskmgr,下面略),在茫茫進程樹中,如何找到它呢?
我們就用一個比較便捷的方法。
HWND hWnd = FindWindow("TaskManagerWindow", "任務管理器");
根據類名和窗口名稱找到它,做到這些,只需下一個Spy++,自制Spy。
有人問,如果有開了多個任務管理器怎麼辦?那只能全部關掉重新試了,因為這裡有權限的問題。
接下來獲取它的句柄:
DWORD dwPId;
GetWindowThreadProcessId(hWnd, &dwPId);
以最高權限打開進程:
HANDLE hRemoteProcess = OpenProcess(PROCESS_ALL_ACCESS, FALSE, dwPId);
現在需要將縮寫的dll的路徑寫入到子進程:
LPCTSTR szLibPath = "DLL的絕對路徑";
LPVOID pLibRemoteSrc = VirtualAllocEx(hRemoteProcess, nullptr, nLibPathLength, MEM_COMMIT, PAGE_READWRITE);
WriteProcessMemory(hRemoteProcess, pLibRemoteSrc, LPVOID(*szLibPath), nLibPathLength, &dwPathLength);
現在,子進程的pLibRemoteSrc中就存放了DLL的路徑。
下面需要讓子進程根據路徑加載DLL。
進程加載DLL的函數是LoadLibraryA,我們需要讓子進程執行這個函數,首先需要獲取這個函數的地址。
LoadLibraryA位於kernel32.dll中,由於其特殊性,不同進程會將kernel32.dll加載到同一個地址,此外還有user32.dll等等,這給我們帶來了方便。
獲取LoadLibraryA的地址:
HMODULE hKernel32 = GetModuleHandleA("Kernel32");
FARPROC fpcLoadLibrary = GetProcAddress(hKernel32, "LoadLibraryA");
在子進程中執行LoadLibraryA:
CreateRemoteThread(hRemoteProcess, NULL, NULL, LPTHREAD_START_ROUTINE(fpcLoadLibrary), pLibRemoteSrc, NULL, NULL);
調用VirtualFreeEx釋放內存,CloseHandle關閉句柄,不用多說。
目前是程序最核心的階段——“教會”taskmgr去播放動畫。
動畫都是由一幀幀組成,現在我們已經擁有幾千幀的圖片,放置在某個文件夾中,編號如0000.jpg-9999.jpg。
我們需要找到播放動畫的那個子窗口,怎麼找?用Spy?我們來個高大上的Hook。
Hook在這裡的用處就是過濾或是截獲消息。
首先,我們要替換的CPU圖表為什麼會不停地動?就是因為定時器對它發送重繪消息,我們可以用Hook截獲它,或是SetWindowLong過濾掉它。在嘗試過程中,發現Hook有點問題,因此采用SetWindowLong。
其次,我們要高仿個Spy的功能——實時定位鼠標所在窗口。怎麼做呢?鼠標在移動過程中會發送移動消息WM_MOUSEMOVE,那麼我們規定按下鼠標中鍵WM_MBUTTONDOWN,鼠標此時所在的窗口就播放動畫。
那麼啟用Hook:
SetWindowsHookEx(WH_GETMESSAGE, HOOKPROC(MsgHookProc), NULL, GetWindowThreadProcessId(g_hWnd, NULL));
監聽消息:
LRESULT CALLBACK MsgHookProc(int nCode, WPARAM wParam, LPARAM lParam)
{
    if (nCode < 0) {
        return CallNextHookEx(g_hHook, nCode, wParam, lParam);
    }

    if (nCode == HC_ACTION)
    {
        auto lpMsg = LPMSG(lParam);
        POINT pt;

        switch (lpMsg->message) {
        case WM_MOUSEMOVE:
            if (g_bHooking)
            {
                pt = lpMsg->pt;
                ScreenToClient(g_hWnd, &pt);
                SpyExecScanning(pt);
            }
            break;
        case WM_MBUTTONDOWN:
            if (g_bHooking)
            {
                pt = lpMsg->pt;
                g_prevHwnd = SpyFindSmallestWindow(pt); //找到當前鼠標所在窗口
                g_bHooking = FALSE;
                uHook = SetTimer(g_hWnd, WM_USER + 401, 1000, TIMERPROC(HookProc)); //利用定時器創建渲染線程
            }
            break;
        default:
            break;
        }
    }

    return CallNextHookEx(g_hHook, nCode, wParam, lParam);
}
在這裡面有SpyFindSmallestWindow(找到鼠標所在窗口)和SpyExecScanning(對鼠標所在窗口邊框進行加粗)。
找到鼠標所在窗口:
HWND SpyFindSmallestWindow(const POINT &pt)
{
    auto hWnd = WindowFromPoint(pt); // 鼠標所在窗口

    if (hWnd)
    {
        // 得到本窗口大小和父窗口句柄,以便比較
        RECT rect;
        ::GetWindowRect(hWnd, &rect);
        auto parent = ::GetParent(hWnd); // 父窗口

        // 只有該窗口有父窗口才繼續比較
        if (parent)
        {
            // 按Z方向搜索
            auto find = hWnd; // 遞歸調用句柄
            RECT rect_find;

            while (1) // 循環
            {
                find = ::GetWindow(find, GW_HWNDNEXT); // 得到下一個窗口的句柄
                ::GetWindowRect(find, &rect_find); // 得到下一個窗口的大小

                if (::PtInRect(&rect_find, pt) // 鼠標所在位置是否在新窗口裡
                    && ::GetParent(find) == parent // 新窗口的父窗口是否是鼠標所在主窗口
                    && ::IsWindowVisible(find)) // 窗口是否可視
                {
                    // 比較窗口,看哪個更小
                    if (RECT_SIZE(rect_find) < RECT_SIZE(rect))
                    {
                        // 找到更小窗口
                        hWnd = find;

                        // 計算新窗口的大小
                        ::GetWindowRect(hWnd, &rect);
                    }
                }

                // hWnd的子窗口find為NULL,則hWnd為最小窗口
                if (!find)
                {
                    break; // 退出循環
                }
            }
        }
    }

    return hWnd;
}
對鼠標所在窗口邊框進行加粗:
void SpyInvertBorder(const HWND &hWnd)
{
    // 若非窗口則返回
    if (!IsWindow(hWnd))
        return;

    RECT rect; // 窗口矩形

    // 得到窗口矩形
    ::GetWindowRect(hWnd, &rect);

    auto hDC = ::GetWindowDC(hWnd); // 窗口設備上下文

    // 設置窗口當前前景色的混合模式為R2_NOT
    // R2_NOT - 當前的像素值為屏幕像素值的取反,這樣可以覆蓋掉上次的繪圖
    SetROP2(hDC, R2_NOT);

    // 創建畫筆
    HPEN hPen;

    // PS_INSIDEFRAME - 產生封閉形狀的框架內直線,指定一個限定矩形
    // 3 * GetSystemMetrics(SM_CXBORDER) - 三倍邊界粗細
    // RGB(0,0,0) - 黑色
    hPen = ::CreatePen(PS_INSIDEFRAME, 3 * GetSystemMetrics(SM_CXBORDER), RGB(0, 0, 0));

    // 選擇畫筆
    auto old_pen = ::SelectObject(hDC, hPen);

    // 設定畫刷
    auto old_brush = ::SelectObject(hDC, GetStockObject(NULL_BRUSH));

    // 畫矩形
    Rectangle(hDC, 0, 0, RECT_WIDTH(rect), RECT_HEIGHT(rect));

    // 恢復原來的設備環境
    ::SelectObject(hDC, old_pen);
    ::SelectObject(hDC, old_brush);

    DeleteObject(hPen);
    ReleaseDC(hWnd, hDC);
}

void SpyExecScanning(POINT &pt)
{
    ClientToScreen(g_hWnd, &pt); // 轉換到屏幕坐標

    auto current_window = SpyFindSmallestWindow(pt); //找到當前位置的最小窗口

    if (current_window)
    {
        // 若是新窗口,就把舊窗口的邊界去掉,畫新窗口的邊界
        if (current_window != g_prevHwnd)
        {
            SpyInvertBorder(g_prevHwnd);
            g_prevHwnd = current_window;
            SpyInvertBorder(g_prevHwnd);
        }
    }

    g_savedHwnd = g_prevHwnd;
}
那麼我們就實現了跟隨鼠標找到目標窗口的功能。
大體思路:
LRESULT CALLBACK PaintProc(HWND hWnd, UINT msg, WPARAM wParam, LPARAM lParam)
{
    if (msg == WM_PAINT)
        return TRUE;

    if (msg == WM_LBUTTONUP)
        bUpdate = !bUpdate;

    return CallWindowProc(oldProc, hWnd, msg, wParam, lParam);
}

SetWindowLong(hWnd, GWL_WNDPROC, LONG(PaintProc));
替換窗口子過程,如是重繪消息,不予處理。
原先的啟動Hook、替換子過程等任務是在OnAttach中做的,即DLL剛加載至子進程中,而在OnAttach這個初始化線程中,是無法創建新線程的,這是因為此時DLL尚未初始化完成。
然而有解決方法,即用SetTimer運行任務,當任務被Timer喚醒時,DLL已加載完畢。
此時開始渲染。
在播放動畫之前,做了許多繁瑣的工作。其實涉及渲染的代碼反而不是很多。
我們這裡用SDL完成渲染任務,一方面為了方便,另一方面體驗一把SDL。
去官網上下載SDL後,還需下一個SDL_TTF插件,用來顯示文字。
下面就初始化:
Print("Create SDL Window...");
    if (SDL_Init(SDL_INIT_VIDEO) < 0)
    {
        Print("Create SDL Window... FAILED");
        Print(SDL_GetError());
        return;
    }

    sdlWindow = SDL_CreateWindowFrom(static_cast<void*>(hWnd));
    if (sdlWindow)
        Print("Create SDL Window... OK");
    else
    {
        Print("Create SDL Window... FAILED");
        return;
    }
    Print("Create SDL Surface... OK");

    sdlRenderer = SDL_CreateRenderer(sdlWindow, -1,
        SDL_RENDERER_ACCELERATED | SDL_RENDERER_PRESENTVSYNC);
    if (!sdlRenderer)
    {
        Print("Create SDL Renderer... FAILED");
        return;
    }
    Print("Create SDL Renderer... OK");

    sdlSurface = SDL_GetWindowSurface(sdlWindow);
    if (!sdlSurface)
    {
        Print("Create SDL Surface... FAILED");
        return;
    }
    Print("Create SDL Surface... OK");

    if (TTF_Init() == -1)
    {
        Print("Create SDL TTF... FAILED");
        Print(TTF_GetError());
        return;
    }
    Print("Create SDL TTF... OK");

    SDL_SetRenderDrawColor(sdlRenderer, 255, 255, 255, 255);
    SDL_RenderClear(sdlRenderer);
    SDL_RenderPresent(sdlRenderer);

    auto font = TTF_OpenFont("C:\\windows\\fonts\\msyh.ttf", 32);//微軟雅黑
    assert(font);
    SDL_Color color = { 17, 152, 187 };

    auto surface = TTF_RenderUNICODE_Blended(font, PUINT16(L"准備播放動畫!"), color);
    auto texture = SDL_CreateTextureFromSurface(sdlRenderer, surface);

    SDL_Rect rt;
    rt.x = 0;
    rt.y = 0;
    SDL_QueryTexture(texture, nullptr, nullptr, &rt.w, &rt.h);

    SDL_RenderClear(sdlRenderer);
    SDL_RenderCopy(sdlRenderer, texture, &rt, &rt);
    SDL_RenderPresent(sdlRenderer);

    SDL_DestroyTexture(texture);
    SDL_FreeSurface(surface);
    TTF_CloseFont(font);

    SDL_Delay(2000);

    Prepare();

    GetWindowTextA(g_hWnd, oldCaption, sizeof(oldCaption));

    uSDL = SetTimer(g_hWnd, WM_USER + 402, REFRESH_RATE, SDLProc);//啟動計時器,開始播放逐幀動畫
我們將目標窗口的句柄直接傳給了SDL,這樣有個好處——窗口大小變化時,動畫的大小也會相應變化。
在每一幀中,我們要加載一幀圖片,處理後再渲染。
VOID CALLBACK SDLProc(HWND, UINT, UINT_PTR, DWORD)
{
    static char filename[100];

    if (bUpdate)
        nSDLTime++;
    else
        return;

    sprintf_s(filename, g_strImagePathFormat, nSDLTime);
    int x, y, comp;
    auto data = stbi_load(filename, &x, &y, &comp, 0);
    if (!data)
        return;

    ProcessingImage(data, x, y, comp, x * comp);

    auto image = SDL_CreateRGBSurfaceFrom(data, x, y, comp << 3, x * comp, 0, 0, 0, 0);
    if (!image)
    {
        SetWindowTextA(g_hWnd, SDL_GetError());
        return;
    }

    auto texture = SDL_CreateTextureFromSurface(sdlRenderer, image);

    SDL_RenderClear(sdlRenderer);
    SDL_RenderCopy(sdlRenderer, texture, nullptr, nullptr);
    SDL_RenderPresent(sdlRenderer);

    SDL_DestroyTexture(texture);
    SDL_FreeSurface(image);
    stbi_image_free(data);

    if (nSDLTime > MAX_FRAME)
    {
        //對SDL的清掃工作

        if (uSDL)
            KillTimer(g_hWnd, uSDL);
        return;
    }
}
大家發現,顯示的動畫跟保存的jpg畫風相差太大,這是因為程序對圖片進行了處理。
簡單來說,做的工作有:
void ProcessingImage(stbi_uc* data, int width, int height, int comp, int pitch)
{
    int i, j;
    BYTE c, prev;
    //二值化
    for (j = 0; j < height; j++)
    {
        for (i = 0; i < width; i++)
        {
            //auto B = data[j * pitch + i * comp];
            //auto G = data[j * pitch + i * comp + 1];
            //auto R = data[j * pitch + i * comp + 2];
            auto Gray = 0.212671f * data[j * pitch + i * comp + 2] +
                0.715160f * data[j * pitch + i * comp + 1] +
                0.072169f * data[j * pitch + i * comp];
            if (Gray < 128.0f)
            {
                data[j * pitch + i * comp] = 0;
                data[j * pitch + i * comp + 1] = 0;
                data[j * pitch + i * comp + 2] = 0;
            }
            else
            {
                data[j * pitch + i * comp] = 255;
                data[j * pitch + i * comp + 1] = 255;
                data[j * pitch + i * comp + 2] = 255;
            }
        }
    }
    //邊緣檢測
    prev = 0;
    for (j = 0; j < height; j++)
    {
        for (i = 0; i < width; i++)
        {
            c = data[j * pitch + i * comp];
            if (c != prev)
            {
                data[j * pitch + i * comp] = DISPLAY_B;
                data[j * pitch + i * comp + 1] = DISPLAY_G;
                data[j * pitch + i * comp + 2] = DISPLAY_R;
            }
            prev = c;
        }
    }
    //邊緣檢測
    prev = 0;
    for (i = 0; i < width; i++)
    {
        for (j = 0; j < height; j++)
        {
            c = data[j * pitch + i * comp];
            if (c != prev)
            {
                data[j * pitch + i * comp] = DISPLAY_B;
                data[j * pitch + i * comp + 1] = DISPLAY_G;
                data[j * pitch + i * comp + 2] = DISPLAY_R;
            }
            prev = c;
        }
    }
    //背景
    for (i = 0; i < width; i++)
    {
        for (j = 0; j < height; j++)
        {
            c = data[j * pitch + i * comp];
            if (c == DISPLAY_B)
                continue;
            if ((j % (height / 10) == 0) && j != 0)//橫線
            {
                data[j * pitch + i * comp] = LINE_B;
                data[j * pitch + i * comp + 1] = LINE_G;
                data[j * pitch + i * comp + 2] = LINE_R;
            }
            else if ((i % (width / 5) == (((MAX_FRAME - nSDLTime) / 30 * (width / 20))) % (width / 5)) && i != 0)//豎線
            {
                data[j * pitch + i * comp] = LINE_B;
                data[j * pitch + i * comp + 1] = LINE_G;
                data[j * pitch + i * comp + 2] = LINE_R;
            }
            else if (c == 255)
            {
                data[j * pitch + i * comp] = BG_B;
                data[j * pitch + i * comp + 1] = BG_G;
                data[j * pitch + i * comp + 2] = BG_R;
            }
            else if (c == 0)
            {
                data[j * pitch + i * comp] = FILL_B;
                data[j * pitch + i * comp + 1] = FILL_G;
                data[j * pitch + i * comp + 2] = FILL_R;
            }
        }
    }
    //邊框
    for (i = 0; i < width; i++)
    {
        for (j = 0; j < height; j++)
        {
            if ((i == 0 || i == width - 1) || (j == 0 || j == height - 1))
            {
                data[j * pitch + i * comp] = EDGE_B;
                data[j * pitch + i * comp + 1] = EDGE_G;
                data[j * pitch + i * comp + 2] = EDGE_R;
            }
        }
    }
}
我們需要子進程把渲染的信息實時在控制台中顯示出來。
這就涉及到進程間通訊(IPC)了,方法有很多,這裡以管道(Pipe)為例。
主進程-控制台(管道讀):
子進程-應用程序(管道寫):
一個非常有趣的程序就這麼完成了。
通過此次實驗,我們接觸了: