學習Hadoop Common模塊,當然應該是從最簡單,最基礎的模塊學習最好,所以我挑選了其中的conf配置模塊進行學習。整體的類結構非常簡單。
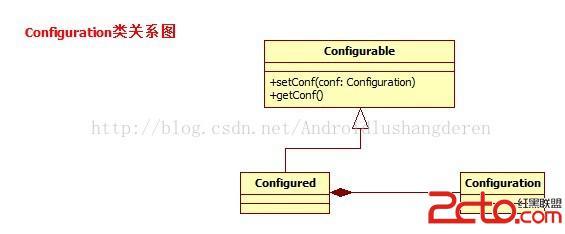
只要繼承了Configurable接口,一般表明就是可配置的,可以執行相應的配置操作,但是配置的集中操作的體現是在Configuration這個類中。這個類中定義了很多的集合變量:
/** * List of configuration resources. */ private ArrayList上面只是列舉出了一部分,基本的用途都是拿來保存一些資源的數據。還有一個變量比較關鍵:
//資源配置文件中的屬性會加載到Properties屬性中來
  private Properties properties;
所有的屬性變量都是存放到java中的Properties中存放,便於後面的直接存取。Property其實就是一個HashTable。我們按著Configuration加載的順序來學習一下他的整個過程。首先當然是執行初始化代碼塊:
static{
    //print deprecation warning if hadoop-site.xml is found in classpath
    ClassLoader cL = Thread.currentThread().getContextClassLoader();
    if (cL == null) {
      cL = Configuration.class.getClassLoader();
    }
    if(cL.getResource("hadoop-site.xml")!=null) {
      LOG.warn("DEPRECATED: hadoop-site.xml found in the classpath. " +
          "Usage of hadoop-site.xml is deprecated. Instead use core-site.xml, "
          + "mapred-site.xml and hdfs-site.xml to override properties of " +
          "core-default.xml, mapred-default.xml and hdfs-default.xml " +
          "respectively");
    }
    //初始化中加載默認配置文件,core-site是用戶的屬性定義
    //如果有相同,後者的屬性會覆蓋前者的屬性
    addDefaultResource("core-default.xml");
    addDefaultResource("core-site.xml");
  }
學習過java構造函數的執行順序的同學,應該知道初始化代碼塊中的代碼的執行順序是先於構造函數的,所以會執行完上面的操作,就來到了addDefaultResource():
/**
   * Add a default resource. Resources are loaded in the order of the resources
   * added.
   * @param name file name. File should be present in the classpath.
   */
  public static synchronized void addDefaultResource(String name) {
    if(!defaultResources.contains(name)) {
      defaultResources.add(name);
      //遍歷注冊過的資源配置,進行重新加載操作
      for(Configuration conf : REGISTRY.keySet()) {
        if(conf.loadDefaults) {
          conf.reloadConfiguration();
        }
      }
    }
  }
把資源的名字加入到相應的集合中,然後遍歷每個配置類,重新加載配置操作,因為默認資源列表改動了,所以要重新加載了,這個也好理解。這裡簡單介紹一下,每一個Configuration類初始化後,都會加入到REGISTRY集合中,這是一個static 變量,所以會保持全局統一的一個。然後把重點移到reloadConfiguration():
 /**
   * Reload configuration from previously added resources.
   *
   * This method will clear all the configuration read from the added
   * resources, and final parameters. This will make the resources to
   * be read again before accessing the values. Values that are added
   * via set methods will overlay values read from the resources.
   */
  public synchronized void reloadConfiguration() {
	//重新加載Configuration就是重新將裡面的屬性記錄清空
    properties = null;                            // trigger reload
    finalParameters.clear();                      // clear site-limits
  }
操作非常簡單,就是clear一些操作,也許這時候,你會想難道不用馬上加載新的資源嗎?其實這也是作者的一大設計,答案在後面。好的,程序執行到這裡,初始化代碼塊的操作完成了,接下來就是構造函數的執行了:
/** A new configuration. */
  public Configuration() {
	//初始化是需要加載默認資源的
    this(true);
  }
然後繼續調用重載函數:
/** A new configuration where the behavior of reading from the default
   * resources can be turned off.
   *
   * If the parameter {@code loadDefaults} is false, the new instance
   * will not load resources from the default files.
   * @param loadDefaults specifies whether to load from the default files
   */
  public Configuration(boolean loadDefaults) {
    this.loadDefaults = loadDefaults;
    if (LOG.isDebugEnabled()) {
      LOG.debug(StringUtils.stringifyException(new IOException("config()")));
    }
    synchronized(Configuration.class) {
      //加載過的Configuration對象對會加入到REGISTRY集合中
      REGISTRY.put(this, null);
    }
    this.storeResource = false;
  }
重點觀察人家把當前初始化的Configuration類加入到全局REGISTRY裡面了。
以上分析的代碼都是前期的操作,那麼比較關鍵的set/get這類和屬性直接相關的方法怎麼實現的,所以這個時候,必須要先了解Hadoop中的配置文件是怎樣的格式存在於文件中的。比如HDFS的配置文件hdfs-site.xml;
節點層級的關系不是很復雜,關鍵在每個Property節點保留name名字,value值,des對於此屬性的描述,final標簽用於判斷此屬性能不能被改變,為true代表無法變更,類似於java語言裡的final關鍵字。了解完配置文件的結構之後,就可以繼續往下看了,比如我要設置1個屬性,set的一個小小的方法如下:dfs.name.dir /var/local/hadoop/hdfs/name Determines where on the local filesystem the DFS name node should store the name table. If this is a comma-delimited list of directories then the name table is replicated in all of the directories, for redundancy. true ....... dfs.data.dir /var/local/hadoop/hdfs/data Determines where on the local filesystem an DFS data node should store its blocks. If this is a comma-delimited list of directories, then data will be stored in all named directories, typically on different devices. Directories that do not exist are ignored. true
/** * Set the後面的setProperty就是Property的設置方法,jdk的API,所以關鍵就是前面獲取getProps的方法,如何把文件中的屬性加載到Property的變量中的。valueof thenameproperty. * * @param name property name. * @param value property value. * 根據name設置屬性值,屬性鍵值對保存在property中 */ public void set(String name, String value) { getOverlay().setProperty(name, value); getProps().setProperty(name, value); }
/**
   * 加載的時候采用了延時加載的策略
   * @return
   */
  private synchronized Properties getProps() {
    if (properties == null) {
      properties = new Properties();
      //從資源中再次獲取屬性相關的數據
      loadResources(properties, resources, quietmode);
      if (overlay!= null) {
        properties.putAll(overlay);
        if (storeResource) {
          for (Map.Entry item: overlay.entrySet()) {
            updatingResource.put((String) item.getKey(), "Unknown");
          }
        }
      }
    }
    return properties;
  }
看了上面為NULL的判斷,也許你就知道為什麼剛剛的重新加載操作那麼簡單,就執行了clear操作就完了,就是等著後面真正要獲取這個Property的時候在加載的,就是所謂的延時加載策略,類似於單例模式中的懶漢式模型。所以loadResources又是此實現的關鍵:
private void loadResource(Properties properties, Object name, boolean quiet) {
    try {
      //工廠模式獲取解析xml文件對象,這裡用的是doc解析方式
      DocumentBuilderFactory docBuilderFactory
        = DocumentBuilderFactory.newInstance();
      //ignore all comments inside the xml file
      docBuilderFactory.setIgnoringComments(true);

      //allow includes in the xml file
      docBuilderFactory.setNamespaceAware(true);
      try {
          docBuilderFactory.setXIncludeAware(true);
      } catch (UnsupportedOperationException e) {
        LOG.error("Failed to set setXIncludeAware(true) for parser "
                + docBuilderFactory
                + ":" + e,
                e);
      }
      DocumentBuilder builder = docBuilderFactory.newDocumentBuilder();
      .....

      if (root == null) {
    	//獲取xml中的節點進行獲取,這裡先獲取了根節點
        root = doc.getDocumentElement();
      }
      if (!"configuration".equals(root.getTagName()))
        LOG.fatal("bad conf file: top-level element not ");
      NodeList props = root.getChildNodes();
      for (int i = 0; i < props.getLength(); i++) {
        Node propNode = props.item(i);
        if (!(propNode instanceof Element))
          continue;
        Element prop = (Element)propNode;
        if ("configuration".equals(prop.getTagName())) {
          //如果子節點是configuration,則再次遞歸調用loadResource()方法
          loadResource(properties, prop, quiet);
          continue;
        }
        if (!"property".equals(prop.getTagName()))
          LOG.warn("bad conf file: element not ");
        NodeList fields = prop.getChildNodes();
        String attr = null;
        String value = null;
        boolean finalParameter = false;
        for (int j = 0; j < fields.getLength(); j++) {
          Node fieldNode = fields.item(j);
          if (!(fieldNode instanceof Element))
            continue;
          //屬性節點分3種判斷,name,value,final
          Element field = (Element)fieldNode;
          if ("name".equals(field.getTagName()) && field.hasChildNodes())
            attr = ((Text)field.getFirstChild()).getData().trim();
          if ("value".equals(field.getTagName()) && field.hasChildNodes())
            value = ((Text)field.getFirstChild()).getData();
          if ("final".equals(field.getTagName()) && field.hasChildNodes())
        	//final參數需額外添加到finalParameters參數的集合中
            finalParameter = "true".equals(((Text)field.getFirstChild()).getData());
        }

        // Ignore this parameter if it has already been marked as 'final'
        if (attr != null) {
          if (value != null) {
            if (!finalParameters.contains(attr)) {
              //在這步把上面去的值放入properties屬性中
              properties.setProperty(attr, value);
              if (storeResource) {
                updatingResource.put(attr, name.toString());
              }
            } else if (!value.equals(properties.getProperty(attr))) {
              LOG.warn(name+":a attempt to override final parameter: "+attr
                     +";  Ignoring.");
            }
          }
          if (finalParameter) {
            finalParameters.add(attr);
          }
        }
      }
和上面我們看的實際配置文件一對照,就不難理解了,就是簡單的doc解析xml文件,這裡不過多了一些處理,比如final的參數要額外再做一下操作。加載完成之後,屬性信息就被放到了Property中了,就達成了目標了。
下面我們說說get的屬性獲取操作,同樣有別樣的設計,他可不僅僅是getProps().get(name)這樣的操作,因為有的時候,通過這樣的操作還無法取出真正想要的值。比如下面這樣的結構:
也許你會直接通過dfs.secondary.namenode.kerberos.principal這個name去獲取值,然後獲取的值就是hdfs/_HOST@${local.realm},但是很顯然這不是我們需要的值,因為中間還有${local.realm},這個其實代表的是另外的一個設置的值,有的時候更多的是系統變量的值,所以這一點告訴我們,在值的查找操作裡面我們需要替換這些變量。dfs.secondary.namenode.kerberos.principal hdfs/_HOST@${local.realm} Kerberos principal name for the secondary NameNode.
/** * Get the value of the所以Hadoop在獲取值後又進行了一步值替換的操作,用到了正則表達式。nameproperty,nullif * no such property exists. * * Values are processed for variable expansion * before being returned. * * @param name the property name. * @return the value of thenameproperty, * or null if no such property exists. */ public String get(String name) { return substituteVars(getProps().getProperty(name)); }
//需匹配的模式為\$\{[^\}\$ ]+\},裡面多的\是在java裡進行轉義
//$,{,}是正則表達式中的保留字,因此需要加\,此匹配可分解為
//'\$\'{匹配的是${的部分
//最後的'\}'匹配了結尾符},這樣就構成了初步的${....}的目標類型結構了
//中間[^\}\$ ]匹配了除了},$,空格除外的關鍵字
//+是1個修飾次數,保證中間的匹配至少為1次,也就是說中間至少有值存在
private static Pattern varPat = Pattern.compile("\\$\\{[^\\}\\$\u0020]+\\}");
private static int MAX_SUBST = 20;
private String substituteVars(String expr) {
//輸入的屬性匹配值,為空的話直接返回
if (expr == null) {
return null;
}
Matcher match = varPat.matcher("");
String eval = expr;
//避免循環迭代陷入死循環,這裡強制最多MAX_SUBST20次的替換
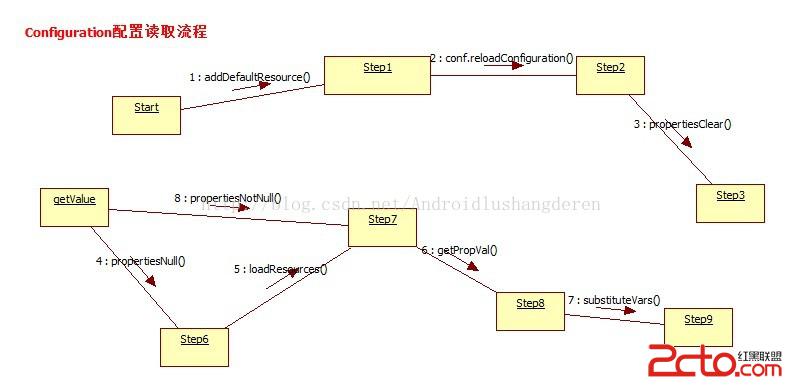
for(int s=0; s關鍵的難點是對於${...}這種模式的匹配器的構造,像我這種平時對於正則表達式第一想到的是上網找的人來說,就比較難想到了。還有1個特殊處理就是為了避免替換之後還會存在${...}出現死循環,所以這裡有次數的限制。get操作的實現就是如此。最後看看我對於Configuration做的2條不同情況下的流程分析圖:
配置類代碼的實現應該說是短小和精煉,以後開發大型系統的時候完全可以借鑒此類似的原理。