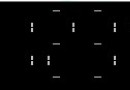
網上的UICollectionView的Layout布局,其cell的形狀多為矩形和圓形。
本篇博文將正六邊形作為cell的基本形狀,為您展現獨特的蜂窩布局效果及實現源碼。
幫助您讓自己的App脫穎而出,更加與眾不同。
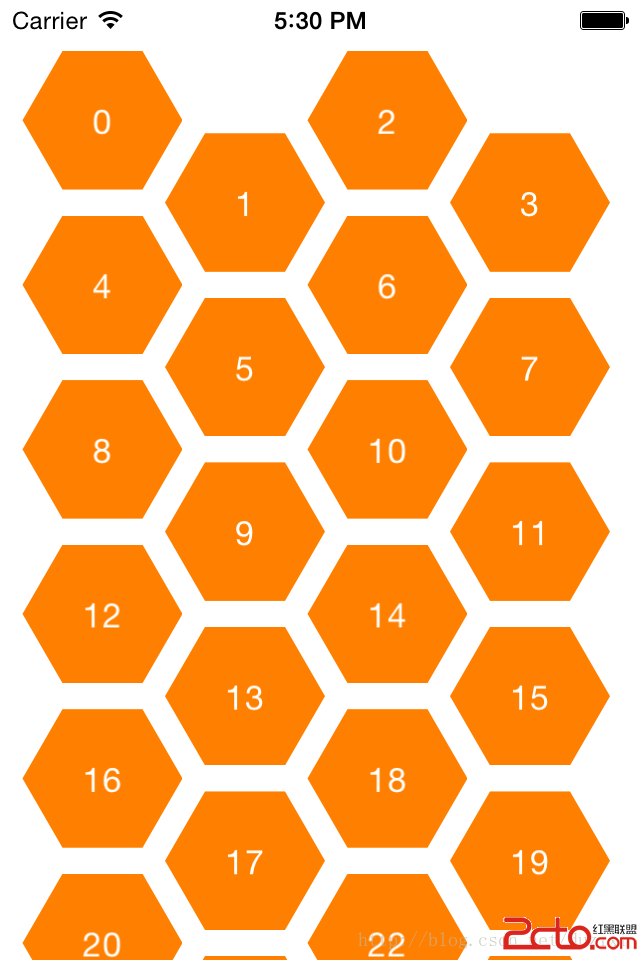
實現效果圖:
核心源代碼:
自定義Layout
// // HoneyCombLayout.h // Demo-Layouts // // Created by 杜子兮(duzixi) on 14-9-1. // Copyright (c) 2014年 lanou3g.com All rights reserved. // #import@interface HoneyCombLayout : UICollectionViewLayout @property (nonatomic, assign) NSInteger margin; @property (nonatomic, assign) NSInteger oX; @property (nonatomic, assign) NSInteger oY; @end
//
//  HoneyCombLayout.m
//  Demo-Layouts
//
//  Created by 杜子兮(duzixi) on 14-9-1.
//  Copyright (c) 2014年 lanou3g.com All rights reserved.
//

#import HoneyCombLayout.h

@implementation HoneyCombLayout

///  返回內容大小,用於判斷是否需要加快滑動

-(CGSize)collectionViewContentSize
{
    float height = (SIZE + self.margin) * ([self.collectionView numberOfItemsInSection:0] / 4 + 1);
    return CGSizeMake(320, height);
}


///  返回YES,改變布局
/*
- (BOOL)shouldInvalidateLayoutForBoundsChange:(CGRect)newBounds
{
    return YES;
}
*/
#pragma mark - UICollectionViewLayout
///  為每一個Item生成布局特性
- (UICollectionViewLayoutAttributes *)layoutAttributesForItemAtIndexPath:(NSIndexPath *)indexPath
{
    UICollectionViewLayoutAttributes *attributes = [UICollectionViewLayoutAttributes layoutAttributesForCellWithIndexPath:indexPath];

    UICollectionView *collection = self.collectionView;

    float x = (SIZE + self.margin) * (indexPath.item % COL + 1) * 0.75;
    float y = (SIZE + self.margin) * (indexPath.item / COL + 0.5) * cos(M_PI * 30.0f / 180.0f);
    if (indexPath.item % 2 == 1) {
        y += (SIZE + self.margin) * 0.5 * cosf(M_PI * 30.0f / 180.0f);
    }

    x += self.oX;
    y += self.oY;

    attributes.center = CGPointMake(x + collection.contentOffset.x, y + collection.contentOffset.y);
    attributes.size = CGSizeMake(SIZE, SIZE * cos(M_PI * 30.0f / 180.0f));

    return attributes;
}

-(NSArray *)layoutAttributesForElementsInRect:(CGRect)rect
{
    NSArray *arr = [super layoutAttributesForElementsInRect:rect];
    if ([arr count] > 0) {
        return arr;
    }
    NSMutableArray *attributes = [NSMutableArray array];
    for (NSInteger i = 0 ; i < [self.collectionView numberOfItemsInSection:0 ]; i++) {
        NSIndexPath *indexPath = [NSIndexPath indexPathForItem:i inSection:0];
        [attributes addObject:[self layoutAttributesForItemAtIndexPath:indexPath]];
    }
    return attributes;
}


@end
// // HoneycombViewCell.h // Demo-Layouts // // Created by 杜子兮(duzixi) on 14-9-1. // Copyright (c) 2014年 lanou3g.com All rights reserved. // #import@interface HoneycombViewCell : UICollectionViewCell @property (nonatomic,strong) UILabel *titleLabel; @end
//
//  HoneycombViewCell.m
//  Demo-Layouts
//
//  Created by 杜子兮(duzixi) on 14-9-1.
//  Copyright (c) 2014年 lanou3g.com All rights reserved.
//

#import HoneycombViewCell.h

@implementation HoneycombViewCell

- (id)initWithFrame:(CGRect)frame
{
    self = [super initWithFrame:frame];
    if (self) {
        // Initialization code
        self.titleLabel = [[UILabel alloc] init];
        self.titleLabel.textColor = [UIColor whiteColor];
        [self.contentView addSubview:self.titleLabel];
    }
    return self;
}

-(void)layoutSubviews
{
    [super layoutSubviews];
    // step 1: 生成六邊形路徑
    CGFloat longSide = SIZE * 0.5 * cosf(M_PI * 30 / 180);
    CGFloat shortSide = SIZE * 0.5 * sin(M_PI * 30 / 180);
    UIBezierPath *path = [UIBezierPath bezierPath];
    [path moveToPoint:CGPointMake(0, longSide)];
    [path addLineToPoint:CGPointMake(shortSide, 0)];
    [path addLineToPoint:CGPointMake(shortSide + SIZE * 0.5, 0)];
    [path addLineToPoint:CGPointMake(SIZE, longSide)];
    [path addLineToPoint:CGPointMake(shortSide + SIZE * 0.5, longSide * 2)];
    [path addLineToPoint:CGPointMake(shortSide, longSide * 2)];
    [path closePath];

    // step 2: 根據路徑生成蒙板
    CAShapeLayer *maskLayer = [CAShapeLayer layer];
    maskLayer.path = [path CGPath];

    // step 3: 給cell添加模版
    self.layer.mask = maskLayer;


    self.backgroundColor = [UIColor orangeColor];
    self.titleLabel.textAlignment = NSTextAlignmentCenter;
    self.titleLabel.frame = self.contentView.frame;

}

/*
// Only override drawRect: if you perform custom drawing.
// An empty implementation adversely affects performance during animation.
- (void)drawRect:(CGRect)rect
{
    // Drawing code
}
*/

@end