一. 舉例
我之前做過一個文件系統就叫 MyFileSys 吧,後來的話,客戶想加入一些附加功能,比如壓縮、加密、殺毒之類的操作,這些附加操作沒有先後順序,比如你可以先壓縮再加密,也可以先殺毒再壓縮,等等。
這些附加功能是可選的,有的客戶要這些功能,有的不要,有的要其中的幾種附加功能等等。怎麼設計呢?
第一種方案:
直接修改這個獨立的文件系統 MyFileSys,對於不同的客戶實現不同的文件系統。
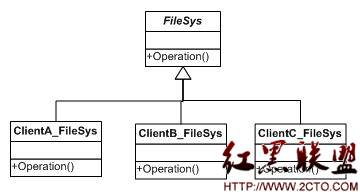
後來隨著客戶的增多,發現維護和修改的工作量越來越大。因為每增加一個客戶就要重新生成一個類,然後把客戶想要的附加功能加入,更加郁悶的是,只針對一個客戶有時也是要修改很多次,客戶今天要這些附加功能,明天又想加入另外一些功能,這樣改來改去,維護工作量也是很大的。
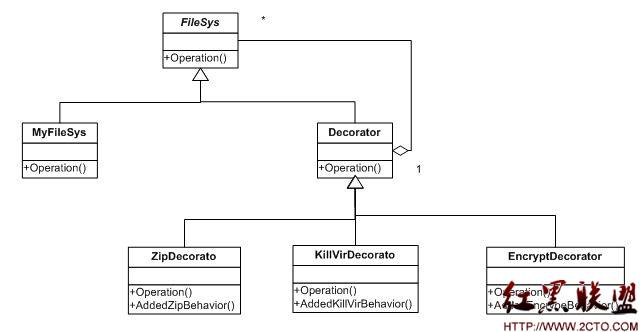
第二種方案:
後來改用第二種方案,實現一個單獨的附加功能類,保持原文件系統不變,這樣在客戶端就可以輕松的加入一些附加功能。
代碼如下:
[cpp] //定義一個對象接口,可以給這些對象動態地添加職責
class FileSys
{
public:
virtual ~FileSys()
{
}
virtual void Operation()
{
}
protected:
FileSys()
{
}
};
//定義一個具體的對象
class MyFileSys:public FileSys
{
public:
MyFileSys()
{
}
~MyFileSys()
{
}
void Operation()
{
cout<<"MyFileSys operation..."<<endl;
}
};
//裝飾抽象類
class Decorator:public FileSys
{
public:
Decorator(FileSys* fileSys)
{
this->_fileSys = fileSys;
}
virtual ~Decorator()
{
delete _fileSys;
}
void Operation()
{
}
protected:
FileSys* _fileSys;
};
//壓縮裝飾類
class ZipDecorator:public Decorator
{
public:
ZipDecorator(FileSys* fileSys):Decorator(fileSys)
{
}
~ZipDecorator()
{
}
void Operation()
{
_fileSys->Operation(); //首先運行以前的功能
this->AddedZipBehavior(); //附加功能
}
void AddedZipBehavior()
{
cout<<"Added Zip Behavior...."<<endl;
}
};
//殺毒裝飾類
class KillVirDecorator:public Decorator
{
public:
KillVirDecorator(FileSys* fileSys):Decorator(fileSys)
{
}
~KillVirDecorator()
{
}
void Operation()
{
_fileSys->Operation();
this->AddedKillVirBehavior();
}
void AddedKillVirBehavior()
{
cout<<"Added Kill Virus Behavior...."<<endl;
}
};
//加密裝飾類
class EncryptDecorator:public Decorator
{
public:
EncryptDecorator(FileSys* fileSys):Decorator(fileSys)
{
}
~EncryptDecorator()
{
}
void Operation()
{
_fileSys->Operation();
this->AddedEncrypeBehavior();
}
void AddedEncrypeBehavior()
{
cout<<"Added Encrypt Behavior...."<<endl;
}
};
//////////////////////////////////////////////////////////////////////////
//測試
int main()
{
FileSys* fileSys = new MyFileSys();
Decorator* dec1 = new ZipDecorator(fileSys); //在原文件系統上,加入壓縮功能
Decorator* dec2 = new KillVirDecorator(dec1); //在之前的基礎上,加入殺毒功能
Decorator* dec3 = new EncryptDecorator(dec2); //再加入加密功能
dec3->Operation();
return 0;
}
//定義一個對象接口,可以給這些對象動態地添加職責
class FileSys
{
public:
virtual ~FileSys()
{
}
virtual void Operation()
{
}
protected:
FileSys()
{
}
};
//定義一個具體的對象 www.2cto.com
class MyFileSys:public FileSys
{
public:
MyFileSys()
{
}
~MyFileSys()
{
}
void Operation()
{
cout<<"MyFileSys operation..."<<endl;
}
};
//裝飾抽象類
class Decorator:public FileSys
{
public:
Decorator(FileSys* fileSys)
{
this->_fileSys = fileSys;
}
virtual ~Decorator()
{
delete _fileSys;
}
void Operation()
{
}
protected:
FileSys* _fileSys;
};
//壓縮裝飾類
class ZipDecorator:public Decorator
{
public:
ZipDecorator(FileSys* fileSys):Decorator(fileSys)
{
}
~ZipDecorator()
{
}
void Operation()
{
_fileSys->Operation(); //首先運行以前的功能
this->AddedZipBehavior(); //附加功能
}
void AddedZipBehavior()
{
cout<<"Added Zip Behavior...."<<endl;
}
};
//殺毒裝飾類
class KillVirDecorator:public Decorator
{
public:
KillVirDecorator(FileSys* fileSys):Decorator(fileSys)
{
}
~KillVirDecorator()
{
}
void Operation()
{
_fileSys->Operation();
this->AddedKillVirBehavior();
}
void AddedKillVirBehavior()
{
cout<<"Added Kill Virus Behavior...."<<endl;
}
};
//加密裝飾類
class EncryptDecorator:public Decorator
{
public:
EncryptDecorator(FileSys* fileSys):Decorator(fileSys)
{
}
~EncryptDecorator()
{
}
void Operation()
{
_fileSys->Operation();
this->AddedEncrypeBehavior();
}
void AddedEncrypeBehavior()
{
cout<<"Added Encrypt Behavior...."<<endl;
}
};
//////////////////////////////////////////////////////////////////////////
//測試
int main()
{
FileSys* fileSys = new MyFileSys();
Decorator* dec1 = new ZipDecorator(fileSys); //在原文件系統上,加入壓縮功能
Decorator* dec2 = new KillVirDecorator(dec1); //在之前的基礎上,加入殺毒功能
Decorator* dec3 = new EncryptDecorator(dec2); //再加入加密功能
dec3->Operation();
return 0;
}這樣之後,如果要添加附加功能,實現起來就很方便了。這種模式就是裝飾模式。
二. 裝飾模式
裝飾模式:動態地給一個對象添加一些額外的職責。就增加功能來說,裝飾模式相比生成子類更為靈活。
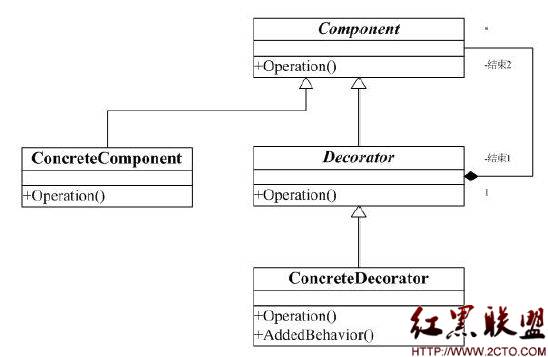
說明:
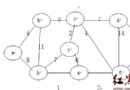
Componet,主要是定義一個接口,通過這個接口可以給這些對象(ConcreteComponent)添加職責。
Dectorator,裝飾類,通過外類(ConcreteDecorator)來擴展Component 類的功能,對於Component來說,是無需知道這個抽象類的存在的。
ConcreteDecorator,具體裝飾類,添加具體的附加功能。
優點:
1. 裝飾類是為已有功能動態地添加更多功能的一種方式。
2. 有效地把類的核心職責和裝飾功能區分開,而且可以去除相關類中重復的裝飾邏輯。
三. 問題討論
從上圖可以看到 Decorator 是繼承於 Component 的,也就和 ConcreteComponent 成了兄弟了,但是 Decorator 的作用卻是修飾 ConcreteComponent 的,這點好像是很怪怪的!!最說不通的是Decorator 與 Component 是沒有is-a關系的!!
我個人覺得:
1. 這個繼承關系,不應該是我們要重點關注的。這裡使用繼承主要是為了要重用 Operation() 這個接口,以達修飾的目的。
2. 重點是 Decorator 與 Component 這個組合關系。裝飾類裡有一個Component 指針,正是由於它的存在才能修飾到具體的 Component 對象。
作者 lwbeyond