說實話,本來我是沒有打算放一個很大的例子的,一則比較復雜,二來或許需要很多次才能說得完。不過,現在已經說完了繪圖部分,所以計劃還是上一個這樣的例子。這裡我會只做出一個簡單的畫板程序,大體上就是能夠畫直線和矩形吧。這樣,我計劃分成兩種實現,一是使用普通的QWidget作為畫板,第二則是使用Graphcis View Framework來實現。因為前面有朋友說不大明白Graphics View的相關內容,所以計劃如此。
好了,現在先來看看我們的主體框架。我們的框架還是使用Qt Creator創建一個Gui Application工程。
簡單的main()函數就不再贅述了,這裡首先來看MainWindow。順便說一下,我一般不會使用ui文件,所以這些內容都是手寫的。首先先來看看最終的運行結果:
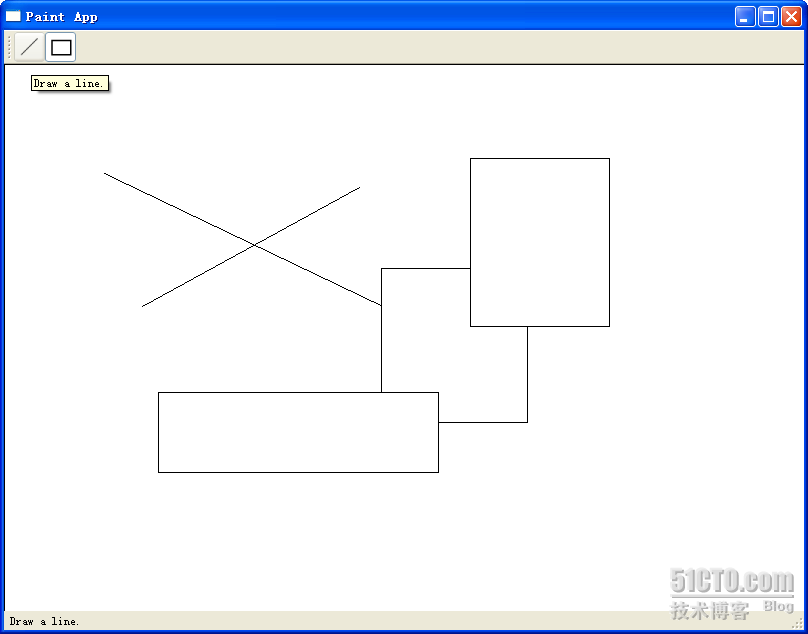
或許很簡單,但是至少我們能夠把前面所說的各種知識串連起來,這也就達到目的了。
現在先來看看MainWindow的代碼:
mainwindow.h

#ifndef MAINWINDOW_H

#define MAINWINDOW_H

#include <QtGui>

#include "shape.h"

#include "paintwidget.h"

class MainWindow : public QMainWindow

{

        Q_OBJECT

public:

        MainWindow(QWidget *parent = 0);

signals:

        void changeCurrentShape(Shape::Code newShape);

private slots:

        void drawLineActionTriggered();

        void drawRectActionTriggered();

};

#endif // MAINWINDOW_H


mainwindow.cpp

#include "mainwindow.h"

MainWindow::MainWindow(QWidget *parent)

        : QMainWindow(parent)

{

        QToolBar *bar = this->addToolBar("Tools");

        QActionGroup *group = new QActionGroup(bar);

        QAction *drawLineAction = new QAction("Line", bar);

        drawLineAction->setIcon(QIcon(":/line.png"));

        drawLineAction->setToolTip(tr("Draw a line."));

        drawLineAction->setStatusTip(tr("Draw a line."));

        drawLineAction->setCheckable(true);

        drawLineAction->setChecked(true);

        group->addAction(drawLineAction);

        bar->addAction(drawLineAction);

        QAction *drawRectAction = new QAction("Rectangle", bar);

        drawRectAction->setIcon(QIcon(":/rect.png"));

        drawRectAction->setToolTip(tr("Draw a rectangle."));

        drawRectAction->setStatusTip(tr("Draw a rectangle."));

        drawRectAction->setCheckable(true);

        group->addAction(drawRectAction);

        bar->addAction(drawRectAction);

        QLabel *statusMsg = new QLabel;

        statusBar()->addWidget(statusMsg);

        PaintWidget *paintWidget = new PaintWidget(this);

        setCentralWidget(paintWidget);

        connect(drawLineAction, SIGNAL(triggered()),

                        this, SLOT(drawLineActionTriggered()));

        connect(drawRectAction, SIGNAL(triggered()),

                        this, SLOT(drawRectActionTriggered()));

        connect(this, SIGNAL(changeCurrentShape(Shape::Code)),

                        paintWidget, SLOT(setCurrentShape(Shape::Code)));

}

void MainWindow::drawLineActionTriggered()

{

 emit changeCurrentShape(Shape::Line);

}

void MainWindow::drawRectActionTriggered()

{

 emit changeCurrentShape(Shape::Rect);

}
應該說,從以往的學習中可以看出,這裡的代碼沒有什麼奇怪的了。我們在MainWindow類裡面聲明了一個信號,changeCurrentShape(Shape::Code),用於按鈕按下後通知畫圖板。注意,QActio的triggered()信號是沒有參數的,因此,我們需要在QAction的槽函數中重新emit我們自己定義的信號。構造函數裡面創建了兩個QAction,一個是 drawLineAction,一個是drawRectAction,分別用於繪制直線和矩形。MainWindow的中心組件是PainWidget,也就是我們的畫圖板。下面來看看PaintWidget類:
paintwidget.h

#ifndef PAINTWIDGET_H

#define PAINTWIDGET_H

#include <QtGui>

#include <QDebug>

#include "shape.h"

#include "line.h"

#include "rect.h"

class PaintWidget : public QWidget

{

 Q_OBJECT

public:

 PaintWidget(QWidget *parent = 0);

public slots:

 void setCurrentShape(Shape::Code s)

 {

  if(s != currShapeCode) {

   currShapeCode = s;

  }

 }

protected:

 void paintEvent(QPaintEvent *event);

 void mousePressEvent(QMouseEvent *event);

 void mouseMoveEvent(QMouseEvent *event);

 void mouseReleaseEvent(QMouseEvent *event);

private:

 Shape::Code currShapeCode;

 Shape *shape;

 bool perm;

 QList<Shape*> shapeList;

};

#endif // PAINTWIDGET_H


paintwidget.cpp

#include "paintwidget.h"

PaintWidget::PaintWidget(QWidget *parent)

 : QWidget(parent), currShapeCode(Shape::Line), shape(NULL), perm(false)

{

 setSizePolicy(QSizePolicy::Expanding, QSizePolicy::Expanding);

}

void PaintWidget::paintEvent(QPaintEvent *event)

{

 QPainter painter(this);

 painter.setBrush(Qt::white);

 painter.drawRect(0, 0, size().width(), size().height());

 foreach(Shape * shape, shapeList) {

  shape->paint(painter);

 }

 if(shape) {

  shape->paint(painter);

 }

}

void PaintWidget::mousePressEvent(QMouseEvent *event)

{

 switch(currShapeCode)

 {

  case Shape::Line:

   {

    shape = new Line;

    break;

   }

  case Shape::Rect:

   {

    shape = new Rect;

    break;

   }

 }

 if(shape != NULL) {

  perm = false;

  shapeList<<shape;

  shape->setStart(event->pos());

  shape->setEnd(event->pos());

 }

}

void PaintWidget::mouseMoveEvent(QMouseEvent *event)

{

 if(shape && !perm) {

  shape->setEnd(event->pos());

  update();

 }

}

void PaintWidget::mouseReleaseEvent(QMouseEvent *event)

{

 perm = true;

}
PaintWidget類定義了一個slot,用於接收改變後的新的ShapeCode。最主要的是,PaintWidget重定義了三個關於鼠標的事件:mousePressEvent,mouseMoveEvent和mouseReleaseEvent。
我們來想象一下如何繪制一個圖形:圖形的繪制與鼠標操作息息相關。以畫直線為例,首先我們需要按下鼠標,確定直線的第一個點,所以在 mousePressEvent裡面,我們讓shape保存下start點。然後在鼠標按下的狀態下移動鼠標,此時,直線就會發生變化,實際上是直線的終止點在隨著鼠標移動,所以在mouseMoveEvent中我們讓shape保存下end點,然後調用update()函數,這個函數會自動調用 paintEvent()函數,顯示出我們繪制的內容。最後,當鼠標松開時,圖形繪制完畢,我們將一個標志位置為true,此時說明這個圖形繪制完畢。
為了保存我們曾經畫下的圖形,我們使用了一個List。每次按下鼠標時,都會把圖形存入這個List。可以看到,我們在paintEvent()函數中使用了foreach遍歷了這個List,繪制出歷史圖形。foreach是Qt提供的一個宏,用於遍歷集合中的元素。
最後我們來看看Shape類。
shape.h

#ifndef SHAPE_H

#define SHAPE_H

#include <QtGui>

class Shape

{

public:

 enum Code {

  Line,

  Rect

 };

 Shape();

 void setStart(QPoint s)

 {

  start = s;

 }

 void setEnd(QPoint e)

 {

  end = e;

 }

 QPoint startPoint()

 {

  return start;

 }

 QPoint endPoint()

 {

  return end;

 }

 void virtual paint(QPainter & painter) = 0;

protected:

 QPoint start;

 QPoint end;

};

#endif // SHAPE_H


shape.cpp

#include "shape.h"

Shape::Shape()

{

}
Shape類最重要的就是保存了start和end兩個點。為什麼只要這兩個點呢?因為我們要繪制的是直線和矩形。對於直線來說,有了兩個點就可以確定這條直線,對於矩形來說,有了兩個點作為左上角的點和右下角的點也可以確定這個矩形,因此我們只要保存兩個點,就足夠保存這兩種圖形的位置和大小的信息。paint()函數是Shape類的一個純虛函數,子類都必須實現這個函數。我們現在有兩個子類:Line和Rect,分別定義如下:
line.h

#ifndef LINE_H

#define LINE_H

#include "shape.h"

class Line : public Shape

{

public:

 Line();

 void paint(QPainter &painter);

};

#endif // LINE_H


line.cpp

#include "line.h"

Line::Line()

{

}

void Line::paint(QPainter &painter)

{

 painter.drawLine(start, end);

}


rect.h

#ifndef RECT_H

#define RECT_H

#include "shape.h"

class Rect : public Shape

{

public:

 Rect();

 void paint(QPainter &painter);

};

#endif // RECT_H


rect.cpp

#include "rect.h"

Rect::Rect()

{

}

void Rect::paint(QPainter &painter)

{

 painter.drawRect(start.x(), start.y(),end.x() - start.x(), end.y() - start.y());

}
使用paint()函數,根據兩個點的數據,Line和Rect都可以繪制出它們自身來。此時就可以看出,我們之所以要建立一個Shape作為父類,因為這兩個類有幾乎完全相似的數據對象,並且從語義上來說,Line、Rect與Shape也完全是一個is-a的關系。如果你想要添加顏色等的信息,完全可以在Shape類進行記錄。這也就是類層次結構的好處。
代碼很多也會比較亂,附件裡面是整個工程的文件,有興趣的朋友不妨看看哦!
出處:http://devbean.blog.51cto.com/448512/243546
本文配套源碼