0.為了與本文情況一致,建議各位看官的工具均升至最新版
Eclipse Kepler+ADT 22.3.0+CDT-master-8.2.1+android-ndk-r9c-windows-x86_64
1.下載Android版Irrlicht的源碼。https://gitorious.org/irrlichtandroid/irrlichtandroid/source/f12c3b9743d64dc5cd61931f40e42e8ca64b40ef:
2.將源碼導入到Eclipse。怎麼導入?蹲牆角反省半小時~~
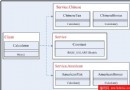
3.導入完畢,代碼結構如下圖


為了程序能支持OpenGL ES,Android的版本號要在8以上,這裡我選擇的是android-16。並且將AndroidManifest.xml中的minSdkVersion改成8
4.右擊項目,選擇Android Tools→Add Native Support,在彈出的輸入框中,輸入irrlicht

如果所有插件均是最新版,則會出現Include文件夾。

5.接下來,就是最激動人心的時刻,右擊項目,Run As | Android Application。完成!!
6.好吧~~看到有人拿刀來了~~OK,還沒結束……,在經過幾分鐘的編譯以後,如果你的NDK是r9版本,就會碰到第一個坑。

這是因為,r9版本以後,方法的接口名變了。只需將
__android_log_print(ANDROID_LOG_INFO, "log", message);改為
__android_log_print(ANDROID_LOG_INFO, "log", “%s”, message);
7.重新編譯,在即將完成編譯時,半路又殺出來一個程咬金![]()
multiple definition of 'GL_BGRA'。這是因為,同時編譯了OpenGL ES1和OpenGL ES2,造成了重復定義。我們首先使用ES1.x渲染。在include\irrCompileConfig.h,注釋掉#define _IRR_COMPILE_WITH_OGLES2_,再次重新編譯。
8.由於所有的文件都間接包含了irrCompileConfig.h,因此等於是又重新編譯了一遍。
![]()
恭喜,編譯成功。
9.oh on!閃退~~看看logcat吧
![]() 請注意這句No OpenGL-ES2 support compiled in.其實,在/jni/android-activity.cpp的nativeInitGL()方法中,我們可以找到答案。
請注意這句No OpenGL-ES2 support compiled in.其實,在/jni/android-activity.cpp的nativeInitGL()方法中,我們可以找到答案。
1: device = createDevice( video::EDT_OGLES2, dimension2d<u32>(gWindowWidth, gWindowHeight), 16, false, false, false, 0);
在創建device,用的是OGLES2,如果我們一路跟進去createDevice()→new CIrrDeviceAndroid()→createDriver(),就會發現,由於我們注釋了_IRR_COMPILE_WITH_OGLES2_,導致程序irrlicht沒有底層圖形庫去渲染圖形,造成程序閃退。現在將createDevice的參數改為video::EDT_OGLES1
1: device = createDevice( video::EDT_OGLES1, dimension2d<u32>(gWindowWidth, gWindowHeight), 16, false, false, false, 0);
10.再次運行,是不是點的想吐了?吐也不行,哥依然閃現給你看~~……。繼續logcat吧
![]()
又發現線索,Could not load mesh, because file could not be opened: 和cannot getMesh。我們可以在項目中搜索cannot getMesh試試看。在/jni/app-android.cpp的initSydney()方法中,我們發現
1: smgr = device->getSceneManager();
2: guienv = device->getGUIEnvironment();
3:
4: stringc myDir = gSdCardPath;
5: myDir += "/Irrlicht";
6: device->getFileSystem()->changeWorkingDirectoryTo(myDir.c_str());
7:
8: stringc sydneyFilename = "/Irrlicht/sydney.md2";
9: mesh = smgr->getMesh( (gSdCardPath+sydneyFilename).c_str() );
10:if (!mesh){11: device->drop();
12: __android_log_print(ANDROID_LOG_INFO, "Irrlicht", "cannot getMesh");
13:return;
14: }
如果你能看懂上面的代碼,那差不多,也就知道錯出在哪了。程序要從/sdcard/Irrlicht/獲去sydney.md2,但手機的SD卡上並沒有這個路徑。所以,我們可以在SD卡上創建一個Irrlicht目錄,並把/IrrlichtSDCard下的文件拷貝到/sdcard/Irrlicht/。
11.如果一切順利,勞拉將會在紅色的背景中原地踏步~~

帥不帥~~
12.總有些人怕麻煩,還得在SD卡創建文件夾,還要復制文件……,DDMS還只能一個一個復制~~麻煩啊~~,還有方法嗎?
不怕麻煩的程序員不是好碼農!秘密就在Utils.java中,直接看unpackOnSdCard()
1:if (Environment.getExternalStorageState().compareTo(Environment.MEDIA_MOUNTED)==0) {2: File sdcard = Environment.getExternalStorageDirectory();
3: String irrlichtPath = sdcard.getAbsoluteFile() + "/Irrlicht/";
4: File irrlichtDir = new File(irrlichtPath);
5:if (irrlichtDir.exists() && !irrlichtDir.isDirectory()) { 6:thrownew IOException("Irrlicht exists and is not a directory on SD Card"); 7: } elseif (!irrlichtDir.exists()) {8: irrlichtDir.mkdirs();
9: }
10:// Note: /sdcard/irrlicht dir exists
11: String[] filenames = assetManager.list("data"); 12:for(String filename:filenames) { 13: InputStream inputStream = assetManager.open("data/" + filename);14: OutputStream outputStream = new FileOutputStream(irrlichtPath + "/" + filename);
15:// copy
16: byte[] buffer = new byte[4096];
17:int length;
18:while ( (length = inputStream.read(buffer)) > 0 ) {19: outputStream.write(buffer, 0, length);
20: }
21: outputStream.flush();
22: outputStream.close();
23: inputStream.close();
24: }
25: } else { 26:thrownew IOException("SD Card not available");27: }
#1—#9 正是在SD卡上創建Irrlicht目錄
重點看11行
String[] filenames = assetManager.list("data");
該行代碼是獲取,/asset/data/下的所有文件名
由此,該函數的功能正是取代我們之前的手動操作,將文件復制到/sdcard/Irrlicht/目錄下。
刪除之前的SD卡上的Irrlicht目錄,在assets目錄下新建data目錄,將IrrlichtSdcard下的文件復制到data目錄下

運行程序~~勞拉依舊飛奔~~
PS:在USB連接手機時,請將USB模式設置成僅充電,即不用通過windows的資源管理器訪問到手機的SD卡,否則Environment.getExternalStorageState()將會返回shard。剩下的,你懂得~~
本文出自 “若羽☆初見” 博客,請務必保留此出處http://youngcold.blog.51cto.com/6366865/1349168