9. 把Visual Studio .Net的當前窗口切換到【Form1.cs(設計)】窗口,並 從【工具箱】中的【Windows窗體組件】選項卡中往設計窗體中拖入下列組件,並 執行相應操作:
一個OpenFileDialog組件,用於選擇播放的視頻;一個panel組件,作為視頻 播放的宿主組件;四個Button按鈕,分別執行視頻打開、播放、暫停和停止操作 。並在這四個組件拖入設計窗口後分別雙擊它們,則系統會在Form1.cs中分別產 生這四個組件Click事件對應的處理代碼。
10. 把Visual Studio .Net的當前窗口切換到Form1.cs的代碼編輯窗口,在 Form1.cs的首部的引入命名空間的代碼區中,用下列代碼替換Form1.cs中由系統 自動產生的引入命名空間代碼:
using System ;
using System.Drawing ;
using System.Collections ;
using System.ComponentModel ;
using System.Windows.Forms ;
using System.Data ;
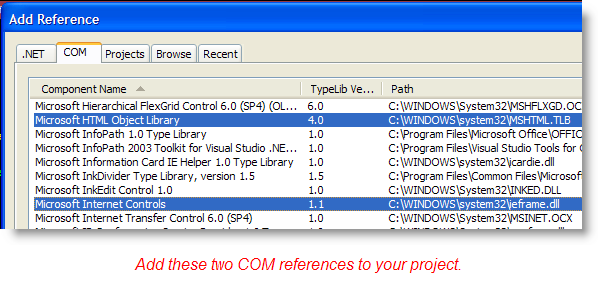
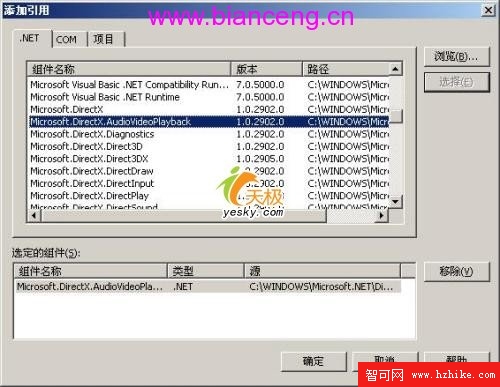
using Microsoft.DirectX.AudioVideoPlayback ;
//引入視頻播放所要使用的Direct X命名空間
11. 在Form1.cs的class的代碼區中添加下列代碼,下列代碼是創建全局使用 的Video實例:
private Video MyVideo = null ;
//創建一個Video實例
12. 以下面代碼替代系統產生的InitializeComponent過程。下面代碼是對加 入窗體的組件以及創建的全局變量進行初始化和定義四個Button組件的Click事件 和Form1的Load事件:
private void InitializeComponent ( )
{
 this.panel1 = new System.Windows.Forms.Panel ( ) ;
 this.button1 = new System.Windows.Forms.Button ( ) ;
 this.button2 = new System.Windows.Forms.Button ( ) ;
 this.button3 = new System.Windows.Forms.Button ( ) ;
 this.button4 = new System.Windows.Forms.Button ( ) ;
 this.openFileDialog1 = new System.Windows.Forms.OpenFileDialog ( ) ;
 this.SuspendLayout ( ) ;
 this.panel1.Dock = System.Windows.Forms.DockStyle.Top ;
 this.panel1.Location = new System.Drawing.Point ( 0, 0 ) ;
 this.panel1.Name = "panel1" ;
 this.panel1.Size = new System.Drawing.Size ( 540, 346 ) ;
 this.panel1.TabIndex = 0 ;
 this.button1.Location = new System.Drawing.Point ( 62, 380 ) ;
 this.button1.Name = "button1" ;
 this.button1.Size = new System.Drawing.Size ( 80, 38 ) ;
 this.button1.TabIndex = 1 ;
 this.button1.Text = "打開" ;
 this.button1.Click += new System.EventHandler ( this.button1_Click ) ;
 this.button2.Location = new System.Drawing.Point ( 165, 380 ) ;
 this.button2.Name = "button2" ;
 this.button2.Size = new System.Drawing.Size ( 81, 38 ) ;
 this.button2.TabIndex = 1 ;
 this.button2.Text = "播放" ;
 this.button2.Click += new System.EventHandler ( this.button2_Click ) ;
 this.button3.Location = new System.Drawing.Point ( 268, 380 ) ;
 this.button3.Name = "button3" ;
 this.button3.Size = new System.Drawing.Size ( 80, 38 ) ;
 this.button3.TabIndex = 1 ;
 this.button3.Text = "暫停" ;
 this.button3.Click += new System.EventHandler ( this.button3_Click ) ;
 this.button4.Location = new System.Drawing.Point ( 371, 380 ) ;
 this.button4.Name = "button4" ;
 this.button4.Size = new System.Drawing.Size ( 81, 38 ) ;
 this.button4.TabIndex = 1 ;
 this.button4.Text = "停止" ;
 this.button4.Click += new System.EventHandler ( this.button4_Click ) ;
 this.openFileDialog1.DefaultExt = "avi" ;
 this.openFileDialog1.Filter = "視頻文件|*.avi||" ;
 this.openFileDialog1.Title = "請選擇播放的AVI文件" ;
 this.AutoScaleBaseSize = new System.Drawing.Size ( 6, 14 ) ;
 this.ClIEntSize = new System.Drawing.Size ( 540, 461 ) ;
 this.Controls.Add ( this.button1 ) ;
 this.Controls.Add ( this.panel1 ) ;
 this.Controls.Add ( this.button2 ) ;
 this.Controls.Add ( this.button3 ) ;
 this.Controls.Add ( this.button4 ) ;
 this.FormBorderStyle = System.Windows.Forms.FormBorderStyle.FixedDialog ;
 this.MaximizeBox = false ;
 this.Name = "Form1" ;
 this.Text = "Visual C#中使用DrIEctX實現媒體播放" ;
 this.Load += new System.EventHandler ( this.Form1_Load ) ;
 this.ResumeLayout ( false ) ;
}
至此【Visual C#中使用DrIEctX實現媒體播放】項目的界面設計和功能實現的 前期工作就完成了,設計界面如圖03所示:
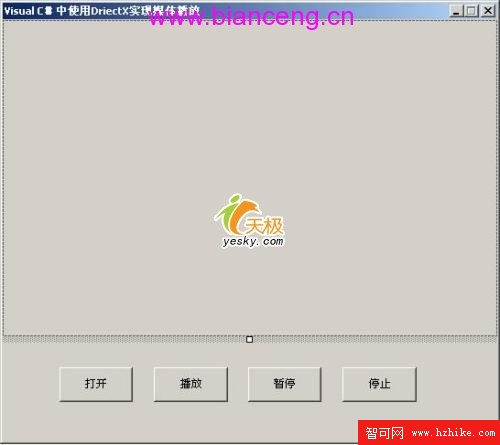
圖03:【Visual C#中使用DrIEctX實現媒體播放】項目的界面設計