六.Visual C#實現Ping命令的實現步驟:
下面是Visual C#實現Ping命令的具體實現步驟:
1.啟動Visual Studio .Net。
2.選擇菜單【文件】|【新建】|【項目】後,彈出【新建項目】對話框。
3.將【項目類型】設置為【Visual C#項目】。
4.將【模板】設置為【Windows應用程序】。
5.在【名稱】文本框中輸入【Visual C#實現Ping命令】。
6.在【位置】的文本框中輸入【E:\VS.Net項目】,然後單擊【確定】按鈕,具體如圖05所示:

圖05:【Visual C#實現Ping命令】項目的【新建項目】對話框
7.【解決方案資源管理器】窗口中,雙擊Form1.cs文件,進入Form1.cs文件的編輯界面。
8.在Form1.cs文件的開頭的導入命名空間的代碼區,添加下列代碼,下列代碼是導入下面程序中使用到的類所在的命名空間:
using System.Net ;
using System.Net.Sockets ;
9.把Visual Studio .Net的當前窗口切換到【Form1.cs(設計)】窗口,並從【工具箱】中的【Windows窗體組件】選項卡中拖入下列組件到設計窗體,並執行相應的操作:
一個TextBox組件,用來輸入進行Ping操作的遠程主機名稱或IP地址。
一個ListBox組件,用以顯示Ping操作結果。
一個Label組件。
一個Button組件,名稱為button1,並在它拖入窗體後,雙擊它,則Visual Studio .Net會在Form1.cs文件中產生其Click事件對應的處理代碼。
10. 把Visual Studio .Net的當前窗口切換到Form1.cs的代碼編輯窗口,並用下列代碼替換Form1.cs中的InitializeComponent過程對應的處理代碼:
private void InitializeComponent ( )
{
this.textBox1 = new System.Windows.Forms.TextBox ( ) ;
this.label1 = new System.Windows.Forms.Label ( ) ;
this.listBox1 = new System.Windows.Forms.ListBox ( ) ;
this.button1 = new System.Windows.Forms.Button ( ) ;
this.SuspendLayout ( ) ;
this.textBox1.Location = new System.Drawing.Point ( 116 , 14 ) ;
this.textBox1.Name = "textBox1" ;
this.textBox1.Size = new System.Drawing.Size ( 148 , 21 ) ;
this.textBox1.TabIndex = 0 ;
this.textBox1.Text = "" ;
this.textBox1.TextChanged += new System.EventHandler ( this.textBox1_TextChanged ) ;
this.label1.Location = new System.Drawing.Point ( 12 , 14 ) ;
this.label1.Name = "label1" ;
this.label1.TabIndex = 1 ;
this.label1.Text = "請輸入主機名:" ;
this.listBox1.BackColor = System.Drawing.SystemColors.WindowText ;
this.listBox1.ForeColor = System.Drawing.SystemColors.Window ;
this.listBox1.ItemHeight = 12 ;
this.listBox1.Location = new System.Drawing.Point ( 6 , 42 ) ;
this.listBox1.Name = "listBox1" ;
this.listBox1.Size = new System.Drawing.Size ( 400 , 280 ) ;
this.listBox1.TabIndex = 2 ;
this.button1.Location = new System.Drawing.Point ( 274 , 12 ) ;
this.button1.Name = "button1" ;
this.button1.TabIndex = 3 ;
this.button1.Text = "Ping" ;
this.button1.Click += new System.EventHandler ( this.button1_Click ) ;
this.AutoScaleBaseSize = new System.Drawing.Size ( 6 , 14 ) ;
this.ClIEntSize = new System.Drawing.Size ( 410 , 333 ) ;
this.Controls.AddRange ( new System.Windows.Forms.Control[ ] {
this.button1 ,
this.listBox1 ,
this.label1 ,
this.textBox1 } ) ;
this.MaximizeBox = false ;
this.Name = "Form1" ;
this.Text = "Visual C#實現Ping" ;
this.ResumeLayout ( false ) ;
}
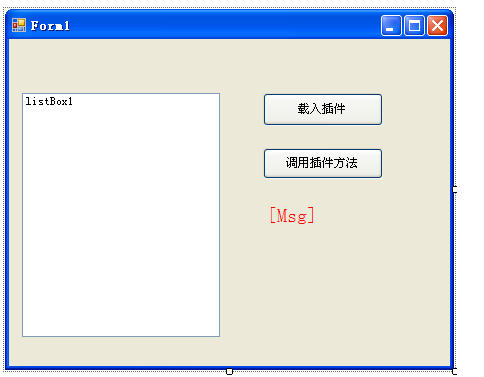
至此【Visual C#實現Ping命令】項目的界面設計工作和功能實現的前期准備工作就完成了,設計後的界面如圖06所示:

圖06:【Visual C#實現Ping命令】項目的設計界面