private void InitializeComponent ( )
{
this.groupBox1 = new System.Windows.Forms.GroupBox ( ) ;
this.txtUserText = new System.Windows.Forms.TextBox ( ) ;
this.label1 = new System.Windows.Forms.Label ( ) ;
this.groupBox1.SuspendLayout ( ) ;
this.SuspendLayout ( ) ;
this.groupBox1.Controls.Add ( this.txtUserText ) ;
this.groupBox1.Controls.Add ( this.label1 ) ;
this.groupBox1.Location = new System.Drawing.Point ( 8 , 8 ) ;
this.groupBox1.Name = "groupBox1" ;
this.groupBox1.Size = new System.Drawing.Size ( 272 , 56 ) ;
this.groupBox1.TabIndex = 0 ;
this.groupBox1.TabStop = false ;
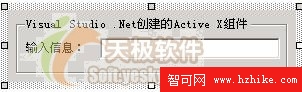
this.groupBox1.Text = "Visual Studio .Net創建的Active X組件" ;
this.txtUserText.Enabled = false ;
this.txtUserText.Location = new System.Drawing.Point ( 84 , 20 ) ;
this.txtUserText.Name = "txtUserText" ;
this.txtUserText.Size = new System.Drawing.Size ( 180 , 21 ) ;
this.txtUserText.TabIndex = 1 ;
this.txtUserText.Text = "" ;
this.label1.Location = new System.Drawing.Point ( 8 , 24 ) ;
this.label1.Name = "label1" ;
this.label1.Size = new System.Drawing.Size ( 66 , 16 ) ;
this.label1.TabIndex = 0 ;
this.label1.Text = "輸入信息:" ;
this.Controls.Add ( this.groupBox1 ) ;
this.Name = "MyControl" ;
this.Size = new System.Drawing.Size ( 288 , 72 ) ;
this.groupBox1.ResumeLayout ( false ) ;
this.ResumeLayout ( false ) ;
}
public interface AxMyControl
{
String UserText { set ; get ; }
}
private String mStr_UserText ;
public String UserText
{
get { return mStr_UserText ; }
set
{
mStr_UserText = value ;
//修改組件的數值
txtUserText.Text = value ;
}
}
using System ;
using System.Collections ;
using System.ComponentModel ;
using System.Drawing ;
using System.Data ;
using System.Windows.Forms ;
namespace ActiveXDotNet
{
public interface AxMyControl
{
String UserText { set ; get ; }
}
/// <summary>
/// MyControl 的摘要說明。
/// </summary>
public class MyControl : System.Windows.Forms.UserControl , AxMyControl
{
/// <summary>
/// 必需的設計器變量。
/// </summary>
private System.ComponentModel.Container components = null ;
private System.Windows.Forms.GroupBox groupBox1 ;
private System.Windows.Forms.Label label1 ;
private System.Windows.Forms.TextBox txtUserText ;
private String mStr_UserText ;
public String UserText
{
get { return mStr_UserText ; }
set
{
mStr_UserText = value ;
//修改組件的數值
txtUserText.Text = value ;
}
}
public MyControl ( )
{
// 該調用是 Windows.Forms 窗體設計器所必需的。
InitializeComponent ( ) ;
// TODO: 在 InitializeComponent 調用後添加任何初始化
}
/// <summary>
/// 清理所有正在使用的資源。
/// </summary>
protected override void Dispose ( bool disposing )
{
if ( disposing )
{
if ( components != null )
{
components.Dispose ( ) ;
}
}
base.Dispose ( disposing ) ;
}
#region 組件設計器生成的代碼
/// <summary>
/// 設計器支持所需的方法 - 不要使用代碼編輯器
/// 修改此方法的內容。
/// </summary>
private void InitializeComponent ( )
{
this.groupBox1 = new System.Windows.Forms.GroupBox ( ) ;
this.txtUserText = new System.Windows.Forms.TextBox ( ) ;
this.label1 = new System.Windows.Forms.Label ( ) ;
this.groupBox1.SuspendLayout ( ) ;
this.SuspendLayout ( ) ;
this.groupBox1.Controls.Add ( this.txtUserText ) ;
this.groupBox1.Controls.Add ( this.label1 ) ;
this.groupBox1.Location = new System.Drawing.Point ( 8 , 8 ) ;
this.groupBox1.Name = "groupBox1" ;
this.groupBox1.Size = new System.Drawing.Size ( 272 , 56 ) ;
this.groupBox1.TabIndex = 0 ;
this.groupBox1.TabStop = false ;
this.groupBox1.Text = "Visual C#創建的Active X組件" ;
this.txtUserText.Enabled = false ;
this.txtUserText.Location = new System.Drawing.Point ( 84 , 20 ) ;
this.txtUserText.Name = "txtUserText" ;
this.txtUserText.Size = new System.Drawing.Size ( 180 , 21 ) ;
this.txtUserText.TabIndex = 1 ;
this.txtUserText.Text = "" ;
this.label1.Location = new System.Drawing.Point ( 8 , 24 ) ;
this.label1.Name = "label1" ;
this.label1.Size = new System.Drawing.Size ( 66 , 16 ) ;
this.label1.TabIndex = 0 ;
this.label1.Text = "輸入信息:" ;
this.Controls.Add ( this.groupBox1 ) ;
this.Name = "MyControl" ;
this.Size = new System.Drawing.Size ( 288 , 72 ) ;
this.groupBox1.ResumeLayout ( false ) ;
this.ResumeLayout ( false ) ;
}
#endregion
}
}
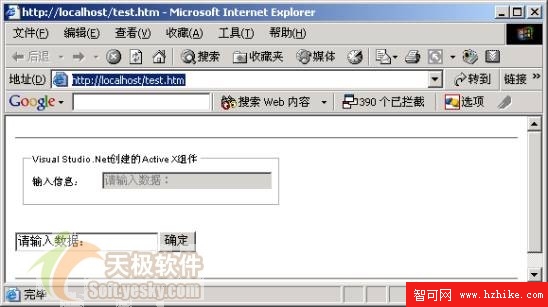
<Html>
<body color = white>
<hr>
<font face = arial size = 1>
<OBJECT id = "MyControl1" name = "MyControl1" classid = "ActiveXDotNet.dll#ActiveXDotNet.MyControl" width = 288 height = 72 >
</OBJECT>
</font>
<form name = "frm" id = "frm" >
<input type = "text" name = "txt" value = "請輸入數據:" ><input type = button value = "確定" onClick = "DOScript ( ) ; ">
</form>
<hr>
</body>
<script language = "Javascript">
function DOScript ( )
{
MyControl1.UserText = frm.txt.value ;
}
</script>
</Html>