本章我們將以工業控制和嵌入式系統中運用極為廣泛的串口通信為例講述多線程的典型應用。
而網絡通信也是多線程應用最廣泛的領域之一,所以本章的最後一節也將對多線程網絡通信進行簡短的描述。
1.串口通信
在工業控制系統中,工控機(一般都基於PC Windows平台)經常需要與單片機通過串口進行通信。因此,操作和使用PC的串口成為大多數單片機、嵌入式系統領域工程師必須具備的能力。
串口的使用需要通過三個步驟來完成的:
(1) 打開通信端口;
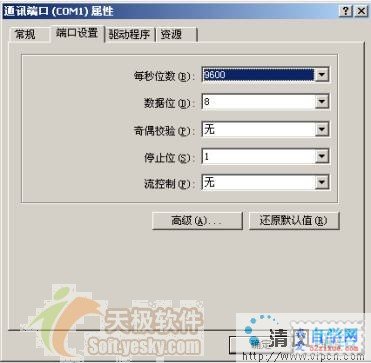
(2) 初始化串口,設置波特率、數據位、停止位、奇偶校驗等參數。為了給讀者一個直觀的印象,下圖從Windows的"控制面板->系統->設備治理器->通信端口(COM1)"打開COM的設置窗口:
(3) 讀寫串口。
在WIN32平台下,對通信端口進行操作跟基本的文件操作一樣。
創建/打開COM資源
下列函數假如調用成功,則返回一個標識通信端口的句柄,否則返回-1:
HADLE CreateFile(PCTSTR lpFileName, //通信端口名,如"COM1"
Word dwDesiredaccess, //對資源的訪問類型
WORD dwShareMode, //指定共享模式,COM不能共享,該參數為0
PSECURITY_ATTRIBUTES lpSecurityAttributes,
//安全描述符指針,可為NULL
WORD dwCreationDisposition, //創建方式
WORD dwFlagsAndAttributes, //文件屬性,可為NULL
HANDLE hTemplateFile //模板文件句柄,置為NULL
);
獲得/設置COM屬性
下列函數可以獲得COM口的設備控制塊,從而獲得相關參數:
BOOL WINAPI GetCommState(
HANDLE hFile, //標識通信端口的句柄
LPDCB lpDCB //指向一個設備控制塊(DCB結構)的指針
);
假如要調整通信端口的參數,則需要重新配置設備控制塊,再用WIN32 API SetCommState()函數進行設置:
BOOL SetCommState(
HANDLE hFile, //標識通信端口的句柄
LPDCB lpDCB //指向一個設備控制塊(DCB結構)的指針
);
DCB結構包含了串口的各項參數設置,如下:
typedef strUCt _DCB
{
// dcb
DWORD DCBlength; // sizeof(DCB)
DWORD BaudRate; // current baud rate
DWORD fBinary: 1; // binary mode, no EOF check
DWORD fParity: 1; // enable parity checking
DWORD fOutxCtsFlow: 1; // CTS output flow control
DWORD fOutxDsrFlow: 1; // DSR output flow control
DWORD fDtrControl: 2; // DTR flow control type
DWORD fDsrSensitivity: 1; // DSR sensitivity
DWORD fTXContinueOnXoff: 1; // XOFF continues Tx
DWORD fOutX: 1; // XON/XOFF out flow control
DWORD fInX: 1; // XON/XOFF in flow control
DWORD fErrorChar: 1; // enable error replacement
DWORD fNull: 1; // enable null stripping
DWORD fRtsControl: 2; // RTS flow control
DWORD fAbortOnError: 1; // abort reads/writes on error
DWORD fDummy2: 17; // reserved
WORD wReserved; // not currently used
WORD XonLim; // transmit XON threshold
WORD XoffLim; // transmit XOFF threshold
BYTE ByteSize; // number of bits/byte, 4-8
BYTE Parity; // 0-4=no,odd,even,mark,space
BYTE StopBits; // 0,1,2 = 1, 1.5, 2
char XonChar; // Tx and Rx XON character
char XoffChar; // Tx and Rx XOFF character
char ErrorChar; // error replacement character
char EofChar; // end of input character
char EvtChar; // received event character
WORD wReserved1; // reserved; do not use
} DCB;
讀寫串口
在讀寫串口之前,還要用PurgeComm()函數清空緩沖區,並用SetCommMask ()函數設置事件掩模來監視指定通信端口上的事件,其原型為:
BOOL SetCommMask(
HANDLE hFile, //標識通信端口的句柄
DWORD dwEvtMask //能夠使能的通信事件
);
串口上可能發生的事件如下表所示:
值 事件描述 EV_BREAK A break was detected on input. EV_CTS The CTS (clear-to-send) signal changed state. EV_DSR The DSR(data-set-ready) signal changed state. EV_ERR A line-status error occurred. Line-status errors are CE_FRAME, CE_OVERRUN, and CE_RXPARITY. EV_RING A ring indicator was detected. EV_RLSD The RLSD (receive-line-signal-detect) signal changed state. EV_RXCHAR A character was received and placed in the input buffer. EV_RXFLAG The event character was received and placed in the input buffer. The event character is specified in the device's DCB structure, which is applied to a serial port by using the SetCommState function. EV_TXEMPTY The last character in the output buffer was sent.
在設置好事件掩模後,我們就可以利用WaitCommEvent()函數來等待串口上發生事件,其函數原型為:
BOOL WaitCommEvent(
HANDLE hFile, //標識通信端口的句柄
LPDWORD lpEvtMask, //指向存放事件標識變量的指針
LPOVERLAPPED lpOverlapped, // 指向overlapped結構
);
我們可以在發生事件後,根據相應的事件類型,進行串口的讀寫操作:
BOOL ReadFile(HANDLE hFile, //標識通信端口的句柄
LPVOID lpBuffer, //輸入數據Buffer指針
DWORD nNumberOfBytesToRead, // 需要讀取的字節數
LPDWORD lpNumberOfBytesRead, //實際讀取的字節數指針
LPOVERLAPPED lpOverlapped //指向overlapped結構
);
BOOL WriteFile(HANDLE hFile, //標識通信端口的句柄
LPCVOID lpBuffer, //輸出數據Buffer指針
DWORD nNumberOfBytesToWrite, //需要寫的字節數
LPDWORD lpNumberOfBytesWritten, //實際寫入的字節數指針
LPOVERLAPPED lpOverlapped //指向overlapped結構
);
2.工程實例
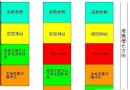
下面我們用第1節所述API實現一個多線程的串口通信程序。這個例子工程(工程名為MultiThreadCom)的界面很簡單,如下圖所示:
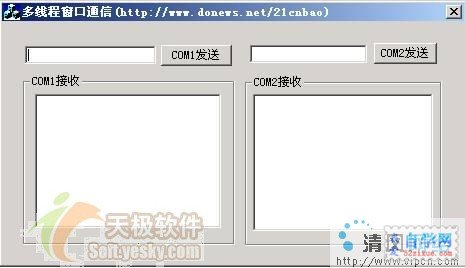
它是一個多線程的應用程序,包括兩個工作者線程,分別處理串口1和串口2。為了簡化問題,我們讓連接兩個串口的電纜只包含RX、TX兩根連線(即不以硬件控制RS-232,串口上只會發生EV_TXEMPTY、EV_RXCHAR事件)。
在工程實例的BOOL CMultiThreadComApp::InitInstance()函數中,啟動並設置COM1和COM2,其源代碼為:
BOOL CMultiThreadComApp::InitInstance()
{
AfxEnableControlContainer();
//打開並設置COM1
hComm1=CreateFile("COM1", GENERIC_READGENERIC_WRITE, 0, NULL ,OPEN_EXISTING, 0,NULL);
if (hComm1==(HANDLE)-1)
{
AfxMessageBox("打開COM1失敗");
return false;
}
else
{
DCB wdcb;
GetCommState (hComm1,&wdcb);
wdcb.BaudRate=9600;
SetCommState (hComm1,&wdcb);
PurgeComm(hComm1,PURGE_TXCLEAR);
}
//打開並設置COM2
hComm2=CreateFile("COM2", GENERIC_READGENERIC_WRITE, 0, NULL ,OPEN_EXISTING, 0,NULL);
if (hComm2==(HANDLE)-1)
{
AfxMessageBox("打開COM2失敗");
return false;
}
else
{
DCB wdcb;
GetCommState (hComm2,&wdcb);
wdcb.BaudRate=9600;
SetCommState (hComm2,&wdcb);
PurgeComm(hComm2,PURGE_TXCLEAR);
}
CMultiThreadComDlg dlg;
m_pMainWnd = &dlg;
int nResponse = dlg.DoModal();
if (nResponse == IDOK)
{
// TODO: Place code here to handle when the dialog is
// dismissed with OK
}
else if (nResponse == IDCANCEL)
{
// TODO: Place code here to handle when the dialog is
// dismissed with Cancel
}
return FALSE;
}
此後我們在對話框CMultiThreadComDlg的初始化函數OnInitDialog中啟動兩個分別處理COM1和COM2的線程:
BOOL CMultiThreadComDlg::OnInitDialog()
{
CDialog::OnInitDialog();
// Add "About..." menu item to system menu.
// IDM_ABOUTBOX must be in the system command range.
ASSERT((IDM_ABOUTBOX & 0xFFF0) == IDM_ABOUTBOX);
ASSERT(IDM_ABOUTBOX < 0xF000);
CMenu* pSysMenu = GetSystemMenu(FALSE);
if (pSysMenu != NULL)
{
CString strAboutMenu;
strAboutMenu.LoadString(IDS_ABOUTBOX);
if (!strAboutMenu.IsEmpty())
{
pSysMenu->AppendMenu(MF_SEPARATOR);
pSysMenu->AppendMenu(MF_STRING, IDM_ABOUTBOX, strAboutMenu);
}
}
// Set the icon for this dialog. The framework does this automatically
// when the application's main window is not a dialog
SetIcon(m_hIcon, TRUE); // Set big icon
SetIcon(m_hIcon, FALSE); // Set small icon
// TODO: Add extra initialization here
//啟動串口1處理線程
DWORD nThreadId1;
hCommThread1 = ::CreateThread((LPSECURITY_ATTRIBUTES)NULL, 0,
(LPTHREAD_START_ROUTINE)Com1ThreadPRocess, AfxGetMainWnd()->m_hWnd, 0, &nThreadId1);
if (hCommThread1 == NULL)
{
AfxMessageBox("創建串口1處理線程失敗");
return false;
}
//啟動串口2處理線程
DWORD nThreadId2;
hCommThread2 = ::CreateThread((LPSECURITY_ATTRIBUTES)NULL, 0,
(LPTHREAD_START_ROUTINE)Com2ThreadProcess, AfxGetMainWnd()->m_hWnd, 0, &nThreadId2);
if (hCommThread2 == NULL)
{
AfxMessageBox("創建串口2處理線程失敗");
return false;
}
return TRUE; // return TRUE unless you set the focus to a control
}
兩個串口COM1和COM2對應的線程處理函數等待串口上發生事件,並根據事件類型和自身緩沖區是否有數據要發送進行相應的處理,其源代碼為:
DWORD WINAPI Com1ThreadProcess(HWND hWnd//主窗口句柄)
{
DWORD wEven;
char str[10]; //讀入數據
SetCommMask(hComm1, EV_RXCHAR EV_TXEMPTY);
while (TRUE)
{
WaitCommEvent(hComm1, &wEven, NULL);
if(wEven = 0)
{
CloseHandle(hCommThread1);
hCommThread1 = NULL;
ExitThread(0);
}
else
{
switch (wEven)
{
case EV_TXEMPTY:
if (wTxPos < wTxLen)
{
//在串口1寫入數據
DWORD wCount; //寫入的字節數
WriteFile(hComm1, com1Data.TxBuf[wTxPos], 1, &wCount, NULL);
com1Data.wTxPos++;
}
break;
case EV_RXCHAR:
if (com1Data.wRxPos < com1Data.wRxLen)
{
//讀取串口數據, 處理收到的數據
DWORD wCount; //讀取的字節數
ReadFile(hComm1, com1Data.RxBuf[wRxPos], 1, &wCount, NULL);
com1Data.wRxPos++;
if(com1Data.wRxPos== com1Data.wRxLen);
::PostMessage(hWnd, COM_SENDCHAR, 0, 1);
}
break;
}
}
}
}
return TRUE;
}
DWORD WINAPI Com2ThreadProcess(HWND hWnd //主窗口句柄)
{
DWORD wEven;
char str[10]; //讀入數據
SetCommMask(hComm2, EV_RXCHAR EV_TXEMPTY);
while (TRUE)
{
WaitCommEvent(hComm2, &wEven, NULL);
if (wEven = 0)
{
CloseHandle(hCommThread2);
hCommThread2 = NULL;
ExitThread(0);
}
else
{
switch (wEven)
{
case EV_TXEMPTY:
if (wTxPos < wTxLen)
{
//在串口2寫入數據
DWORD wCount; //寫入的字節數
WriteFile(hComm2, com2Data.TxBuf[wTxPos], 1, &wCount, NULL);
com2Data.wTxPos++;
}
break;
case EV_RXCHAR:
if (com2Data.wRxPos < com2Data.wRxLen)
{
//讀取串口數據, 處理收到的數據
DWORD wCount; //讀取的字節數
ReadFile(hComm2, com2Data.RxBuf[wRxPos], 1, &wCount, NULL);
com2Data.wRxPos++;
if(com2Data.wRxPos== com2Data.wRxLen);
::PostMessage(hWnd, COM_SENDCHAR, 0, 1);
}
break;
}
}
}
return TRUE;
}
線程控制函數中所操作的com1Data和com2Data是與串口對應的數據結構struct tagSerialPort的實例,這個數據結構是:
typedef struct tagSerialPort
{
BYTE RxBuf[SPRX_BUFLEN];//接收Buffer
WORD wRxPos; //當前接收字節位置
WORD wRxLen; //要接收的字節數
BYTE TxBuf[SPTX_BUFLEN];//發送Buffer
WORD wTxPos; //當前發送字節位置
WORD wTxLen; //要發送的字節數
}SerialPort, * LPSerialPort;
3.多線程串口類
使用多線程串口通信更方便的途徑是編寫一個多線程的串口類,例如Remon Spekreijse編寫了一個CSerialPort串口類。仔細分析這個類的源代碼,將十分有助於我們對先前所學多線程及同步知識的理解。
3.1類的定義
#ifndef __SERIALPORT_H__
#define __SERIALPORT_H__
#define WM_COMM_BREAK_DETECTED WM_USER+1 // A break was detected on input.
#define WM_COMM_CTS_DETECTED WM_USER+2 // The CTS (clear-to-send) signal changed state.
#define WM_COMM_DSR_DETECTED WM_USER+3 // The DSR (data-set-ready) signal changed state.
#define WM_COMM_ERR_DETECTED WM_USER+4 // A line-status error occurred. Line-status errors are CE_FRAME, CE_OVERRUN, and CE_RXPARITY.
#define WM_COMM_RING_DETECTED WM_USER+5 // A ring indicator was detected.
#define WM_COMM_RLSD_DETECTED WM_USER+6 // The RLSD (receive-line-signal-detect) signal changed state.
#define WM_COMM_RXCHAR WM_USER+7 // A character was received and placed in the input buffer.
#define WM_COMM_RXFLAG_DETECTED WM_USER+8 // The event character was received and placed in the input buffer.
#define WM_COMM_TXEMPTY_DETECTED WM_USER+9 // The last character in the output buffer was sent.
class CSerialPort
{
public:
// contruction and destruction
CSerialPort();
virtual ~CSerialPort();
// port initialisation
BOOL InitPort(CWnd* pPortOwner, UINT portnr = 1, UINT baud = 19200, char parity = 'N', UINT databits = 8, UINT stopsbits = 1, DWORD dwCommEvents = EV_RXCHAR EV_CTS, UINT nBufferSize = 512);
// start/stop comm watching
BOOL StartMonitoring();
BOOL RestartMonitoring();
BOOL StopMonitoring();
DWORD GetWriteBufferSize();
DWORD GetCommEvents();
DCB GetDCB();
void WriteToPort(char* string);
protected:
// protected memberfunctions
void ProcessErrorMessage(char* ErrorText);
static UINT CommThread(LPVOID pParam);
static void ReceiveChar(CSerialPort* port, COMSTAT comstat);
static void WriteChar(CSerialPort* port);
// thread
CWinThread* m_Thread;
// synchronisation objects
CRITICAL_SECTION m_csCommunicationSync;
BOOL m_BThreadAlive;
// handles
HANDLE m_hShutdownEvent;
HANDLE m_hComm;
HANDLE m_hWriteEvent;
// Event array.
// One element is used for each event. There are two event handles for each port.
// A Write event and a receive character event which is located in the overlapped structure (m_ov.hEvent).
// There is a general shutdown when the port is closed.
HANDLE m_hEventArray[3];
// structures
OVERLAPPED m_ov;
COMMTIMEOUTS m_CommTimeouts;
DCB m_dcb;
// owner window
CWnd* m_pOwner;
// misc
UINT m_nPortNr;
char* m_szWriteBuffer;
DWORD m_dwCommEvents;
DWORD m_nWriteBufferSize;
};
#endif __SERIALPORT_H__
3.2類的實現
3.2.1構造函數與析構函數
進行相關變量的賦初值及內存恢復:
CSerialPort::CSerialPort()
{
m_hComm = NULL;
// initialize overlapped structure members to zero
m_ov.Offset = 0;
m_ov.OffsetHigh = 0;
// create events
m_ov.hEvent = NULL;
m_hWriteEvent = NULL;
m_hShutdownEvent = NULL;
m_szWriteBuffer = NULL;
m_bThreadAlive = FALSE;
}
//
// Delete dynamic memory
//
CSerialPort::~CSerialPort()
{
do
{
SetEvent(m_hShutdownEvent);
}
while (m_bThreadAlive);
TRACE("Thread ended\n");
delete []m_szWriteBuffer;
}
3.2.2核心函數:初始化串口
在初始化串口函數中,將打開串口,設置相關參數,並創建串口相關的用戶控制事件,初始化臨界區(Critical Section),以成隊的EnterCriticalSection()、LeaveCriticalSection()函數進行資源的排它性訪問:
BOOL CSerialPort::InitPort(CWnd *pPortOwner,
// the owner (CWnd) of the port (receives message)
UINT portnr, // portnumber (1..4)
UINT baud, // baudrate
char parity, // parity
UINT databits, // databits
UINT stopbits, // stopbits
DWORD dwCommEvents, // EV_RXCHAR, EV_CTS etc
UINT writebuffersize) // size to the writebuffer
{
assert(portnr > 0 && portnr < 5);
assert(pPortOwner != NULL);
// if the thread is alive: Kill
if (m_bThreadAlive)
{
do
{
SetEvent(m_hShutdownEvent);
}
while (m_bThreadAlive);
TRACE("Thread ended\n");
}
// create events
if (m_ov.hEvent != NULL)
ResetEvent(m_ov.hEvent);
m_ov.hEvent = CreateEvent(NULL, TRUE, FALSE, NULL);
if (m_hWriteEvent != NULL)
ResetEvent(m_hWriteEvent);
m_hWriteEvent = CreateEvent(NULL, TRUE, FALSE, NULL);
if (m_hShutdownEvent != NULL)
ResetEvent(m_hShutdownEvent);
m_hShutdownEvent = CreateEvent(NULL, TRUE, FALSE, NULL);
// initialize the event objects
m_hEventArray[0] = m_hShutdownEvent; // highest priority
m_hEventArray[1] = m_ov.hEvent;
m_hEventArray[2] = m_hWriteEvent;
// initialize critical section
InitializeCriticalSection(&m_csCommunicationSync);
// set buffersize for writing and save the owner
m_pOwner = pPortOwner;
if (m_szWriteBuffer != NULL)
delete []m_szWriteBuffer;
m_szWriteBuffer = new char[writebuffersize];
m_nPortNr = portnr;
m_nWriteBufferSize = writebuffersize;
m_dwCommEvents = dwCommEvents;
BOOL bResult = FALSE;
char *szPort = new char[50];
char *szBaud = new char[50];
// now it critical!
EnterCriticalSection(&m_csCommunicationSync);
// if the port is already opened: close it
if (m_hComm != NULL)
{
CloseHandle(m_hComm);
m_hComm = NULL;
}
// prepare port strings
sprintf(szPort, "COM%d", portnr);
sprintf(szBaud, "baud=%d parity=%c data=%d stop=%d", baud, parity, databits,stopbits);
// get a handle to the port
m_hComm = CreateFile(szPort, // communication port string (COMX)
GENERIC_READ GENERIC_WRITE, // read/write types
0, // comm devices must be opened with exclusive access
NULL, // no security attributes
OPEN_EXISTING, // comm devices must use OPEN_EXISTING
FILE_FLAG_OVERLAPPED, // Async I/O
0); // template must be 0 for comm devices
if (m_hComm == INVALID_HANDLE_VALUE)
{
// port not found
delete []szPort;
delete []szBaud;
return FALSE;
}
// set the timeout values
m_CommTimeouts.ReadIntervalTimeout = 1000;
m_CommTimeouts.ReadTotalTimeoutMultiplier = 1000;
m_CommTimeouts.ReadTotalTimeoutConstant = 1000;
m_CommTimeouts.WriteTotalTimeoutMultiplier = 1000;
m_CommTimeouts.WriteTotalTimeoutConstant = 1000;
// configure
if (SetCommTimeouts(m_hComm, &m_CommTimeouts))
{
if (SetCommMask(m_hComm, dwCommEvents))
{
if (GetCommState(m_hComm, &m_dcb))
{
m_dcb.fRtsControl = RTS_CONTROL_ENABLE; // set RTS bit high!
if (BuildCommDCB(szBaud, &m_dcb))
{
if (SetCommState(m_hComm, &m_dcb))
;
// normal Operation... continue
else
ProcessErrorMessage("SetCommState()");
}
else
ProcessErrorMessage("BuildCommDCB()");
}
else
ProcessErrorMessage("GetCommState()");
}
else
ProcessErrorMessage("SetCommMask()");
}
else
ProcessErrorMessage("SetCommTimeouts()");
delete []szPort;
delete []szBaud;
// flush the port
PurgeComm(m_hComm, PURGE_RXCLEAR PURGE_TXCLEAR PURGE_RXABORT PURGE_TXABORT);
// release critical section
LeaveCriticalSection(&m_csCommunicationSync);
TRACE("Initialisation for communicationport %d completed.\nUse Startmonitor to communicate.\n", portnr);
return TRUE;
}
(編輯:)
本文標簽: