在Windows編程中圖像處理相對比較復雜,好在C++ Builder提供了一些圖形類,它們通過對Windows中的圖形對象進行包裝,從而大大簡化了圖像操作的難度。下面就通過對圖像進行柔化、銳化、浮雕效果等幾個特殊效果處理來具體說明一下。
一、准備工作 位圖圖形實際上是像素的二維數組,它記錄了每個像素的顏色信息,而TCanvas類提供了Pixels屬性,用它可以存取指定像素的顏色值,通過這個屬性將位圖圖形的部分或全部像素的顏色值進行相應的變換處理,就可以實現圖像的特殊效果處理。在Windows中顏色是根據紅、綠、藍三種顏色的飽和度來定義的,在這裡我們要將像素顏色值的紅、綠、藍分量從像素值中分離出來,分別加以保存,所以需要定義一個結構來存放顏色分量:
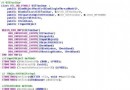
struct rgb_str

{

unsigned char r_color;

unsigned char g_color;

unsigned char b_color;

};

rgb_str rgb[2000][2000];

建立全局變量:Graphics::TBitmap *bitmap;

//用來存放變換後的位圖

int i,j,width,height;
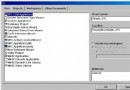
在窗體上放置一個TImage組件和OpenPictureDialog組件,將TImage的AutoSize屬性設為true,將OpenPictureDialog的Filter設為*.bmp。當用戶選擇Open命令後,打開相應的對話框,讓用戶選擇要處理的圖像文件,然後程序將圖像的所有像素的顏色分量保存到rgb數組中:
void __fastcall TForm1::mnuFileOpenClick(TObject *Sender)

{

TColor color;

if(OpenPictureDialog1- >Execute())

  {

  Image1- >Picture->LoadFromFile(OpenPictureDialog1- >FileName);

  width=Image1- >Picture- >Width; height=Image1->Picture->Height;

  for(i=0;i< width-1;i++)

   for(j=0;j< height-1;j++)

    {

    color=Image1- >Canvas->Pixels[i][j];

    rgb[i][j].r_color=GetRValue(color);

    rgb[i][j].g_color=GetGValue(color);

    rgb[i][j].b_color=GetBValue(color);

    }

  bitmap=new Graphics::TBitmap;

  bitmap->Width=width;

  bitmap->Height=height;

  }

}
二、圖像的柔化處理
柔化就是對圖像進行平滑處理,減少相鄰像素間的顏色差別,一般選用3*3像素塊,將中間的像素值改成這9個像素的平均像素值,從而達到柔化效果。其代碼如下:
void __fastcall TForm1::btnSmoothClick(TObject *Sender)

{

int red,green,blue;

for(i=1;i< width-2;i++)

  for(j=1;j< height-2;j++)

   {

   red=rgb[i-1][j-1].r_color+rgb[i][j-1].r_color+rgb[i+1][j-1].r_color+rgb[i-1][j].r_color+rgb[i][j].r_color+rgb[i+1][j].r_color+

rgb[i-1][j+1].r_color+rgb[i][j+1].r_color+rgb[i+1][j+1].r_color;

   green=rgb[i-1][j-1].g_color+rgb[i][j-1].g_color+rgb[i+1][j-1].g_color+rgb[i-1][j].g_color+rgb[i][j].g_color+rgb[i+1][j].g_color+

rgb[i-1][j+1].g_color+rgb[i][j+1].g_color+rgb[i+1][j+1].g_color;

   blue=rgb[i-1][j-1].b_color+rgb[i][j-1].b_color+rgb[i+1][j-1].b_color+rgb[i-1][j].b_color+rgb[i][j].b_color+rgb[i+1][j].b_color +

rgb[i-1][j+1].b_color+rgb[i][j+1].b_color+rgb[i+1][j+1].b_color;

   bitmap->Canvas->Pixels[i][j]=RGB(red/9,green/9,blue/9);

   }

  Image1- >Picture- >Bitmap- >Assign(bitmap);

}