一、前言
關於表單驗證,已經有不少的文章,相信Web開發人員也都基本寫過,最近在一個個人項目中剛好用到,在這裡與大家分享一下。本來想從用戶注冊開始寫起,但發現東西比較多,涉及到界面、前端驗證、前端加密、後台解密、用戶密碼Hash、權限驗證等等,文章寫起來可能會很長,所以這裡主要介紹的是登錄驗證和權限控制部分,有興趣的朋友歡迎一起交流。
一般驗證方式有Windows驗證和表單驗證,web項目用得更多的是表單驗證。原理很簡單,簡單地說就是利用浏覽器的cookie,將驗證令牌存儲在客戶端浏覽器上,cookie每次會隨請求發送到服務器,服務器驗證這個令牌。通常一個系統的用戶會分為多種角色:匿名用戶、普通用戶和管理員;這裡面又可以再細分,例如用戶可以是普通用戶或Vip用戶,管理員可以是普通管理員或超級管理員等。在項目中,我們有的頁面可能只允許管理員查看,有的只允許登錄用戶查看,這就是角色區分(Roles);某些特別情況下,有些頁面可能只允許叫“張三”名字的人查看,這就是用戶區分(Users)。
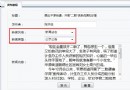
我們先看一下最後要實現的效果:
1.這是在Action級別的控制。
public class Home1Controller : Controller
{
  //匿名訪問
  public ActionResult Index()
  {
    return View();
  }
  //登錄用戶訪問
  [RequestAuthorize]
  public ActionResult Index2()
  {
    return View();
  }
  //登錄用戶,張三才能訪問
  [RequestAuthorize(Users="張三")]
  public ActionResult Index3()
  {
    return View();
  }
  //管理員訪問
  [RequestAuthorize(Roles="Admin")]
  public ActionResult Index4()
  {
    return View();
  }
}
2.這是在Controller級別的控制。當然,如果某個Action需要匿名訪問,也是允許的,因為控制級別上,Action優先級大於Controller。
//Controller級別的權限控制
[RequestAuthorize(User="張三")]
public class Home2Controller : Controller
{
  //登錄用戶訪問
  public ActionResult Index()
  {
    return View();
  }
  //允許匿名訪問
  [AllowAnonymous]
  public ActionResult Index2()
  {
    return View();
  }
}
3.Area級別的控制。有時候我們會把一些模塊做成分區,當然這裡也可以在Area的Controller和Action進行標記。
從上面可以看到,我們需要在各個地方進行標記權限,如果把Roles和Users硬寫在程序中,不是很好的做法。我希望能更簡單一點,在配置文件進行說明。例如如下配置:
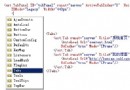
<?xml version="1.0" encoding="utf-8" ?>
<!--
  1.這裡可以把權限控制轉移到配置文件,這樣就不用在程序中寫roles和users了
  2.如果程序也寫了,那麼將覆蓋配置文件的。
  3.action級別的優先級 > controller級別 > Area級別
-->
<root>
 <!--area級別-->
 <area name="Admin">
  <roles>Admin</roles>
 </area>

 <!--controller級別-->
 <controller name="Home2">
  <user>張三</user>
 </controller>

 <!--action級別-->
 <controller name="Home1">
  <action name="Inde3">
   <users>張三</users>
  </action>
  <action name="Index4">
   <roles>Admin</roles>
  </action>
 </controller>
</root>
寫在配置文件裡,是為了方便管理,如果程序裡也寫了,將覆蓋配置文件的。ok,下面進入正題。
二、主要接口
先看兩個主要用到的接口。
IPrincipal 定義了用戶對象的基本功能,接口定義如下:
public interface IPrincipal
{
  //標識對象
  IIdentity Identity { get; }
  //判斷當前角色是否屬於指定的角色
  bool IsInRole(string role);
}
它有兩個主要成員,IsInRole用於判斷當前對象是否屬於指定角色的,IIdentity定義了標識對象信息。HttpContext的User屬性就是IPrincipal類型的。
IIdentity 定義了標識對象的基本功能,接口定義如下:
public interface IIdentity
{
  //身份驗證類型
  string AuthenticationType { get; }
  //是否驗證通過
  bool IsAuthenticated { get; }
  //用戶名
  string Name { get; }
}
IIdentity包含了一些用戶信息,但有時候我們需要存儲更多信息,例如用戶ID、用戶角色等,這些信息會被序列到cookie中加密保存,驗證通過時可以解碼再反序列化獲得,狀態得以保存。例如定義一個UserData。
public class UserData : IUserData
{
  public long UserID { get; set; }
  public string UserName { get; set; }
  public string UserRole { get; set; }

  public bool IsInRole(string role)
  {
    if (string.IsNullOrEmpty(role))
    {
      return true;
    }
    return role.Split(',').Any(item => item.Equals(this.UserRole, StringComparison.OrdinalIgnoreCase));
  }

  public bool IsInUser(string user)
  {
    if (string.IsNullOrEmpty(user))
    {
      return true;
    }
    return user.Split(',').Any(item => item.Equals(this.UserName, StringComparison.OrdinalIgnoreCase));
  }
}
UserData實現了IUserData接口,該接口定義了兩個方法:IsInRole和IsInUser,分別用於判斷當前用戶角色和用戶名是否符合要求。該接口定義如下:
public interface IUserData
{
  bool IsInRole(string role);
  bool IsInUser(string user);
}
  接下來定義一個Principal實現IPrincipal接口,如下:
public class Principal : IPrincipal
{
  public IIdentity Identity{get;private set;}
  public IUserData UserData{get;set;}

  public Principal(FormsAuthenticationTicket ticket, IUserData userData)
  {
    EnsureHelper.EnsureNotNull(ticket, "ticket");
    EnsureHelper.EnsureNotNull(userData, "userData");
    this.Identity = new FormsIdentity(ticket);
    this.UserData = userData;
  }

  public bool IsInRole(string role)
  {
    return this.UserData.IsInRole(role);
  }

  public bool IsInUser(string user)
  {
    return this.UserData.IsInUser(user);
  }
}
Principal包含IUserData,而不是具體的UserData,這樣很容易更換一個UserData而不影響其它代碼。Principal的IsInRole和IsInUser間接調用了IUserData的同名方法。
三、寫入cookie和讀取cookie
接下來,需要做的就是用戶登錄成功後,創建UserData,序列化,再利用FormsAuthentication加密,寫到cookie中;而請求到來時,需要嘗試將cookie解密並反序列化。如下:
public class HttpFormsAuthentication
{
  public static void SetAuthenticationCookie(string userName, IUserData userData, double rememberDays = 0)
  {
    EnsureHelper.EnsureNotNullOrEmpty(userName, "userName");
    EnsureHelper.EnsureNotNull(userData, "userData");
    EnsureHelper.EnsureRange(rememberDays, "rememberDays", 0);

    //保存在cookie中的信息
    string userJson = JsonConvert.SerializeObject(userData);

    //創建用戶票據
    double tickekDays = rememberDays == 0 ? 7 : rememberDays;
    var ticket = new FormsAuthenticationTicket(2, userName,
      DateTime.Now, DateTime.Now.AddDays(tickekDays), false, userJson);

    //FormsAuthentication提供web forms身份驗證服務
    //加密
    string encryptValue = FormsAuthentication.Encrypt(ticket);

    //創建cookie
    HttpCookie cookie = new HttpCookie(FormsAuthentication.FormsCookieName, encryptValue);
    cookie.HttpOnly = true;
    cookie.Domain = FormsAuthentication.CookieDomain;

    if (rememberDays > 0)
    {
      cookie.Expires = DateTime.Now.AddDays(rememberDays);
    }
    HttpContext.Current.Response.Cookies.Remove(cookie.Name);
    HttpContext.Current.Response.Cookies.Add(cookie);
  }

  public static Principal TryParsePrincipal<TUserData>(HttpContext context)
    where TUserData : IUserData
  {
    EnsureHelper.EnsureNotNull(context, "context");

    HttpRequest request = context.Request;
    HttpCookie cookie = request.Cookies[FormsAuthentication.FormsCookieName];
    if(cookie == null || string.IsNullOrEmpty(cookie.Value))
    {
      return null;
    }
    //解密cookie值
    FormsAuthenticationTicket ticket = FormsAuthentication.Decrypt(cookie.Value);
    if(ticket == null || string.IsNullOrEmpty(ticket.UserData))
    {
      return null;
    }
    IUserData userData = JsonConvert.DeserializeObject<TUserData>(ticket.UserData);
    return new Principal(ticket, userData);
  }
}
在登錄時,我們可以類似這樣處理:
public ActionResult Login(string userName,string password)
{
  //驗證用戶名和密碼等一些邏輯...

  UserData userData = new UserData()
  {
    UserName = userName,
    UserID = userID,
    UserRole = "Admin"
  };
  HttpFormsAuthentication.SetAuthenticationCookie(userName, userData, 7);

  //驗證通過...
}
登錄成功後,就會把信息寫入cookie,可以通過浏覽器觀察請求,就會有一個名稱為"Form"的Cookie(還需要簡單配置一下配置文件),它的值是一個加密後的字符串,後續的請求根據此cookie請求進行驗證。具體做法是在HttpApplication的AuthenticateRequest驗證事件中調用上面的TryParsePrincipal,如:
protected void Application_AuthenticateRequest(object sender, EventArgs e)
{
  HttpContext.Current.User = HttpFormsAuthentication.TryParsePrincipal<UserData>(HttpContext.Current);
}
這裡如果驗證不通過,HttpContext.Current.User就是null,表示當前用戶未標識。但在這裡還不能做任何關於權限的處理,因為上面說到的,有些頁面是允許匿名訪問的。
三、AuthorizeAttribute
這是一個Filter,在Action執行前執行,它實現了IActionFilter接口。關於Filter,可以看我之前的這篇文章,這裡就不多介紹了。我們定義一個RequestAuthorizeAttribute繼承AuthorizeAttribute,並重寫它的OnAuthorization方法,如果一個Controller或者Action標記了該特性,那麼該方法就會在Action執行前被執行,在這裡判斷是否已經登錄和是否有權限,如果沒有則做出相應處理。具體代碼如下:
[AttributeUsage(AttributeTargets.Class | AttributeTargets.Method)]
public class RequestAuthorizeAttribute : AuthorizeAttribute
{
  //驗證
  public override void OnAuthorization(AuthorizationContext context)
  {
    EnsureHelper.EnsureNotNull(context, "httpContent");
    //是否允許匿名訪問
    if (context.ActionDescriptor.IsDefined(typeof(AllowAnonymousAttribute), false))
    {
      return;
    }
    //登錄驗證
    Principal principal = context.HttpContext.User as Principal;
    if (principal == null)
    {
      SetUnAuthorizedResult(context);
      HandleUnauthorizedRequest(context);
      return;
    }
    //權限驗證
    if (!principal.IsInRole(base.Roles) || !principal.IsInUser(base.Users))
    {
      SetUnAuthorizedResult(context);
      HandleUnauthorizedRequest(context);
      return;
    }
    //驗證配置文件
    if(!ValidateAuthorizeConfig(principal, context))
    {
      SetUnAuthorizedResult(context);
      HandleUnauthorizedRequest(context);
      return;
    }
  }

  //驗證不通過時
  private void SetUnAuthorizedResult(AuthorizationContext context)
  {
    HttpRequestBase request = context.HttpContext.Request;
    if (request.IsAjaxRequest())
    {
      //處理ajax請求
      string result = JsonConvert.SerializeObject(JsonModel.Error(403));
      context.Result = new ContentResult() { Content = result };
    }
    else
    {
      //跳轉到登錄頁面
      string loginUrl = FormsAuthentication.LoginUrl + "?ReturnUrl=" + preUrl;
      context.Result = new RedirectResult(loginUrl);
    }
  }

  //override
  protected override void HandleUnauthorizedRequest(AuthorizationContext filterContext)
  {
    if(filterContext.Result != null)
    {
      return;
    }
    base.HandleUnauthorizedRequest(filterContext);
  }
}
注:這裡的代碼摘自個人項目中的,簡寫了部分代碼,有些是輔助類,代碼沒有貼出,但應該不影響閱讀。
1. 如果我們在HttpApplication的AuthenticateRequest事件中獲得的IPrincipal為null,那麼驗證不通過。
2. 如果驗證通過,程序會進行驗證AuthorizeAttribute的Roles和User屬性。
3. 如果驗證通過,程序會驗證配置文件中對應的Roles和Users屬性。
驗證配置文件的方法如下:
  private bool ValidateAuthorizeConfig(Principal principal, AuthorizationContext context)
  {
    //action可能有重載,重載時應該標記ActionName區分
    ActionNameAttribute actionNameAttr = context.ActionDescriptor
      .GetCustomAttributes(typeof(ActionNameAttribute), false)
      .OfType<ActionNameAttribute>().FirstOrDefault();
    string actionName = actionNameAttr == null ? null : actionNameAttr.Name;
    AuthorizationConfig ac = ParseAuthorizeConfig(actionName, context.RouteData);
    if (ac != null)
    {
      if (!principal.IsInRole(ac.Roles))
      {
        return false;
      }
      if (!principal.IsInUser(ac.Users))
      {
        return false;
      }
    }
    return true;
  }

  private AuthorizationConfig ParseAuthorizeConfig(string actionName, RouteData routeData)
  {
    string areaName = routeData.DataTokens["area"] as string;
    string controllerName = null;
    object controller, action;
    if(string.IsNullOrEmpty(actionName))
    {
      if(routeData.Values.TryGetValue("action", out action))
      {
        actionName = action.ToString();
      }
    }
    if (routeData.Values.TryGetValue("controller", out controller))
    {
      controllerName = controller.ToString();
    }
    if(!string.IsNullOrEmpty(controllerName) && !string.IsNullOrEmpty(actionName))
    {
      return AuthorizationConfig.ParseAuthorizationConfig(
        areaName, controllerName, actionName);
    }
    return null;
  }
}
可以看到,它會根據當前請求的area、controller和action名稱,通過一個AuthorizationConfig類進行驗證,該類的定義如下:
public class AuthorizationConfig
{
  public string Roles { get; set; }
  public string Users { get; set; }

  private static XDocument _doc;

  //配置文件路徑
  private static string _path = "~/Identity/Authorization.xml";

  //首次使用加載配置文件
  static AuthorizationConfig()
  {
    string absPath = HttpContext.Current.Server.MapPath(_path);
    if (File.Exists(absPath))
    {
      _doc = XDocument.Load(absPath);
    }
  }

  //解析配置文件,獲得包含Roles和Users的信息
  public static AuthorizationConfig ParseAuthorizationConfig(string areaName, string controllerName, string actionName)
  {
    EnsureHelper.EnsureNotNullOrEmpty(controllerName, "controllerName");
    EnsureHelper.EnsureNotNullOrEmpty(actionName, "actionName");

    if (_doc == null)
    {
      return null;
    }
    XElement rootElement = _doc.Element("root");
    if (rootElement == null)
    {
      return null;
    }
    AuthorizationConfig info = new AuthorizationConfig();
    XElement rolesElement = null;
    XElement usersElement = null;
    XElement areaElement = rootElement.Elements("area")
      .Where(e => CompareName(e, areaName)).FirstOrDefault();
    XElement targetElement = areaElement ?? rootElement;
    XElement controllerElement = targetElement.Elements("controller")
      .Where(e => CompareName(e, controllerName)).FirstOrDefault();

    //如果沒有area節點和controller節點則返回null
    if (areaElement == null && controllerElement == null)
    {
      return null;
    }
    //此時獲取標記的area
    if (controllerElement == null)
    {
      rootElement = areaElement.Element("roles");
      usersElement = areaElement.Element("users");
    }
    else
    {
      XElement actionElement = controllerElement.Elements("action")
        .Where(e => CompareName(e, actionName)).FirstOrDefault();
      if (actionElement != null)
      {
        //此時獲取標記action的
        rolesElement = actionElement.Element("roles");
        usersElement = actionElement.Element("users");
      }
      else
      {
        //此時獲取標記controller的
        rolesElement = controllerElement.Element("roles");
        usersElement = controllerElement.Element("users");
      }
    }
    info.Roles = rolesElement == null ? null : rolesElement.Value;
    info.Users = usersElement == null ? null : usersElement.Value;
    return info;
  }

  private static bool CompareName(XElement e, string value)
  {
    XAttribute attribute = e.Attribute("name");
    if (attribute == null || string.IsNullOrEmpty(attribute.Value))
    {
      return false;
    }
    return attribute.Value.Equals(value, StringComparison.OrdinalIgnoreCase);
  }
}
這裡的代碼比較長,但主要邏輯就是解析文章開頭的配置信息。
簡單總結一下程序實現的步驟:
1. 校對用戶名和密碼正確後,調用SetAuthenticationCookie將一些狀態信息寫入cookie。
2. 在HttpApplication的Authentication事件中,調用TryParsePrincipal獲得狀態信息。
3. 在需要驗證的Action(或Controller)標記 RequestAuthorizeAttribute特性,並設置Roles和Users;Roles和Users也可以在配置文件中配置。
4. 在RequestAuthorizeAttribute的OnAuthorization方法中進行驗證和權限邏輯處理。
四、總結
上面就是整個登錄認證的核心實現過程,只需要簡單配置一下就可以實現了。但實際項目中從用戶注冊到用戶管理整個過程是比較復雜的,而且涉及到前後端驗證、加解密問題。關於安全問題,FormsAuthentication在加密的時候,會根據服務器的MachineKey等一些信息進行加密,所以相對安全。當然,如果說請求被惡意攔截,然後被偽造登錄還是有可能的,這是後面要考慮的問題了,例如使用安全的http協議https。
以上就是本文的全部內容,希望對大家的學習有所幫助。