將DataGridView中的數據導出到Excel中有許多方法,常見的方法是使用Office COM組件將DataGridView中的數據循環復制到Excel Cell對象中,然後再保存整個Excel Workbook。但是如果數據量太大,例如上萬行數據或者有多個Excel Sheet需要同時導出,效率會比較低。可以嘗試使用異步操作或多線程的方式來解決UI死鎖的問題。
這裡介紹一種直接通過Windows剪貼板將數據從DataGridView導出到Excel的方法。代碼如下:
復制代碼 代碼如下:
using System;
using System.Collections.Generic;
using System.ComponentModel;
using System.Data;
using System.Drawing;
using System.Linq;
using System.Text;
using System.Windows.Forms;
using Excel = Microsoft.Office.Interop.Excel;
using System.Reflection;
using Microsoft.Office.Interop.Excel;
namespace WindowsFormsApplication1
{
public partial class Form1 : Form
{
public Form1()
{
InitializeComponent();
this.saveFileDialog1.Filter = "Excel Workbook|*.xlsx|Excel Macro-Enabled Workbook|*.xlsm|Excel 97-2003 Workbook|*.xls";
this.saveFileDialog1.FileName = "demo.xlsx";
LoadData();
}
private void LoadData()
{
BindingList<Car> cars = new BindingList<Car>();
cars.Add(new Car("Ford", "Mustang", 1967));
cars.Add(new Car("Shelby AC", "Cobra", 1965));
cars.Add(new Car("Chevrolet", "Corvette Sting Ray", 1965));
this.dataGridView1.DataSource = cars;
}
private void toolStripButton1_Click(object sender, EventArgs e)
{
string filePath = string.Empty;
if (this.saveFileDialog1.ShowDialog() == System.Windows.Forms.DialogResult.OK)
{
filePath = this.saveFileDialog1.FileName;
}
else
{
return;
}
this.dataGridView1.SelectAll();
Clipboard.SetDataObject(this.dataGridView1.GetClipboardContent());
Excel.Application objExcel = null;
Excel.Workbook objWorkbook = null;
Excel.Worksheet objsheet = null;
try
{
objExcel = new Microsoft.Office.Interop.Excel.Application();
objWorkbook = objExcel.Workbooks.Add(Missing.Value);
objsheet = (Excel.Worksheet)objWorkbook.ActiveSheet;
objExcel.Visible = false;
objExcel.get_Range("A1", System.Type.Missing).PasteSpecial(XlPasteType.xlPasteAll, XlPasteSpecialOperation.xlPasteSpecialOperationNone, Type.Missing, Type.Missing);
objsheet.Name = "Demo";
//Set table properties
objExcel.Cells.EntireColumn.AutoFit();//auto column width
objExcel.Cells.VerticalAlignment = Microsoft.Office.Interop.Excel.Constants.xlCenter;
objExcel.Cells.HorizontalAlignment = Microsoft.Office.Interop.Excel.Constants.xlLeft;
objExcel.ErrorCheckingOptions.BackgroundChecking = false;
//save file
objWorkbook.SaveAs(filePath, Missing.Value, Missing.Value, Missing.Value, Missing.Value,
Missing.Value, Excel.XlSaveAsAccessMode.xlShared, Missing.Value, Missing.Value, Missing.Value,
Missing.Value, Missing.Value);
}
catch (Exception error)
{
MessageBox.Show(error.Message, "Error", MessageBoxButtons.OK, MessageBoxIcon.Error);
return;
}
finally
{
//Dispose the Excel related objects
if (objWorkbook != null)
{
objWorkbook.Close(Missing.Value, Missing.Value, Missing.Value);
}
if (objExcel.Workbooks != null)
{
objExcel.Workbooks.Close();
}
if (objExcel != null)
{
objExcel.Quit();
}
objsheet = null;
objWorkbook = null;
objExcel = null;
GC.Collect(); // force final cleanup.
}
}
}
public class Car
{
private string _make;
private string _model;
private int _year;
public Car(string make, string model, int year)
{
_make = make;
_model = model;
_year = year;
}
public string Make
{
get { return _make; }
set { _make = value; }
}
public string Model
{
get { return _model; }
set { _model = value; }
}
public int Year
{
get { return _year; }
set { _year = value; }
}
}
}
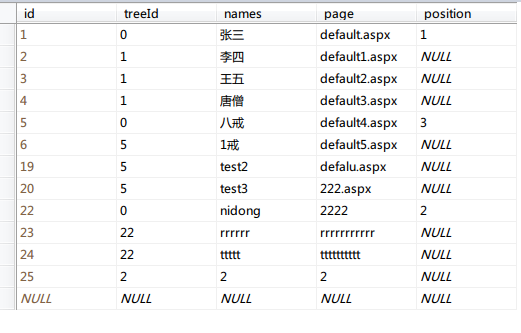
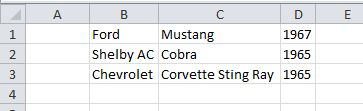
導出數據到Excel的操作在事件toolStripButton1_Click中,代碼的第49行和50行是將DataGridView當前選中的行復制到系統剪貼板中,62行將剪貼板中的內容粘貼到Excel默認Sheet的A1單元格中。Excel會自動格式化將粘貼的內容,如下圖。
使用剪貼板導出數據過程比較簡單,省去了對Excel對象的遍歷和操作,缺點是無法對導出的數據進行格式和樣式的設置。如果需要對導出的數據進行樣式設置,可以嘗試使用OpenXML的方式來修改Excel文件的樣式,