這下可把我難住了,難道要 在開發的代碼中一個一個地設置想要的名稱,然後重新編譯,再注冊成服務?
但是如果將來又要換個名稱呢?再重新設置、 編譯、注冊一遍?這樣操作太麻煩了!
於是我就想能不能通過在安裝的時候進行配置,比如加一個xml文件記錄要安裝的服務的服務名等信息,每次安裝前修改該xml文件就可以了。
操作:
1、首先添加一個配置文件到服務主程序的根目錄,取名“ServiceSetting.xml”:
代碼如下:
<?xml version="1.0" encoding="utf-8" ?>
<Settings>
<ServiceName>testme</ServiceName>
<DisplayName>testmedisplay</DisplayName>
<Description>這裡僅僅是個測試而已</Description>
</Settings>
2、然後添加一個類文件到服務主程序的根目錄,取名"SettingHelper.cs":
代碼如下:
SettingHelper
#region 文件描述
//-------------------------------------------------------------------------------------------------
// 描述:服務安裝配置幫助類
// 作者:鮑昊晟
// 時間:2012-05-10
//-------------------------------------------------------------------------------------------------
#endregion
using System;
using System.IO;
using System.Xml;
/// <summary>
/// 服務安裝配置幫助類
/// </summary>
internal class SettingHelper : IDisposable
{
#region 私有成員
private string _ServiceName;
private string _DisplayName;
private string _Description;
#endregion
#region 構造函數
/// <summary>
/// 初始化服務配置幫助類
/// </summary>
public SettingHelper()
{
InitSettings();
}
#endregion
#region 屬性
/// <summary>
/// 系統用於標志此服務的名稱
/// </summary>
public string ServiceName
{
get { return _ServiceName; }
}
/// <summary>
/// 向用戶標志服務的友好名稱
/// </summary>
public string DisplayName
{
get { return _DisplayName; }
}
/// <summary>
/// 服務的說明
/// </summary>
public string Description
{
get { return _Description; }
}
#endregion
#region 私有方法
#region 初始化服務配置信息
/// <summary>
/// 初始化服務配置信息
/// </summary>
private void InitSettings()
{
string root = System.Reflection.Assembly.GetExecutingAssembly().Location;
string xmlfile = root.Remove(root.LastIndexOf('\\') + 1) + "ServiceSetting.xml";
if (File.Exists(xmlfile))
{
XmlDocument doc = new XmlDocument();
doc.Load(xmlfile);
XmlNode xn = doc.SelectSingleNode("Settings/ServiceName");
_ServiceName = xn.InnerText;
xn = doc.SelectSingleNode("Settings/DisplayName");
_DisplayName = xn.InnerText;
xn = doc.SelectSingleNode("Settings/Description");
_Description = xn.InnerText;
doc = null;
}
else
{
throw new FileNotFoundException("未能找到服務名稱配置文件 ServiceSetting.xml!");
}
}
#endregion
#endregion
#region IDisposable 成員
private bool disposed = false;
public void Dispose()
{
Dispose(true);
GC.SuppressFinalize(this);
}
protected virtual void Dispose(bool disposing)
{
if (!this.disposed)
{
if (disposing)
{
//managed dispose
_ServiceName = null;
_DisplayName = null;
_Description = null;
}
//unmanaged dispose
}
disposed = true;
}
~SettingHelper()
{
Dispose(false);
}
#endregion
}
3、修改ProjectInstaller.cs文件,在修改構造函數public ProjectInstaller()如下:
代碼如下:
ProjectInstaller
using System.ComponentModel;
using System.Configuration.Install;
namespace WSInstallTest
{
[RunInstaller(true)]
public partial class ProjectInstaller : Installer
{
public ProjectInstaller()
{
InitializeComponent();
using (SettingHelper setting = new SettingHelper())
{
serviceInstaller1.ServiceName = setting.ServiceName;
serviceInstaller1.DisplayName = setting.DisplayName;
serviceInstaller1.Description = setting.Description;
}
}
//end of class
}
}
4、執行安裝命令:
在開始菜單中找到“Microsoft Visual Studio 2008”-->“Visual Studio Tools”-->“Visual Studio 2008 命令提示”,右鍵“以管理員身份運行”。
在命令行中輸入以下命令:
代碼如下:
Setting environment for using Microsoft Visual Studio 2008 x86 tools.
C:\Windows\system32>installutil /logfile d:\wsinstalltest.exe
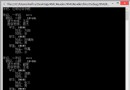
5、當出現以下文字的時候就表明安裝成功了
代碼如下:
安裝成功提示信息
Microsoft (R) .NET Framework 安裝實用工具版本 2.0.50727.5420
版權所有(C) Microsoft Corporation。保留所有權利。
正在運行事務處理安裝。
正在開始安裝的“安裝”階段。
查看日志文件的內容以獲得 d:\wsinstalltest.exe 程序集的進度。
該文件位於 。
正在安裝程序集“d:\wsinstalltest.exe”。
受影響的參數是:
logtoconsole =
assemblypath = d:\wsinstalltest.exe
logfile =
正在安裝服務 testme...
已成功安裝服務 testme。
正在日志 Application 中創建 EventLog 源 testme...
“安裝”階段已成功完成,正在開始“提交”階段。
查看日志文件的內容以獲得 d:\wsinstalltest.exe 程序集的進度。
該文件位於 。
正在提交程序集“d:\wsinstalltest.exe”。
受影響的參數是:
logtoconsole =
assemblypath = d:\wsinstalltest.exe
logfile =
“提交”階段已成功完成。
已完成事務處理安裝。
C:\Windows\system32>
可以進入“服務”程序中查看剛才安裝的服務已經安裝好了。
6、備注:
運行“sc start testme”啟動服務;
運行“sc stop testme”停止服務;
運行“sc delete testme”刪除服務。