Hello! 歡迎新老朋友來到這裡,這裡隨時恭候你的大駕。
接下來說說三層架構↓↓↓↓↓↓
三層架構分為:表現層(UI(User Interface))、業務邏輯層(BLL(Business Logic Layer))、數據訪問層(DAL(Data Access Layer))再加上實體類庫(Model)
1、實體類庫(Model),主要存放數據庫中的表字段。
操作:
(1)先建立實體類庫Model,打開項目,在解決方案中右鍵——>添加——>新建項目——>選中類庫——>改名Model——>確定
(2)選中Model類庫——>Shift+ALT+C——>建立實體類。UserInfo類
 namespace Model
 {
    public  class UserInfo
     {
         public string  UserName { get; set; }
         public string  Password { get; set; }
     }
 }
2、數據訪問層(DAL),主要是存放對數據類的訪問,即對數據庫的添加、刪除、修改、更新等基本操作
操作:
(1)先建立數據訪問層類庫DAL,打開項目,在解決方案中右鍵——>添加——>新建項目——>選中類庫——>改名DAL——>確定
(2)在DAL中添加對Model的引用,選中DAL--》Alt+P+R--》解決方案--》項目--》選中MOdel--》確定
(3)在DAL中添加對system.configuration的引用,選中DAL——>Alt+P+R——>程序集——>框架——>選中System.configuration——>確定
(4)建立數據訪問類,選中DAL——>Shift+ALT+C——>建立數據訪問類。UserDB類
 namespace DAL
 {
     class UserDB
     {
         private string connString = ConfigurationManager.ConnectionStrings[connString].ToString();
         public int AddUser(UserInfo userInfo)
         {
             //對數據庫進添加一個用戶操作
             string commandText = insert into UserInfo (userName,Password)values(@userName,@Password);
             SqlParameter[] paras = new SqlParameter[]
             {
            new SqlParameter (@userName,userInfo.UserName ),
            new SqlParameter (@Password,userInfo.Password )
             };
             return SqlHelper.ExecuteNonQuery(connString, CommandType.Text, commandText, paras);
         }
     }
3、業務邏輯層(BLL)對傳送數據進行邏輯判斷分折,並進行傳送正確的值。
(1)先建立業務邏輯層類庫BLL,打開項目,在解決方案中右鍵——>添加——>新建項目——>選中類庫——>改名BLL——>確定
(2)在BLL中添加對Model、DAL的引用,選中BLL——>Alt+P+R——>解決方案——>項目——>選中MOdel、DAL——>確定
(3)建立業務邏輯類,選中BLL——>Shift+ALT+C——>建立業務邏輯類。LoginManager類
 namespace BLL
 {
     public class LoginManager
     {
         private UserDB userDB = new UserDB();
         public bool Add(UserInfo userInfo, out string messageStr)
         {
             messageStr = ;//返回界面層添加用戶返回信息
             bool isSuccess = false;
             if (userInfo.UserName.Trim().Length != 0)//判斷從傳遞來的username是否為空
             {
                 if (userDB.IsEquals(userInfo))//傳給DALl操作判斷數據庫中是否有重復值
                 {
                     userDB.AddUser(userInfo);//傳給DAL操作增加一個新用戶
                     isSuccess = true;
                 }
                 else
                     messageStr = 有相同的值;
             }
             else
             {
                 messageStr = 不能為空;

             }
             return isSuccess;//返回界面層是否添加成功
         }
     }
 }
4.表現層(UI)即用戶界面層
(1)在UI中添加對Model、BLL的引用,選中UI--》Alt+P+R--》解決方案--》項目--》選中MOdel、BLL--》確定
(2)編寫代碼傳遞數據給BLL層。
  UserInfo userInfo;
     LoginManager lm = new LoginManager();
     private void btnAdd_Click(object sender, EventArgs e)
     {
         userInfo = new UserInfo()
         {
             UserName = txtUserName.Text.Trim(),
             Password = txtPassword.Text.Trim()
         };
         string messageStr = ;

         if (lm.Add(userInfo, out  messageStr))
         {
             MessageBox.Show(添加成功);
         }
         else
         {
             MessageBox.Show(messageStr);
             txtUserName.Focus();
         }

     }
 }
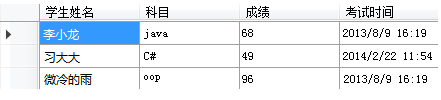
再來說一下怎麼實現如下圖所示 三個表的信息顯示在一個控件
想要實現下圖內容 , 首先要從學生表(Student)、從科目表(Subject)、從成績表(StudentResult)分別拿到學生姓名、科目名、考試成績和考試時間。
首先添加一個擴展類,這裡要用到繼承
namespace Combox.Model
{
   public class StudentExtens:Student
    {
        public string SubjectName { get; set; }
        public int StudentResult { get; set; }
        public DateTime ExamDate { get; set; }
    }
}
繼續DAL層
 public List<StudentExtens> SelectStudentResult()
         {
             //查看學生成績
             List<StudentExtens> list = new List<StudentExtens>();
             SqlConnection con = new SqlConnection("Server=192.168.15.21;initial catalog=MySchool;uid=sa;");
             DataTable dt = SQLHelper.ExecuteDataTable(@"select studentname,subjectname,studentresult,examdate from student,subject,result where student.studentno=result.studentno and result.subjectid=subject.subjectid");
             foreach (DataRow item in dt.Rows)
             {
                 StudentExtens se = new StudentExtens();
                 se.StudentName = item["studentname"].ToString();
                 se.SubjectName = item["subjectname"].ToString();
                 se.StudentResult = Convert.ToInt32(item["studentresult"]);
                 se.ExamDate = Convert.ToDateTime(item["examdate"]);
                 list.Add(se);
             }
             return list;
         }
接下來是BLL層
 namespace Combox.BLL
 {
    public class StudentBLL
     {
        StudentDAL sd = new StudentDAL();
        public List<StudentExtens> SelectStudentResult()
        {
           return sd.SelectStudentResult();
        }
     }
 }
在UI進行調用
            StudentBLL sb = new StudentBLL();
            List<StudentExtens> list = sb.SelectStudentResult();
            dgvlist.DataSource = list;
親們!到這裡分層先告一段落。 感謝關注過我、正在關注我、將要關注我的朋友。一起努力加油!
在這個弱肉強食的時代我們只能:
狼行千裡吃肉!公司裡一個團隊的作戰能力決定你分的肉多少。
十年、二十年以後的你,會回想起現在的你。至於那個時候的你,是否會感謝現在坐在電腦屏幕前的你,答案就在我們每一天裡!
愛編碼愛生活愛音樂愛文字愛小M
16年三月的最後一天