分類:C#、VS2015
創建日期:2016-06-23
使用教材:(十二五國家級規劃教材)《C#程序設計及應用教程》(第3版)
該例子屬於高級技術中的基本用法。對於初學者來說這是難點(難在還沒有學習第13章WPF相關的繪圖技術),因此,這裡的關鍵是理解設計思路,而不是一開始就陷於細節的實現上。或者說,一旦你掌握了這些基本的設計思路,就會極大地提高你對面向對象編程的理解。
用到的技術:封裝、繼承、多態。
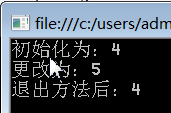
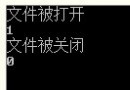
本補充示例的運行效果:
1、新建項目
項目名:WpfAdvanceDemo2
模板:WPF應用程序項目。
2、添加W0_DrawObject.cs文件
鼠標右擊解決方案資源管理器中的項目名,選擇【添加】->【類】,輸入文件名W0_DrawObject.cs,然後將代碼改為下面的內容:
using System;
using System.Windows;
using System.Windows.Controls;
using System.Windows.Ink;
using System.Windows.Input;
using System.Windows.Input.StylusPlugIns;
using System.Windows.Media;

namespace WpfAdvanceDemo2
{
    public abstract class W0_DrawObject : DynamicRenderer
    {
        protected Point previousPoint;

        public MyInkCanvas myInkCanvas { get; private set; }

        public DrawObjectStroke InkStroke { get; protected set; }

        public DrawingAttributes inkDA { get; set; }

        public abstract void CreateNewStroke(InkCanvasStrokeCollectedEventArgs e);

        public abstract Point Draw(Point first, DrawingContext dc, StylusPointCollection points);

        [ThreadStatic]
        protected Brush brush = Brushes.Gray;

        public W0_DrawObject(MyInkCanvas myInkCanvas)
        {
            this.myInkCanvas = myInkCanvas;
            this.inkDA = myInkCanvas.inkDA.Clone();
            this.DrawingAttributes = inkDA;
        }

        protected override void OnStylusDown(RawStylusInput rawStylusInput)
        {
            inkDA = myInkCanvas.inkDA.Clone();
            this.DrawingAttributes = inkDA;
            previousPoint = new Point(double.NegativeInfinity, double.NegativeInfinity);
            base.OnStylusDown(rawStylusInput);
        }

        protected override void OnStylusUp(RawStylusInput rawStylusInput)
        {
            base.OnStylusUp(rawStylusInput);
            this.InkStroke = null;
        }
    }

    public class DrawObjectStroke : Stroke
    {
        protected W0_DrawObject ink;

        public DrawObjectStroke(W0_DrawObject ink, StylusPointCollection stylusPoints)
            : base(stylusPoints)
        {
            this.ink = ink;
            this.DrawingAttributes = ink.inkDA.Clone();
            this.DrawingAttributes.Color = Colors.Transparent;
        }

        protected virtual void RemoveDirtyStylusPoints()
        {
            if (StylusPoints.Count > 2)
            {
                for (int i = StylusPoints.Count - 2; i > 0; i--)
                {
                    StylusPoints.RemoveAt(i);
                }
            }
        }
    }
}
3、添加W1_DrawRectangle.cs文件
鼠標右擊解決方案資源管理器中的項目名,選擇【添加】->【類】,輸入文件名W1_DrawRectangle.cs,然後將代碼改為下面的內容:
using System.Linq;
using System.Windows;
using System.Windows.Controls;
using System.Windows.Ink;
using System.Windows.Input;
using System.Windows.Input.StylusPlugIns;
using System.Windows.Media;

namespace WpfAdvanceDemo2
{
    public class W1_DrawRectangle : W0_DrawObject
    {
        public W1_DrawRectangle(MyInkCanvas myInkCanvas) : base(myInkCanvas)
        {
        }

        public override void CreateNewStroke(InkCanvasStrokeCollectedEventArgs e)
        {
            InkStroke = new DrawRectangleStroke(this, e.Stroke.StylusPoints);
        }

        public override Point Draw(Point first, DrawingContext dc, StylusPointCollection points)
        {
            Point pt = (Point)points.Last();
            Vector v = Point.Subtract(pt, first);
            if (v.Length > 4)
            {
                Rect rect = new Rect(first, v);

                //填充
                var b = new RadialGradientBrush(Colors.White, Colors.Red);
                dc.DrawRectangle(b, null, rect);

                //畫輪廓
                Pen pen = new Pen(Brushes.DarkRed, 1.0);
                dc.DrawRectangle(null, pen, rect);
            }
            return first;
        }
        protected override void OnStylusDown(RawStylusInput rawStylusInput)
        {
            base.OnStylusDown(rawStylusInput);
            previousPoint = (Point)rawStylusInput.GetStylusPoints().First();
        }

        protected override void OnStylusMove(RawStylusInput rawStylusInput)
        {
            StylusPointCollection stylusPoints = rawStylusInput.GetStylusPoints();
            this.Reset(Stylus.CurrentStylusDevice, stylusPoints);
            base.OnStylusMove(rawStylusInput);
        }

        protected override void OnDraw(DrawingContext drawingContext, StylusPointCollection stylusPoints, Geometry geometry, Brush fillBrush)
        {
            Draw(previousPoint, drawingContext, stylusPoints);
            base.OnDraw(drawingContext, stylusPoints, geometry, brush);
        }
    }

    public class DrawRectangleStroke : DrawObjectStroke
    {
        public DrawRectangleStroke(W1_DrawRectangle ink, StylusPointCollection stylusPoints)
            : base(ink, stylusPoints)
        {
            this.RemoveDirtyStylusPoints();
        }

        protected override void DrawCore(DrawingContext drawingContext, DrawingAttributes drawingAttributes)
        {
            base.DrawCore(drawingContext, drawingAttributes);
            Point pt1 = (Point)StylusPoints.First();
            ink.Draw(pt1, drawingContext, StylusPoints);
        }
    }
}
4、添加W2_DrawEllipse.cs文件
鼠標右擊解決方案資源管理器中的項目名,選擇【添加】->【類】,輸入文件名W2_DrawEllipse.cs,然後將代碼改為下面的內容:
using System.Linq;
using System.Windows;
using System.Windows.Controls;
using System.Windows.Ink;
using System.Windows.Input;
using System.Windows.Input.StylusPlugIns;
using System.Windows.Media;

namespace WpfAdvanceDemo2
{
    public class W2_DrawEllipse : W0_DrawObject
    {
        public W2_DrawEllipse(MyInkCanvas myInkCanvas) : base(myInkCanvas)
        {
        }

        public override void CreateNewStroke(InkCanvasStrokeCollectedEventArgs e)
        {
            InkStroke = new DrawEllipseStroke(this, e.Stroke.StylusPoints);
        }

        public override Point Draw(Point first, DrawingContext dc, StylusPointCollection points)
        {
            Point pt = (Point)points.Last();
            Vector v = Point.Subtract(pt, first);
            double radiusX = (pt.X - first.X) / 2.0;
            double radiusY = (pt.Y - first.Y) / 2.0;
            Point center = new Point((pt.X + first.X) / 2.0, (pt.Y + first.Y) / 2.0);

            //填充
            var b = new RadialGradientBrush(Colors.White, Colors.Red);
            dc.DrawEllipse(b, null, center, radiusX, radiusY);

            //畫輪廓
            Pen pen = new Pen(Brushes.DarkRed, 1.0);
            dc.DrawEllipse(null, pen, center, radiusX, radiusY);

            return first;
        }

        protected override void OnStylusDown(RawStylusInput rawStylusInput)
        {
            base.OnStylusDown(rawStylusInput);
            previousPoint = (Point)rawStylusInput.GetStylusPoints().First();
        }

        protected override void OnStylusMove(RawStylusInput rawStylusInput)
        {
            StylusPointCollection stylusPoints = rawStylusInput.GetStylusPoints();
            this.Reset(Stylus.CurrentStylusDevice, stylusPoints);
            base.OnStylusMove(rawStylusInput);
        }

        protected override void OnDraw(DrawingContext drawingContext, StylusPointCollection stylusPoints, Geometry geometry, Brush fillBrush)
        {
            Draw(previousPoint, drawingContext, stylusPoints);
            base.OnDraw(drawingContext, stylusPoints, geometry, brush);
        }
    }

    public class DrawEllipseStroke : DrawObjectStroke
    {
        public DrawEllipseStroke(W2_DrawEllipse ink, StylusPointCollection stylusPoints)
            : base(ink, stylusPoints)
        {
            this.RemoveDirtyStylusPoints();
        }

        protected override void DrawCore(DrawingContext drawingContext, DrawingAttributes drawingAttributes)
        {
            base.DrawCore(drawingContext, drawingAttributes);
            Point pt1 = (Point)StylusPoints.First();
            ink.Draw(pt1, drawingContext, StylusPoints);
        }
    }
}
5、添加W3_DrawCurve.cs文件
鼠標右擊解決方案資源管理器中的項目名,選擇【添加】->【類】,輸入文件名W3_DrawCurve.cs,然後將代碼改為下面的內容:
using System.Windows;
using System.Windows.Controls;
using System.Windows.Ink;
using System.Windows.Input;
using System.Windows.Media;

namespace WpfAdvanceDemo2
{
    public class W3_DrawCurve : W0_DrawObject
    {
        public W3_DrawCurve(MyInkCanvas myInkCanvas)
            : base(myInkCanvas)
        {
        }

        public override void CreateNewStroke(InkCanvasStrokeCollectedEventArgs e)
        {
            InkStroke = new DrawCurveStroke(this, e.Stroke.StylusPoints);
        }
        public override Point Draw(Point first, DrawingContext dc, StylusPointCollection points)
        {
            return first;
        }

        protected override void OnDraw(DrawingContext drawingContext, StylusPointCollection stylusPoints, Geometry geometry, Brush fillBrush)
        {
            base.OnDraw(drawingContext, stylusPoints, geometry, Brushes.Black);
        }
    }

    public class DrawCurveStroke : DrawObjectStroke
    {
        public DrawCurveStroke(W0_DrawObject ink, StylusPointCollection stylusPoints)
            : base(ink, stylusPoints)
        {
            this.DrawingAttributes.FitToCurve = true;
        }

        protected override void DrawCore(DrawingContext drawingContext, DrawingAttributes drawingAttributes)
        {
            base.DrawCore(drawingContext, drawingAttributes);
            Geometry geometry = this.GetGeometry();
            drawingContext.DrawGeometry(Brushes.Black, null, geometry);
        }
    }
}
6、添加MyInkCanvas.cs文件
鼠標右擊解決方案資源管理器中的項目名,選擇【添加】->【類】,輸入文件名MyInkCanvas.cs,然後將代碼改為下面的內容:
using System.Windows.Controls;
using System.Windows.Ink;
using System.Windows.Input;
using System.Windows.Media;

namespace WpfAdvanceDemo2
{
    public class MyInkCanvas : InkCanvas
    {
        private W0_DrawObject ink;

        public DrawingAttributes inkDA { get; private set; }

        public MyInkCanvas()
        {
            inkDA = new DrawingAttributes()
            {
                Color = Colors.Red,
                Width = 15,
                Height = 15,
                StylusTip = StylusTip.Rectangle,
                IgnorePressure = true,
                FitToCurve = false
            };
            this.DefaultDrawingAttributes = inkDA;
            ink = new W1_DrawRectangle(this);
            UpdateInkParams();
        }

        /// <summary>當收集墨跡時,會自動調用此方法</summary>
        protected override void OnStrokeCollected(InkCanvasStrokeCollectedEventArgs e)
        {
            this.Strokes.Remove(e.Stroke);
            ink.CreateNewStroke(e);
            this.Strokes.Add(ink.InkStroke);
            InkCanvasStrokeCollectedEventArgs args = new InkCanvasStrokeCollectedEventArgs(ink.InkStroke);
            base.OnStrokeCollected(args);
        }

        /// <summary>初始化墨跡參數</summary>
        public void SetInkAttributes(string name)
        {
            switch (name)
            {
                //---------------墨跡類型---------------------
                case "矩形":
                    ink = new W1_DrawRectangle(this);
                    inkDA.Width = inkDA.Height = 15;
                    inkDA.StylusTip = StylusTip.Rectangle;
                    this.UseCustomCursor = false;
                    break;
                case "球形":
                    ink = new W2_DrawEllipse(this);
                    inkDA.Width = inkDA.Height = 15;
                    inkDA.StylusTip = StylusTip.Ellipse;
                    this.UseCustomCursor = false;
                    break;
                case "毛筆":
                    ink = new W3_DrawCurve(this);
                    inkDA.Width = inkDA.Height = 10;
                    this.Cursor = Cursors.Pen;
                    this.UseCustomCursor = true;
                    break;
            }
            UpdateInkParams();
        }

        /// <summary>
        /// 根據墨跡類型和筆尖信息,設置MyInkCanvas中的相關參數
        /// </summary>
        private void UpdateInkParams()
        {
            this.DynamicRenderer = ink;
            this.EditingMode = InkCanvasEditingMode.Ink;
        }
    }
}
7、修改MainWindow.xaml文件
將其改為下面的內容。
<Window x:Class="WpfAdvanceDemo2.MainWindow"
        xmlns="http://schemas.microsoft.com/winfx/2006/xaml/presentation"
        xmlns:x="http://schemas.microsoft.com/winfx/2006/xaml"
        xmlns:d="http://schemas.microsoft.com/expression/blend/2008"
        xmlns:mc="http://schemas.openxmlformats.org/markup-compatibility/2006"
        xmlns:local="clr-namespace:WpfAdvanceDemo2"
        mc:Ignorable="d"
        Title="將圖形作為對象--簡單示例(http://cnblogs.com/rainmj)" Height="400" Width="700" WindowStartupLocation="CenterScreen" Background="#FFE4EEDE">
    <Grid>
        <Grid.RowDefinitions>
            <RowDefinition Height="Auto" />
            <RowDefinition Height="*"/>
            <RowDefinition Height="Auto" />
        </Grid.RowDefinitions>
        <StackPanel Grid.Row="0">
            <TextBlock Text="提示:選擇一種繪制類型,然後在繪圖框區域內按住鼠標左鍵拖動繪制。" Margin="0 20" FontSize="16" Foreground="Blue" VerticalAlignment="Center" HorizontalAlignment="Center"/>
            <Separator/>
            <WrapPanel ButtonBase.Click="RadioButton_Click" Margin="0 10 0 0">
                <TextBlock Text="繪制類型:" VerticalAlignment="Center"/>
                <RadioButton Content="矩形" IsChecked="True" Margin="5"/>
                <RadioButton Content="球形" Margin="5"/>
                <RadioButton Content="毛筆" Margin="5"/>
            </WrapPanel>
        </StackPanel>
        <Frame Name="frame1" Grid.Row="1" Margin="10" BorderThickness="1" BorderBrush="Blue"
                   NavigationUIVisibility="Hidden" />
        <TextBlock Grid.Row="2" Text="(完整例子在【網絡應用編程】課程中還會介紹,該例子僅演示了最基本的用法)" Margin="0 0 0 5" VerticalAlignment="Center" HorizontalAlignment="Center"/>
    </Grid>
</Window>
8、修改MainWindow.xaml.cs文件
將其改為下面的內容。
using System;
using System.Collections.Generic;
using System.Linq;
using System.Text;
using System.Threading.Tasks;
using System.Windows;
using System.Windows.Controls;
using System.Windows.Data;
using System.Windows.Documents;
using System.Windows.Input;
using System.Windows.Media;
using System.Windows.Media.Imaging;
using System.Windows.Shapes;

namespace WpfAdvanceDemo2
{
    /// <summary>
    /// MainWindow.xaml 的交互邏輯
    /// </summary>
    public partial class MainWindow : Window
    {
        MyInkCanvas mycanvas;
        public MainWindow()
        {
            InitializeComponent();
            mycanvas = new MyInkCanvas();
            frame1.Content = mycanvas;
        }

        private void RadioButton_Click(object sender, RoutedEventArgs e)
        {
            string s = (e.Source as RadioButton).Content.ToString();
            mycanvas.SetInkAttributes(s);
        }
    }
}
9、運行
按<F5>鍵調試運行。
OK,這個例子雖然簡單,但是卻演示了封裝、繼承、多態在實際項目中的基本應用設計思路。請耐著性子仔細分析該例子的源代碼,相信你掌握設計思路和技巧後一定會對C#面向對象編程的理解有一個大的飛躍。
在此基礎上,你就可以繼續學習復雜的例子了。實際上,任何內容都可以通過拖放繪制出來,包括視頻。
下面的截圖演示了高級用法示例的運行效果(選擇某種繪圖類型以及其他選項後,按住鼠標左鍵隨意拖放即可):
該例子更接近於實際項目,雖然例子看起來好像很復雜,但是基本的設計思路還是這個簡單例子的思路,只不過是在簡單例子基礎上多添加了一些類而已。
這裡順便解釋一下,類似Office的工具箱界面是如何實現的(用到了Ribbon控件):
(1)鼠標右擊【引用】->【添加引用】,然後按下圖所示添加Ribbon引用。
(2)在項目中添加一個Windows窗體,然後就可以在該窗體中使用Ribbon控件設計工具箱的內容了。下面是高級例子對應的XAML代碼(為了方便快速理解,這裡去掉了重復的內容,僅列出了其中的一部分代碼):
<Window x:Class="WpfExamples.ch03.Ex02.WpfAdvanceDemo3.Demo3MainWindow"
        xmlns="http://schemas.microsoft.com/winfx/2006/xaml/presentation"
        xmlns:x="http://schemas.microsoft.com/winfx/2006/xaml"
        xmlns:d="http://schemas.microsoft.com/expression/blend/2008"
        xmlns:mc="http://schemas.openxmlformats.org/markup-compatibility/2006"
        xmlns:local="clr-namespace:WpfExamples.ch03.Ex02.WpfAdvanceDemo3"
        mc:Ignorable="d"
        Title="將圖形圖像作為對象--高級功能" Height="460" Width="980" Background="#FFF0F9D8" WindowState="Maximized">
    <Grid x:Name="root">
        <Grid.RowDefinitions>
            <RowDefinition Height="Auto" />
            <RowDefinition Height="*"/>
        </Grid.RowDefinitions>
        <Ribbon Name="ribbon" Grid.Row="0">
            <Ribbon.Resources>
                <Style TargetType="RibbonRadioButton">
                    <Setter Property="LargeImageSource" Value="/Resources/Images/b1.png"/>
                    <Setter Property="SmallImageSource" Value="/Resources/Images/b1.gif"/>
                    <Setter Property="CornerRadius" Value="13"/>
                    <Setter Property="Margin" Value="5 0 0 0"/>
                    <EventSetter Event="Checked" Handler="RibbonRadioButton_Checked"/>
                </Style>
            </Ribbon.Resources>
            <Ribbon.ApplicationMenu>
                <RibbonApplicationMenu Name="appMenu1" ToolTip="主菜單">
                    <RibbonApplicationMenu.Resources>
                        <Style TargetType="RibbonApplicationMenuItem">
                            <Setter Property="ImageSource" Value="/Resources/Images/b1.gif"/>
                            <EventSetter Event="Click" Handler="RibbonApplicationMenuItem_Click"/>
                        </Style>
                    </RibbonApplicationMenu.Resources>
                    <RibbonApplicationMenuItem Header="打開"/>
                    <RibbonApplicationMenuItem Header="另存為"/>
                    <RibbonSeparator/>
                    <RibbonApplicationMenuItem Header="退出"/>
                </RibbonApplicationMenu>
            </Ribbon.ApplicationMenu>

            <RibbonTab Name="rt1" Header="工具箱">
                <RibbonGroup Header="墨跡類型">
                    <RibbonGroup.GroupSizeDefinitions>
                        <RibbonGroupSizeDefinition>
                            <RibbonControlSizeDefinition ImageSize="Small"/>
                            <RibbonControlSizeDefinition ImageSize="Small"/>
                            ......(略,內容都一樣,個數與下面的RibbonRadioButton個數對應即可)
                        </RibbonGroupSizeDefinition>
                    </RibbonGroup.GroupSizeDefinitions>
                    <RibbonRadioButton x:Name="rrbEllipseType" Label="球形" IsChecked="True"/>
                    <RibbonRadioButton Label="矩形"/>
                    <RibbonRadioButton Label="圖像"/>
                    <RibbonRadioButton Label="球形序列"/>
                    <RibbonRadioButton Label="矩形序列"/>
                    <RibbonRadioButton Label="圖像序列"/>
                    <RibbonRadioButton Label="直線"/>
                    <RibbonRadioButton Label="曲線"/>
                    <RibbonRadioButton Label="文字"/>
                </RibbonGroup>
                <RibbonGroup Header="筆尖類型">
                    <RibbonRadioButton x:Name="rrbEllipseStylus" Label="圓筆" IsChecked="True" GroupName="edit" />
                    <RibbonRadioButton Label="豎筆" GroupName="edit"/>
                    <RibbonRadioButton Label="橫筆" GroupName="edit"/>
                    <RibbonRadioButton Label="鋼筆" GroupName="edit"/>
                </RibbonGroup>
                .....(後面的代碼和前面類似,不再列出了)
            </RibbonTab>
        </Ribbon>
        <Grid x:Name="grid1" Margin="10" Grid.Row="1" Visibility="Visible">
            <Rectangle Grid.ColumnSpan="2" Fill="white"
                       RadiusX="14" RadiusY="14"
                       Stroke="Blue" StrokeDashArray="3" />
            <local:MyInkCanvas x:Name="ink1"/>
        </Grid>
    </Grid>
</Window>
注意:練習時要一行一行的敲,不要用復制粘貼的辦法,否則系統不會自動在後台代碼(代碼隱藏類)中添加對應的事件處理程序。
在後續的章節中,我們還會學習該高級例子涉及的更多概念(比如利用序列化和反序列化將繪圖結果保存到文件中,並將序列化後的結果讀取出來還原為截圖中的各個繪圖對象等)。這裡暫不列出高級例子的設計步驟,准備等後續章節把相關的概念介紹完畢後,再學習高級例子的源代碼也不晚。
說明:這些例子全部都是本人原創的,轉載請注明出處:http://cnblogs.com/rainmj。