今天與大家分享一下"C# asp.net上傳圖片加水印文字",沒什麼技術含量,我也沒裝13,但是還是希望如果轉載的話請注明作者和出處,謝謝!
圖片加文字水印的文章到百度或者谷歌上去一搜一大堆,但是貌似有用的沒多少,很多都是一個版本,其他的都是轉載或者分享的,很多情況下都不能滿足我們自己的需求,今天我正好要用到圖片加水印這方面知識,於是我整理了一下我的心得,僅供大家參考,大蝦們跳過,我是菜鳥,哈哈~~
下面開講:
第一步:首先我想的是原理
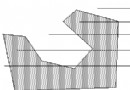
因為使用微博的原因,大家都注意到了,微博上分圖片在右下角都會加上你的微博地址,而且無論圖片是大是小,水印都會加到右下角位置,根據這一想法,我畫了一張圖,直觀一點解釋一下...如圖所示:
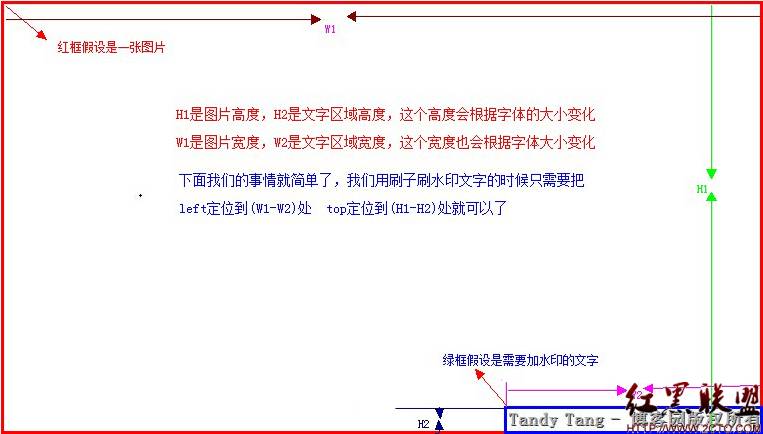
從圖片上我們可以很直觀明了的看出這裡面的原理了,所以我們代碼要解決的問題就是獲取圖片的寬度和高度,以及根據字體大小以及文字的個數計算出所話區域的長度和高度,這樣就很簡單了,呵呵...
第二步:寫代碼、測試代碼
過程我就省略了,直接看代碼吧:
AddWaterText
/// <summary>
/// 圖片加水印文字
/// </summary>
/// <param name="oldpath">舊圖片地址</param>
/// <param name="text">水印文字</param>
/// <param name="newpath">新圖片地址</param>
/// <param name="Alpha">透明度</param>
/// <param name="fontsize">字體大小</param>
public static void AddWaterText(string oldpath, string text, string newpath, int Alpha, int fontsize)
{
try
{
text = text + "版權所有";
FileStream fs = new FileStream(oldpath, FileMode.Open);
BinaryReader br = new BinaryReader(fs);
byte[] bytes = br.ReadBytes((int)fs.Length);
br.Close();
fs.Close();
MemoryStream ms = new MemoryStream(bytes);
System.Drawing.Image imgPhoto = System.Drawing.Image.FromStream(ms);
int imgPhotoWidth = imgPhoto.Width;
int imgPhotoHeight = imgPhoto.Height;
Bitmap bmPhoto = new Bitmap(imgPhotoWidth, imgPhotoHeight, System.Drawing.Imaging.PixelFormat.Format24bppRgb);
bmPhoto.SetResolution(72, 72);
Graphics gbmPhoto = Graphics.FromImage(bmPhoto);
//gif背景色
gbmPhoto.Clear(Color.FromName("white"));
gbmPhoto.InterpolationMode = System.Drawing.Drawing2D.InterpolationMode.High;
gbmPhoto.SmoothingMode = System.Drawing.Drawing2D.SmoothingMode.HighQuality;
gbmPhoto.DrawImage(imgPhoto, new Rectangle(0, 0, imgPhotoWidth, imgPhotoHeight), 0, 0, imgPhotoWidth, imgPhotoHeight, GraphicsUnit.Pixel);
System.Drawing.Font font = null;
System.Drawing.SizeF crSize = new SizeF();
font = new Font("宋體", fontsize, FontStyle.Bold);
//測量指定區域 www.2cto.com
crSize = gbmPhoto.MeasureString(text, font);
float y = imgPhotoHeight - crSize.Height;
float x = imgPhotoWidth - crSize.Width;
System.Drawing.StringFormat StrFormat = new System.Drawing.StringFormat();
StrFormat.Alignment = System.Drawing.StringAlignment.Center;
//畫兩次制造透明效果
System.Drawing.SolidBrush semiTransBrush2 = new System.Drawing.SolidBrush(Color.FromArgb(Alpha, 56, 56, 56));
gbmPhoto.DrawString(text, font, semiTransBrush2, x + 1, y + 1);
System.Drawing.SolidBrush semiTransBrush = new System.Drawing.SolidBrush(Color.FromArgb(Alpha, 176, 176, 176));
gbmPhoto.DrawString(text, font, semiTransBrush, x, y);
bmPhoto.Save(newpath, System.Drawing.Imaging.ImageFormat.Jpeg);
gbmPhoto.Dispose();
imgPhoto.Dispose();
bmPhoto.Dispose();
}
catch
{
;
}
}
代碼我就不解釋了,基本上在原理中都解釋過了。另:關於參數的設置,我們還可以加上是什麼字體、字體顏色、是否加粗,以及定位到什麼位子等,這樣就封裝的更好了,由於我現在只需要把水印加到右下角,所以我就沒有再寫了,呵呵...原理一樣,封裝也很好封裝,留給你們寫吧,哈哈...
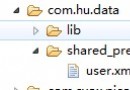
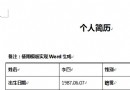
下面看效果圖吧,因為圖是最直觀的展示了...

上面就是我隨便截了張圖的效果圖。
調用方法:命名空間.類名.AddWaterText(picpath, "Tandy Tang - 博客園", picpath, 255, 18);
如果你覺得對你有幫助的話,別忘了點推薦哦~~
摘自 Tandy Tang's Personal Blog