一、將控件內容拖到其他控件
在開發過程中,經常會有客戶要求,拖動一個控件的數據到另外一個控件中。例如將其中一個ListBox中的數據拖到另一個ListBox中。或者將DataGridView中的數據拖動到TreeView的某個節點。
在應用程序中,是通過處理一系列事件,如DragEnter,DragLeave和DragDrop事件來實現在Windows應用程序中的拖放操作的。通過使用這些事件參數中的可用信息,可以輕松實現拖放操作。
拖放操作在代碼中是通過三步實現的,首先是啟動拖放操作,在需要拖動數據的控件上實現MouseDown事件響應代碼,並調用DoDragDrop()方法;其次是實現拖放效果,在目標控件上添加DragEnter事件響應代碼,使用DragDropEffects枚舉類型實現移動或復制等拖動效果;最後是放置數據操作,在目標控件上添加DragDrop響應代碼,把數據添加到目標控件中。
1 using System;
2 using System.Drawing;
3 using System.Collections;
4 using System.ComponentModel;
5 using System.Windows.Forms;
6 using System.Data;
7
8 namespace DragDrop
9 {
10 /// <summary>
11 /// Form1 的摘要說明。
12 /// </summary>
13 public class Form1 : System.Windows.Forms.Form
14 {
15 private System.Windows.Forms.ListBox listBox1;
16 private System.Windows.Forms.ListBox listBox2;
17 /// <summary>
18 /// 必需的設計器變量。
19 /// </summary>
20 private System.ComponentModel.Container components = null;
21
22 public Form1()
23 {
24 //
25 // Windows 窗體設計器支持所必需的
26 //
27 InitializeComponent();
28
29 //
30 // TODO: 在 InitializeComponent 調用後添加任何構造函數代碼
31 //
32 }
33
34 /// <summary>
35 /// 清理所有正在使用的資源。
36 /// </summary>
37 protected override void Dispose(bool disposing)
38 {
39 if (disposing)
40 {
41 if (components != null)
42 {
43 components.Dispose();
44 }
45 }
46 base.Dispose(disposing);
47 }
48
49 #region Windows 窗體設計器生成的代碼
50 /// <summary>
51 /// 設計器支持所需的方法 - 不要使用代碼編輯器修改
52 /// 此方法的內容。
53 /// </summary>
54 private void InitializeComponent()
55 {
56 this.listBox1 = new System.Windows.Forms.ListBox();
57 this.listBox2 = new System.Windows.Forms.ListBox();
58 this.SuspendLayout();
59 //
60 // listBox1
61 //
62 this.listBox1.ItemHeight = 12;
63 this.listBox1.Location = new System.Drawing.Point(32, 24);
64 this.listBox1.Name = "listBox1";
65 this.listBox1.Size = new System.Drawing.Size(120, 280);
66 this.listBox1.TabIndex = 0;
67 this.listBox1.MouseDown += new System.Windows.Forms.MouseEventHandler(this.listBox1_MouseDown);
68 //
69 // listBox2
70 //
71 this.listBox2.ItemHeight = 12;
72 this.listBox2.Location = new System.Drawing.Point(248, 24);
73 this.listBox2.Name = "listBox2";
74 this.listBox2.Size = new System.Drawing.Size(120, 280);
75 this.listBox2.TabIndex = 0;
76 this.listBox2.DragDrop += new System.Windows.Forms.DragEventHandler(this.listBox2_DragDrop);
77 this.listBox2.DragEnter += new System.Windows.Forms.DragEventHandler(this.listBox2_DragEnter);
78 //
79 // Form1
80 //
81 this.AutoScaleBaseSize = new System.Drawing.Size(6, 14);
82 this.ClientSize = new System.Drawing.Size(408, 333);
83 this.Controls.Add(this.listBox1);
84 this.Controls.Add(this.listBox2);
85 this.Name = "Form1";
86 this.Text = "Form1";
87 this.Load += new System.EventHandler(this.Form1_Load);
88 this.ResumeLayout(false);
89
90 }
91 #endregion
92
93 private void Form1_Load(object sender, System.EventArgs e)
94 {
95 this.listBox1.AllowDrop = true;
96 this.listBox2.AllowDrop = true;
97 this.listBox1.Items.Add("a");
98 this.listBox1.Items.Add("b");
99 this.listBox1.Items.Add("c");
100 }
101
102 private void listBox1_MouseDown(object sender, System.Windows.Forms.MouseEventArgs e)
103 {
104 this.listBox1.DoDragDrop(this.listBox1.Items[this.listBox1.SelectedIndex], DragDropEffects.Move);
105 }
106
107 private void listBox2_DragEnter(object sender, System.Windows.Forms.DragEventArgs e)
108 {
109 if (e.Data.GetDataPresent(DataFormats.Text))
110 {
111 e.Effect = DragDropEffects.Move;
112 }
113 }
114
115 private void listBox2_DragDrop(object sender, System.Windows.Forms.DragEventArgs e)
116 {
117 this.listBox2.Items.Add(e.Data.GetData(DataFormats.Text));
118 this.listBox1.Items.Remove(e.Data.GetData(DataFormats.Text));
119 }
120 }
121 }
二、將文件拖到控件中獲得文件路徑
把文件或者目錄直接拖放到你的程序上,這種效果用戶體驗不錯。
得到拖過來的路徑的代碼:(System.Array)e.Data.GetData(DataFormats.FileDrop)。
然後你可以根據這些路徑復制粘貼了。
1 using System;
2 using System.Collections.Generic;
3 using System.ComponentModel;
4 using System.Data;
5 using System.Drawing;
6 using System.Linq;
7 using System.Text;
8 using System.Windows.Forms;
9
10 namespace TestFileDrag
11 {
12 public partial class Form1 : Form
13 {
14 public Form1()
15 {
16 InitializeComponent();
17 }
18
19 private void Form1_Load(object sender, EventArgs e)
20 {
21 SetCtrlDrag.SetCtrlDragEvent(this.textBox1);
22 }
23 }
24
25 public class SetCtrlDrag
26 {
27 public static void SetCtrlDragEvent(Control ctrl)
28 {
29 if(ctrl is TextBox)
30 {
31 TextBox tb = ctrl as TextBox;
32 tb.AllowDrop = true;
33 tb.DragEnter += (sender, e) =>
34 {
35 e.Effect = DragDropEffects.Link;//拖動時的圖標
36 };
37 tb.DragDrop += (sender, e) =>
38 {
39 ((TextBox)sender).Text = ((System.Array)e.Data.GetData(DataFormats.FileDrop)).GetValue(0).ToString();
40 };
41 }
42 }
43 }
44 }
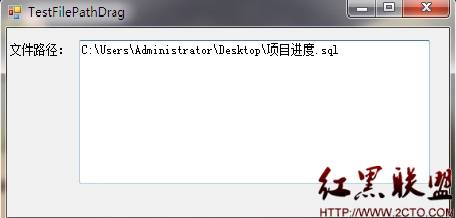
界面效果

三、相關說明
msdn:http://msdn.microsoft.com/zh-cn/library/system.windows.forms.dragdropeffects.aspx
1.方法
實現拖放效果時,C#中提供了一個系統方法DoDragDrop方法,用於實現開始拖放操作,該方法由Control類所定義,由於控件均直接或是間接派生於Control類,因此開發人員可以在任何可視化組件中調用DoDragDrop方法。DoDragDrop方法使用語法如下:
public DragDropEffects DoDragDrop ( Object data,DragDropEffects allowedEffects)
data:用戶所要拖動的數據內容。必須將所要拖動的內容傳入到這個方法的第一個參數位置。
allowedEffects:DragDropEffects枚舉值之一,此類型包含了拖動操作的效果。DragDropEffects枚舉值如表32.8所示。
DragDropEffects枚舉值:
枚舉值 說明
All 從拖動源復制、移除數據,並將其滾動到放置目標中
Copy 將數據復制到放置目標
Link 將拖動源中的數據鏈接到放置目標
Move 將拖動源的數據移動到放置目標
None 放置目標不接受該數據
Scroll 即將在放置目標中開始滾動,或當前正在滾動
開發人員在使用DoDragDrop方法時,必須指定參數allowedEffects為表中的任何一個成員,另外,還可以使用位運算符,把其中的任何一個成員作為一個完整參數傳入,以得到所需的拖動效果,實現關鍵代碼如下:
DragDropEffects.Copy| DragDropEffects.None
2.事件
C#中提供了一個系統拖放事件,與拖放方法一起使用來達到更好的效果。常用的拖放事件如表所示。
表 拖放事件
名稱 說明
DragEnter 當用戶在拖放操作過程中首次將鼠標光標拖到控件上時,會引發該事件
DragDrop 在完成拖放操作時發生
GiveFeedback 在執行拖動操作期間發生
DragLeave 如果用戶移出一個窗口,則引發DragLeave事件
DragOver 如果鼠標移動但停留在同一個控件中,則引發DragOver事件
QueryContinueDrag 在拖放操作過程中,當鍵盤或鼠標按鈕狀態發生變化時,會引發QueryContinueDrag 事件。QueryContinueDrag事件允許拖動源確定是否應取消拖放操作
摘自 SamWang