C# networkcomms 3.0實現模擬登陸總結。本站提示廣大學習愛好者:(C# networkcomms 3.0實現模擬登陸總結)文章只能為提供參考,不一定能成為您想要的結果。以下是C# networkcomms 3.0實現模擬登陸總結正文
作者:蒙蒙大川
這篇文章主要介紹了C# networkcomms 3.0實現模擬登陸總結,需要的朋友可以參考下最近項目需要做一個客戶查詢狀態系統,當前上位機缺少服務功能,於是找到了networkcomms 開源框架,作為項目使用.
最新版networkcomms 下載地址:https://github.com/MarcFletcher/NetworkComms.Net
下載直接vs打開
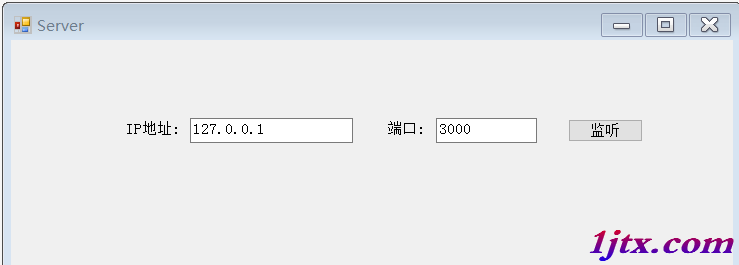
新建服務器端
using MessageContract;
using NetworkCommsDotNet;
using NetworkCommsDotNet.Connections;
using NetworkCommsDotNet.Connections.TCP;
using NetworkCommsDotNet.DPSBase;
using System;
using System.Collections.Generic;
using System.ComponentModel;
using System.Data;
using System.Drawing;
using System.Linq;
using System.Net;
using System.Text;
using System.Windows.Forms;
namespace AppServer
{
public partial class MaiForm : Form
{
public MaiForm()
{
InitializeComponent();
}
SendReceiveOptions aboveOptions = new SendReceiveOptions(DPSManager.GetDataSerializer<ProtobufSerializer>(), null, null);
private void button1_Click(object sender, EventArgs e)
{
//服務器開始監聽客戶端的請求
Connection.StartListening(ConnectionType.TCP, new IPEndPoint(IPAddress.Parse(txtIP.Text), int.Parse(txtPort.Text)));
//服務器開始監聽客戶端的請求
//IPEndPoint thePoint = new IPEndPoint(IPAddress.Parse(txtIP.Text), int.Parse(txtPort.Text));
//TCPConnection.StartListening(thePoint, false);
button1.Text = "監聽中";
button1.Enabled = false;
//button1.Text = "監聽中";
//button1.Enabled = false;
//此方法中包含服務器具體的處理方法。
StartListening();
}
private void StartListening()
{
//開啟日志記錄
//配置日志記錄器
//ILogger logger = new LiteLogger(LiteLogger.LogMode.ConsoleAndLogFile, "ServerLogFile_" + NetworkComms.NetworkIdentifier + ".txt");
//NetworkComms.EnableLogging(logger);
//禁用日志記錄 服務器端正式使用時,贏禁用日志記錄
NetworkComms.DisableLogging();
//服務器端處理收到的消息
//為簡單起見,此示例中我們只處理字符類型的信息,也返回字符類型的信息。
//處理的信息可以使自定義類,具體見下一個Demo
NetworkComms.AppendGlobalIncomingPacketHandler<LoginContract>("ReqLogin", IncomingLoginRequest);
}
//處理某個具體的請求
private void IncomingLoginRequest(PacketHeader header, Connection connection, LoginContract loginContract)
{
try
{
string resMsg = "";
//為了簡單,這裡不調用數據庫,而是模擬一下登錄
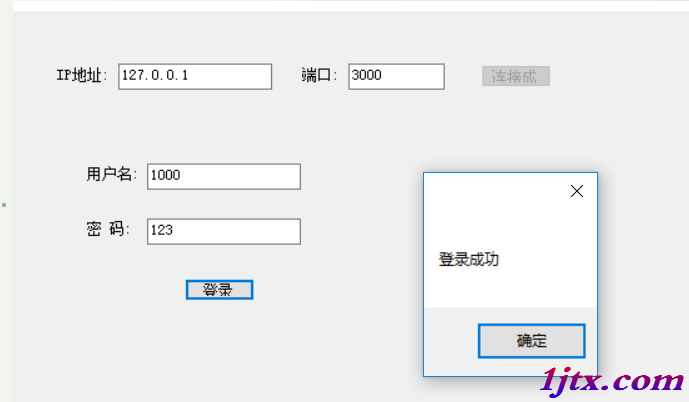
if (loginContract.UserID == "1000" && loginContract.PassWord == "123")
resMsg = "登錄成功";
else
resMsg = "用戶名密碼錯誤";
//把返回結果寫入到契約類中,後面返回給客戶端
//ResMsgContract contract = new ResMsgContract();
//contract.Message = resMsg;
//connection.SendObject<ResMsgContract>("ResLogin", contract);
ResMsgContract contract = new ResMsgContract();
contract.Message = resMsg;
connection.SendObject("ResLogin", contract);
}
catch (Exception ex)
{
// LogTools.LogException(ex, "IncomingMsgHandle");
}
}
}
}
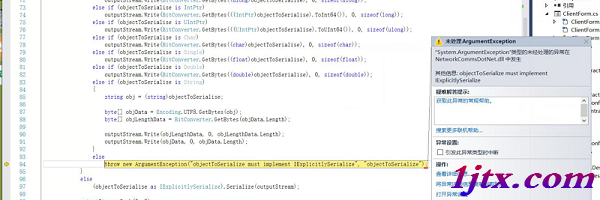
在別的幫助中往往少了這行:導致出現客戶端發送時,類型打包出現問題. 這行代碼是客戶端服務器兩端都要加上的,是指定傳輸方式
SendReceiveOptions aboveOptions = new SendReceiveOptions(DPSManager.GetDataSerializer<ProtobufSerializer>(), null, null);
就是這個報錯了
一下是客戶端
using MessageContract;
using NetworkCommsDotNet;
using NetworkCommsDotNet.Connections;
using NetworkCommsDotNet.Connections.TCP;
using NetworkCommsDotNet.DPSBase;
using System;
using System.Collections.Generic;
using System.ComponentModel;
using System.Data;
using System.Drawing;
using System.Linq;
using System.Text;
using System.Windows.Forms;
namespace AppClient
{
  public partial class MainForm : Form
  {
    public MainForm()
    {
      InitializeComponent();
    }
    //連接信息對象
    public ConnectionInfo connInfo = null;
    //連接對象
    Connection newTcpConnection;
    SendReceiveOptions aboveOptions = new SendReceiveOptions(DPSManager.GetDataSerializer<ProtobufSerializer>(), null, null);
    private void button1_Click(object sender, EventArgs e)
    {
      //給連接信息對象賦值
      connInfo = new ConnectionInfo(txtIP.Text, int.Parse(txtPort.Text));
      //如果不成功,會彈出異常信息
      newTcpConnection = TCPConnection.GetConnection(connInfo);
      button1.Enabled = false;
      button1.Text = "連接成功";
    }
    private void btnlogin_Click(object sender, EventArgs e)
    {
      //給契約類賦值
      LoginContract contract = new LoginContract(txtUserName.Text, txtPassword.Text);
      //contract.UserID = txtUserName.Text;
      //contract.PassWord = txtPassword.Text;
      //向服務器發送登錄信息並獲取登錄結果
       ResMsgContract resMsg = newTcpConnection.SendReceiveObject<LoginContract, ResMsgContract>("ReqLogin", "ResLogin", 5000, contract);
      //向服務器發送登錄信息並獲取登錄結果
      // ResMsgContract resMsg = newTcpConnection.SendReceiveObject<ResMsgContract>("ReqLogin", "ResLogin", 5000, contract);
      if (resMsg.Message == "登錄成功")
      {
        MessageBox.Show("登錄成功");
      }
      else
      {
        MessageBox.Show("用戶名密碼錯誤");
      }
    }
  }
}
契約類
using System;
using System.Collections.Generic;
using System.Linq;
using System.Text;
namespace MessageContract
{
  [ProtoContract]
  public class LoginContract
  {
    [ProtoMember(1)]
    public string UserID { get; set; }
    [ProtoMember(2)]
    public string PassWord { get; set; }
    public LoginContract() { }
    public LoginContract(string userID, string passWord)
    {
      this.UserID = userID;
      this.PassWord = passWord;
    }
  }
}
using ProtoBuf;
using System;
using System.Collections.Generic;
using System.Linq;
using System.Text;
namespace MessageContract
{
  [ProtoContract]
  public class ResMsgContract
  {
    [ProtoMember(1)]
    public string Message;
    public ResMsgContract() { }
    public ResMsgContract(string message)
    {
      this.Message = message;
    }
  }
}
注意:
使用這個框架要配合谷歌的protobuf 要選好版本.本人沒重復測試最高版本,因為在調試登錄過程中出現別的問題過程中,也順改了protobuf 的版本,至今未測試最高版本是否存在兼容問題.本人成功的使用的是2.0.0.668
protobuf簡介protobuf是google提供的一個開源序列化框架,類似於XML,JSON這樣的數據表示語言,其最大的特點是基於二進制,因此比傳統的XML表示高效短小
vs nuget添加方式
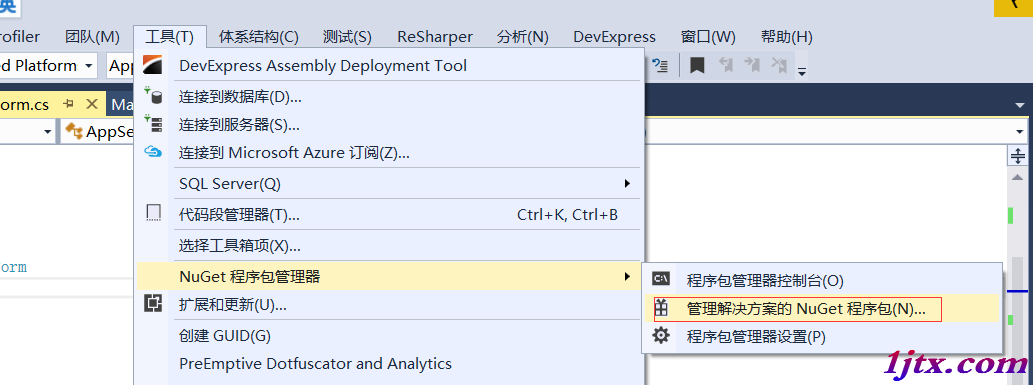
輸入
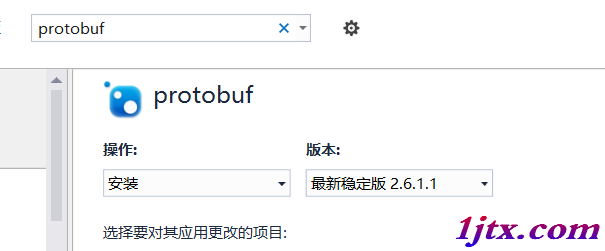
版本選擇自己指定一下,加大項目的契約類裡邊.這是自己定義傳輸對象的方式.

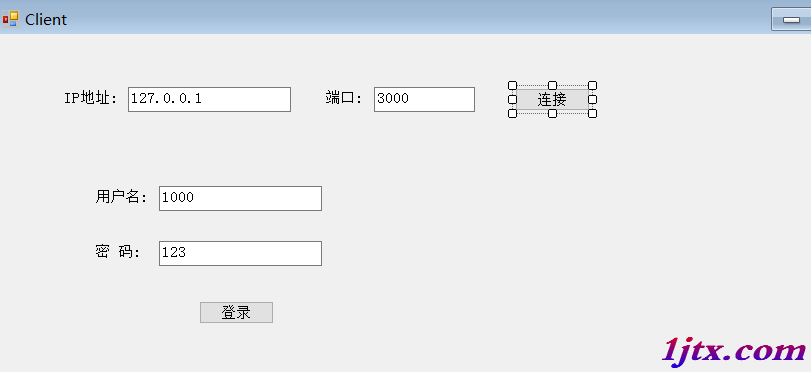
結果:
以上所述是小編給大家介紹的C# networkcomms 3.0實現模擬登陸總結,希望對大家有所幫助,如果大家有任何疑問請給我留言,小編會及時回復大家的。在此也非常感謝大家對網站的支持!