C#完成打造氣泡屏幕掩護後果。本站提示廣大學習愛好者:(C#完成打造氣泡屏幕掩護後果)文章只能為提供參考,不一定能成為您想要的結果。以下是C#完成打造氣泡屏幕掩護後果正文
本文重要是引見C#完成打造氣泡屏幕掩護後果,起首說一下制造要點:1 窗口要全屏置頂 2 模仿氣泡的轉動和粘滯後果 3 支撐快捷鍵ESC加入
年夜致就是這3個要點了,其他還有一些細節我們在法式中依據須要再看,OK,開工!
起首是全屏置頂,由於是屏幕掩護嘛,這個簡略,在窗體的屬性設置裡把FormBorderStyle設置為none表現無邊框,把ShowInTaskbar設置為false表現不在義務欄湧現,最初一個把WindowState設置為Maximized表現最年夜化便可,固然可以設置TopMost為true讓窗口置頂,不外這個不是相對的,假如有其他窗口也應用TopMost的話會讓我們掉去核心,所以我們要注冊一個快捷鍵讓法式可以加入!
模仿氣泡我們可以用Graphics類中的DrawEllipse辦法來畫一個圓,固然這個圓我們可以指定分歧的色彩和年夜小,這裡重點講一下怎樣模仿粘滯後果!
所謂粘滯後果信任年夜家到曉得,膠體年夜家都見過吧?就是相似膠體那種有彈性而且可以在轉變外形後答復原型的那種後果,固然這裡要想模仿這個後果只能說是略微相似,DrawEllipse辦法中最初兩個參數表現圓的年夜小,我們可以在這裡做文章,因為輪回的速度很快,我們只需靜態轉變圓的年夜小便可以發生相似粘滯的後果,固然這個轉變年夜小的參數不克不及太年夜,不然就有效了!
我們在onpaint事宜中寫入以下代碼來繪制一些圓:
Random ra = new Random(); //初始化隨機數
   bmp = new Bitmap(ClientSize.Width,ClientSize.Height, e.Graphics);
   Graphics bmpGraphics = Graphics.FromImage(bmp);
   // 繪制圓形
  for (int i=1;i<=13;i++)//這裡繪制13個圓形
   {
     bmpGraphics.DrawEllipse(new Pen(Color.FromName(colours[i]),2),//依據事前界說好的色彩繪制分歧色彩的圓
      ballarray[i, 1], ballarray[i, 2], 70+ra.Next(1, 10), 70+ra.Next(1, 10));
      //留意下面的最初兩個參數應用隨機數發生粘滯後果
   }
   e.Graphics.DrawImageUnscaled(bmp, 0, 0);
   bmpGraphics.Dispose();
   bmp.Dispose();//這裡長短托管的渣滓收受接管機制,防止發生內存溢出
如許,經由過程以上代碼便可以繪制出一些分歧色彩的具有粘滯後果的圓來模仿氣泡
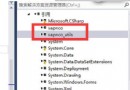
上面是注冊體系熱鍵,有個API函數RegisterHotKey可以完成體系快捷鍵的注冊,應用他之前我們要先援用一個體系的DLL文件:USER32.DLL,然後對這個RegisterHotKey函數停止一下聲明:
[DllImport("user32.dll")]//援用USER32.DLL
public static extern UInt32 RegisterHotKey(IntPtr hWnd, UInt32 id, UInt32 fsModifiers, UInt32 vk); //聲明函數原型
因為援用了一個DLL文件,我們不要忘了在文件頭參加DLLImport的類聲明using System.Runtime.InteropServices;然後在Form1的結構函數中來注冊一個體系熱鍵,這裡我們注冊ESC:RegisterHotKey(this.Handle, 247696411, 0, (UInt32)Keys.Escape); 經由過程以上步調,我們便可以注冊一個或多個體系熱鍵,然則,注冊體系熱鍵後我們還不克不及立刻應用,由於我們在法式中還沒法對這個新聞停止呼應,我們重載一下默許的WndProc進程來呼應我們的熱鍵新聞:
protected override void WndProc(ref Message m)//留意是掩護類型的進程
 {
     const int WM_HOTKEY = 0x0312;
 }
    if (m.Msg == WM_HOTKEY & & m.WParam.ToInt32() == 247696411) //斷定熱鍵新聞是否是我們設置的
       {
        Application.Exit();//假如新聞等於我們的熱鍵新聞,法式加入
      }
    base.WndProc(ref m);//其他新聞前往做默許處置
好了,經由過程以上一些步調,我們就根本完成了這個屏幕掩護法式的要點設計,其他的具體進程可以參考源碼,法式運轉的時刻配景是通明的,這個也不難完成
1.this.BackColor = System.Drawing.Color.FromArgb(((int)(((byte)(255)))), ((int)(((byte)(192)))), ((int)(((byte)(192)))));
2.this.TransparencyKey = System.Drawing.Color.FromArgb(((int)(((byte)(255)))), ((int)(((byte)(192)))), ((int)(((byte)(192)))));
屏幕掩護法式代碼以下:
using System;
using System.Drawing;
using System.Collections;
using System.ComponentModel;
using System.Windows.Forms;
using System.Runtime.InteropServices;
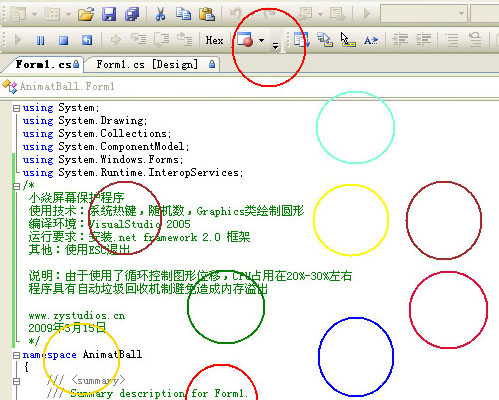
/*
屏幕掩護法式
應用技巧:體系熱鍵,隨機數,Graphics類繪制圓形
編譯情況:VisualStudio 2005
運轉請求:裝置.net framework 2.0 框架
其他:應用ESC加入
解釋:因為應用了輪回掌握圖形位移,CPU占用在20%-30%閣下
法式具有主動渣滓收受接管機制防止形成內存溢出
2009年3月15日
*/
namespace AnimatBall
{
/// <summary>
/// Summary description for Form1.
/// </summary>
public class Form1 : System.Windows.Forms.Form
{
public int[,] ballarray = new int[20,20];
public string[] colours = new string[16];
public Bitmap bmp;
private System.Windows.Forms.Timer timer1;
private System.ComponentModel.IContainer components;
[DllImport("user32.dll")]
public static extern UInt32 RegisterHotKey(IntPtr hWnd, UInt32 id, UInt32 fsModifiers, UInt32 vk); //API
//重寫新聞輪回
protected override void WndProc(ref Message m)
{
const int WM_HOTKEY = 0x0312;
if (m.Msg == WM_HOTKEY && m.WParam.ToInt32() == 247696411) //斷定熱鍵
{
Application.Exit();
}
base.WndProc(ref m);
}
public Form1()
{
//
// Required for Windows Form Designer support
//
InitializeComponent();
//colours[0]="Red";
colours[1]="Red";
colours[2]="Blue";
colours[3]="Black";
colours[4]="Yellow";
colours[5]="Crimson";
colours[6]="Gold";
colours[7]="Green";
colours[8]="Magenta";
colours[9]="Aquamarine";
colours[10]="Brown";
colours[11]="Red";
colours[12]="DarkBlue";
colours[13]="Brown";
colours[14]="Red";
colours[15]="DarkBlue";
InitializeComponent();
RegisterHotKey(this.Handle, 247696411, 0, (UInt32)Keys.Escape); //注冊熱鍵
//
// TODO: Add any constructor code after InitializeComponent call
//
}
/// <summary>
/// Clean up any resources being used.
/// </summary>
protected override void Dispose( bool disposing )
{
if( disposing )
{
if (components != null)
{
components.Dispose();
}
}
base.Dispose( disposing );
}
#region Windows Form Designer generated code
/// <summary>
/// Required method for Designer support - do not modify
/// the contents of this method with the code editor.
/// </summary>
private void InitializeComponent()
{
this.components = new System.ComponentModel.Container();
this.timer1 = new System.Windows.Forms.Timer(this.components);
this.SuspendLayout();
//
// timer1
//
this.timer1.Interval = 25;
this.timer1.Tick += new System.EventHandler(this.timer1_Tick);
//
// Form1
//
this.AutoScaleBaseSize = new System.Drawing.Size(6, 14);
this.BackColor = System.Drawing.Color.FromArgb(((int)(((byte)(255)))), ((int)(((byte)(192)))), ((int)(((byte)(192)))));
this.ClientSize = new System.Drawing.Size(373, 294);
this.DoubleBuffered = true;
this.FormBorderStyle = System.Windows.Forms.FormBorderStyle.None;
this.Name = "Form1";
this.ShowInTaskbar = false;
this.Text = "小焱屏幕掩護";
this.TopMost = true;
this.TransparencyKey = System.Drawing.Color.FromArgb(((int)(((byte)(255)))), ((int)(((byte)(192)))), ((int)(((byte)(192)))));
this.WindowState = System.Windows.Forms.FormWindowState.Maximized;
this.Load += new System.EventHandler(this.Form1_Load);
this.ResumeLayout(false);
}
#endregion
/// <summary>
/// The main entry point for the application.
/// </summary>
[STAThread]
static void Main()
{
Application.Run(new Form1());
}
private void timer1_Tick(object sender, System.EventArgs e)
{
for (int i=1;i<=13;i++)
{
//add direction vectors to coordinates
ballarray[i,1] = ballarray[i,1] + ballarray[i,3];
ballarray[i,2] = ballarray[i,2] + ballarray[i,4];
//if ball goes of to right
if ((ballarray[i,1]+50)>=ClientSize.Width)
{
ballarray[i,1]=ballarray[i,1]-ballarray[i,3];
ballarray[i,3]=-ballarray[i,3];
}
//if ball goes off bottom
else if ((ballarray[i,2]+50)>=ClientSize.Height)
{
ballarray[i,2]=ballarray[i,2]-ballarray[i,4];
ballarray[i,4]=-ballarray[i,4];
}
//if ball goes off to left
else if (ballarray[i,1]<=1)
{
ballarray[i,1]=ballarray[i,1]-ballarray[i,3];
ballarray[i,3]=-ballarray[i,3];
}
//if ball goes over top
else if (ballarray[i,2]<=1)
{
ballarray[i,2]=ballarray[i,2]-ballarray[i,4];
ballarray[i,4]=-ballarray[i,4];
}
}
this.Refresh(); //force repaint of window
}
//Called from timer event when window needs redrawing
protected override void OnPaint(PaintEventArgs e)
{
Random ra = new Random();
bmp = new Bitmap(ClientSize.Width,ClientSize.Height, e.Graphics);
Graphics bmpGraphics = Graphics.FromImage(bmp);
// draw here
for (int i=1;i<=13;i++)
{
bmpGraphics.DrawEllipse(new Pen(Color.FromName(colours[i]),2),
ballarray[i, 1], ballarray[i, 2], 70+ra.Next(1, 10), 70+ra.Next(1, 10));//應用隨機數發生粘滯後果
}
e.Graphics.DrawImageUnscaled(bmp, 0, 0);
//Draw ellipse acording to mouse coords.
bmpGraphics.Dispose();
bmp.Dispose();
}
private void Form1_Load(object sender, EventArgs e)
{
Random r = new Random();
//set ball coords and vectors x,y,xv,yv
for (int i = 1; i <= 13; i++)
{
ballarray[i, 1] = +r.Next(10) + 1; //+1 means i lose zero values
ballarray[i, 2] = +r.Next(10) + 1;
ballarray[i, 3] = +r.Next(10) + 1;
ballarray[i, 4] = +r.Next(10) + 1;
}
timer1.Start();
}
}
}
TransparencyKey可讓窗體的某個色彩通明顯示,我們只需把窗體的色彩和TransparencyKey的色彩設置分歧便可以了,這裡我設置的是粉紅,留意最好設置的色彩是窗體所沒有的,不然一旦婚配將會以通明顯示!
後果以下: