點對點即Peer-To-Peer,通常簡寫為P2P。所謂網絡中的點對點,其實可以看成是一種對等的網絡模型。P2P其實是實現網絡上不同計算機之間,不經過中繼設備直接交換數據或服務的一種技術。P2P由於允許網絡中任一台計算機可以直接連接到網絡中其他計算機,並與之進行數據交換,這樣既消除了中間環節,也使得網絡上的溝通變得更容易、更直接。
P2P作為一種網絡的模型,它有別於傳統的客戶/服務器模型。客戶/服務器模型一般都有預定義的客戶機和服務器。而在P2P模型轉並沒有明確的客戶端和服務器,但其實在P2P模型中,每一台計算機既可以看成是服務器,也可以看成是客戶機。在網絡中,傳統上的客戶機/服務器通訊模型中,發送服務請求或者發送數據的計算機,一般稱為客戶機;而接收、處理服務或接收數據的計算機稱為服務器。而在P2P網絡模型中,計算機不僅接收數據,還有發送數據,不僅提出服務請求,還有接收對方的服務請求。
在下面介紹的用Visual C#實現的局域網點對點通訊程序,就有如下特點,在網絡利用此通訊程序進行通訊的任一計算機,在通訊之前,都需要偵聽端口號,接受其他機器的連接申請,並在連接建立後,就可以接收對方發送來的數據;同時也可以向其他機器提出連接申請,並在對方計算機允許建立連接請求後,發送數據到對方。可見在網絡中利用此軟件進行P2P網絡通訊的任一計算機既是客戶機,同樣也是服務器。
一.程序的設計、調試、運行的軟件環境:
(1).微軟公司視窗2000服務器版
(2).Visual Studio .Net正式版,.Net FrameWork SDK版本號3705
二.關鍵步驟及其解決方法: 關鍵步驟就是實現信息在網絡中的發送和接收。數據接收使用的是Socket,數據發送使用的是NetworkStream。
1.利用Socket來接收信息:
為了更清楚的說明問題,程序在處理數據發送和接收時采用了不通的端口號,發送數據程序在缺省狀態設定的端口號為"8889"。下面代碼是偵聽端口號"8889",接受網絡中對此端口號的連接請求,並在建立連接後,通過Socket接收遠程計算機發送來的數據:
try
{
TcpListener tlListen1 = new TcpListener ( 8889 ) ;
//偵聽端口號
tlListen1.Start ( ) ;
Socket skSocket = tlListen1.AcceptSocket ( );
//接受遠程計算機的連接請求,並獲得用以接收數據的Socket實例
EndPoint tempRemoteEP = skSocket.RemoteEndPoint;
//獲得遠程計算機對應的網絡遠程終結點
while (true)
{
Byte [] byStream = new Byte[80];
//定義從遠程計算機接收到數據存放的數據緩沖區
int i = skSocket.ReceiveFrom(byStream,ref tempRemoteEP);
//接收數據,並存放到定義的緩沖區中
string sMessage = System.Text.Encoding.UTF8.GetString(byStream);
//以指定的編碼,從緩沖區中解析出內容
MessageBox.Show ( sMessage );
//顯示傳送來的數據
}
}
catch ( System.Security.SecurityException )
{
MessageBox.Show ( "防火牆安全錯誤!","錯誤",
MessageBoxButtons.OK , MessageBoxIcon.Exclamation);
}
2.利用NetworkStream來傳送信息:
在使用StreamWriter處理NetworkStream傳送數據時,數據傳送的編碼類型是"UTF8",下列代碼是對IP地址為"10.138.198.213"的計算機的"8888"端口號提出連接申請,並在連接申請建立後,以UTF8編碼發送字符串"您好,見到您很高興"到對方,由於下列代碼中的注釋比較詳細,這裡就不具體介紹了,下列代碼也是使用NetworkStream傳送數據的典型代碼:
try
{
TcpClient tcpc = new TcpClIEnt ("10.138.198.213",8888);
//對IP地址為"10.138.198.213"的計算機的8888端口提出連接申請
NetworkStream tcpStream = tcpc.GetStream ( );
//如果連接申請建立,則獲得用以傳送數據的數據流
}
catch ( Exception )
{
MessageBox.Show ( "目標計算機拒絕連接請求!" ) ;
break ;
}
try
{
string sMsg = "您好,見到您很高興" ;
StreamWriter reqStreamW = new StreamWriter (tcpStream);
//以特定的編碼往向數據流中寫入數據 ,默認為UTF8編碼
reqStreamW.Write (sMsg);
//將字符串寫入數據流中
reqStreamW.Flush ( );
//清理當前編寫器的所有緩沖區,並使所有緩沖數據寫入基礎流
}
catch(Exception)
{
MessageBox.Show ("無法發送信息到目標計算機!") ;
}
當然在具體用Visual C#實現網絡點對點通訊程序時,還必須掌握很多其他方面的知識,如資源的回收。在用Visual C#編寫網絡應用程序的時候,很多朋友遇到這樣的情況。當程序退出後,通過Windows的"資源管理器"看到的是進程數目並沒有減少。這是因為程序中使用的線程可能並沒有有效退出。雖然Thread類中提供了"Abort"方法用以中止進程,但並不能夠保證成功退出。因為進程中使用的某些資源並沒有回收。在某些情況下垃圾回收器也不能保證完全的回收資源,還是需要我們自己手動回收資源的。在本文介紹的程序中也涉及到資源手動回收的問題。實現方法可參閱下面具體實現步驟中的第十二步。
三.具體步驟:
在了解、掌握了上面的關鍵問題及其解決方法後,再實現用Visual C#實現網絡點對點通訊程序相對就容易許多,下面是具體的實現步驟:
1.啟動Visual Studio .Net,並新建一個Visual C#項目,名稱為【Visual C#實現網絡點對點通訊程序】。
2.在Visual Studio .Net集成開發環境中的【解決方案資源管理器】窗口中,雙擊Form1.cs文件,進入Form1.cs文件的編輯界面。
3.在Form1.cs文件的開頭,用下列導入命名空間代碼替代系統缺省的導入命名空間代碼。
using System ;
using System.Drawing ;
using System.Collections ;
using System.ComponentModel ;
using System.Windows.Forms ;
using System.Data ;
using System.Net.Sockets ;
using System.Net ;
using System.IO ;
using System.Text ;
using System.Threading ;
4.再把Visual Studio.Net的當前窗口切換到【Form1.cs(設計)】窗口,並從【工具箱】中的【Windows窗體組件】選項卡中往窗體中拖入下列組件:
四個Button組件;二個ListBox組件;四個TextBox組件;一個StatusBar組件;五個Label組件。並在四個Button組件拖入窗體後,分別在窗體設計界面中雙擊它們,則系統會在Form1.cs文件中分別產生這四個組件的Click事件對應的處理代碼。
5.在【解決方案資源管理器】窗口中,雙擊Form1.cs文件,進入Form1.cs文件的編輯界面。以下面代碼替代系統產生的InitializeComponent過程。下面代碼是對上面添加的組件進行初始化:
private void InitializeComponent ( )
{
this.listBox1 = new System.Windows.Forms.ListBox ( ) ;
this.textBox1 = new System.Windows.Forms.TextBox ( ) ;
this.label3 = new System.Windows.Forms.Label ( ) ;
this.label2 = new System.Windows.Forms.Label ( ) ;
this.textBox3 = new System.Windows.Forms.TextBox ( ) ;
this.button1 = new System.Windows.Forms.Button ( ) ;
this.textBox2 = new System.Windows.Forms.TextBox ( ) ;
this.label1 = new System.Windows.Forms.Label ( ) ;
this.label4 = new System.Windows.Forms.Label ( ) ;
this.label5 = new System.Windows.Forms.Label ( ) ;
this.button2 = new System.Windows.Forms.Button ( ) ;
this.button3 = new System.Windows.Forms.Button ( ) ;
this.button4 = new System.Windows.Forms.Button ( ) ;
this.textBox4 = new System.Windows.Forms.TextBox ( ) ;
this.statusBar1 = new System.Windows.Forms.StatusBar ( ) ;
this.statusBarPanel1 = new System.Windows.Forms.StatusBarPanel( );
this.statusBarPanel2 = new System.Windows.Forms.StatusBarPanel( );
this.label6 = new System.Windows.Forms.Label ( ) ;
this.listBox2 = new System.Windows.Forms.ListBox ( ) ;
( ( System.ComponentModel.ISupportInitialize )
( this.statusBarPanel1 ) ).BeginInit ( ) ;
( ( System.ComponentModel.ISupportInitialize )
( this.statusBarPanel2 ) ).BeginInit ( ) ;
this.SuspendLayout ( ) ;
this.listBox1.ItemHeight = 12 ;
this.listBox1.Location = new System.Drawing.Point ( 122 , 110 ) ;
this.listBox1.Name = "listBox1" ;
this.listBox1.Size = new System.Drawing.Size ( 212 , 88 ) ;
this.listBox1.TabIndex = 4 ;
this.textBox1.Location = new System.Drawing.Point ( 122 , 18 ) ;
this.textBox1.Name = "textBox1" ;
this.textBox1.Size = new System.Drawing.Size ( 210 , 21 ) ;
this.textBox1.TabIndex = 1 ;
this.textBox1.Text = "" ;
this.label3.Location = new System.Drawing.Point ( 220 , 52 ) ;
this.label3.Name = "label3" ;
this.label3.Size = new System.Drawing.Size ( 66 , 23 ) ;
this.label3.TabIndex = 7 ;
this.label3.Text = "本地端口:" ;
this.label2.Location = new System.Drawing.Point ( 38 , 54 ) ;
this.label2.Name = "label2" ;
this.label2.Size = new System.Drawing.Size ( 80 , 23 ) ;
this.label2.TabIndex = 20 ;
this.label2.Text = "遠程端口號:" ;
this.textBox3.Location = new System.Drawing.Point ( 294 , 50 );
this.textBox3.Name = "textBox3" ;
this.textBox3.Size = new System.Drawing.Size ( 38 , 21 ) ;
this.textBox3.TabIndex = 3 ;
this.textBox3.Text = "8889" ;
this.button1.FlatStyle = System.Windows.Forms.FlatStyle.Flat ;
this.button1.Location = new System.Drawing.Point ( 348 , 16 );
this.button1.Name = "button1" ;
this.button1.Size = new System.Drawing.Size ( 92 , 40 );
this.button1.TabIndex = 6 ;
this.button1.Text = "連接遠程機" ;
this.button1.Click += new System.EventHandler(this.button1_Click);
this.textBox2.Location = new System.Drawing.Point ( 122 , 50 ) ;
this.textBox2.Name = "textBox2" ;
this.textBox2.Size = new System.Drawing.Size ( 38 , 21 ) ;
this.textBox2.TabIndex = 2 ;
this.textBox2.Text = "8888" ;
this.label1.Location = new System.Drawing.Point (38,22);
this.label1.Name = "label1" ;
this.label1.Size = new System.Drawing.Size ( 80 , 23 ) ;
this.label1.TabIndex = 16 ;
this.label1.Text = "遠程IP地址:" ;
this.label4.Location = new System.Drawing.Point ( 50 , 84 ) ;
this.label4.Name = "label4" ;
this.label4.Size = new System.Drawing.Size ( 66 , 23 ) ;
this.label4.TabIndex = 23 ;
this.label4.Text = "發送信息:" ;
this.label5.Location = new System.Drawing.Point ( 36 , 112 ) ;
this.label5.Name = "label5" ;
this.label5.Size = new System.Drawing.Size ( 80 , 23 ) ;
this.label5.TabIndex = 24 ;
this.label5.Text = "發送的信息:" ;
this.button2.Enabled = false ;
this.button2.FlatStyle = System.Windows.Forms.FlatStyle.Flat ;
this.button2.Location = new System.Drawing.Point ( 352 , 192 ) ;
this.button2.Name = "button2" ;
this.button2.Size = new System.Drawing.Size ( 92 , 40 ) ;
this.button2.TabIndex = 7 ;
this.button2.Text = "斷開連接" ;
this.button2.Click += new System.EventHandler(this.button2_Click);
this.button3.FlatStyle = System.Windows.Forms.FlatStyle.Flat ;
this.button3.Location = new System.Drawing.Point ( 348 , 74 );
this.button3.Name = "button3" ;
this.button3.Size = new System.Drawing.Size ( 92 , 40 ) ;
this.button3.TabIndex = 8 ;
this.button3.Text = "偵聽端口" ;
this.button3.Click += new System.EventHandler(this.button3_Click);
this.button4.Enabled = false ;
this.button4.FlatStyle = System.Windows.Forms.FlatStyle.Flat ;
this.button4.Location = new System.Drawing.Point ( 350 , 132 ) ;
this.button4.Name = "button4" ;
this.button4.Size = new System.Drawing.Size ( 92 , 40 );
this.button4.TabIndex = 9 ;
this.button4.Text = "發送信息" ;
this.button4.Click += new System.EventHandler(this.button4_Click);
this.textBox4.Location = new System.Drawing.Point ( 122 , 82 ) ;
this.textBox4.Name = "textBox4" ;
this.textBox4.Size = new System.Drawing.Size ( 212 , 21 ) ;
this.textBox4.TabIndex = 25 ;
this.textBox4.Text = "" ;
this.statusBar1.Location = new System.Drawing.Point ( 0 , 301 ) ;
this.statusBar1.Name = "statusBar1" ;
this.statusBar1.Panels.AddRange ( new System.Windows.Forms.
StatusBarPanel[] {
this.statusBarPanel1 ,this.statusBarPanel2} ) ;
this.statusBar1.ShowPanels = true ;
this.statusBar1.Size = new System.Drawing.Size ( 456 , 22 ) ;
this.statusBar1.TabIndex = 26 ;
this.statusBarPanel1.Width = 200 ;
this.statusBarPanel2.Width = 230 ;
this.label6.Location = new System.Drawing.Point ( 48 , 210 ) ;
this.label6.Name = "label6" ;
this.label6.Size = new System.Drawing.Size ( 66 , 23 ) ;
this.label6.TabIndex = 28 ;
this.label6.Text = "接收信息:" ;
this.listBox2.ItemHeight = 12 ;
this.listBox2.Location = new System.Drawing.Point (122,206);
this.listBox2.Name = "listBox2" ;
this.listBox2.Size = new System.Drawing.Size ( 214 , 88 ) this.listBox2.TabIndex = 27 ;
this.AutoScaleBaseSize = new System.Drawing.Size ( 6 , 14 ) ;
this.ClIEntSize = new System.Drawing.Size ( 456 ,323 ) ;
this.Controls.AddRange ( new System.Windows.Forms.Control[] {
this.label6 ,
this.listBox2 ,
this.statusBar1 ,
this.textBox4 ,
this.button4 ,
this.button3 ,
this.button2 ,
this.label5 ,
this.label4 ,
this.label2 ,
this.textBox3 ,
this.button1 ,
this.textBox2 ,
this.label1 ,
this.label3 ,
this.textBox1 ,
this.listBox1} ) ;
this.FormBorderStyle = System.Windows.Forms.FormBorderStyle.
FixedSingle ;
this.MaximizeBox = false ;
this.Name = "Form1" ;
this.Text = "Visual C#實現網絡點對點通訊程序" ;
this.Load += new System.EventHandler ( this.Form1_Load ) ;
( ( System.ComponentModel.ISupportInitialize )
( this.statusBarPanel1 ) ).EndInit ( ) ;
( ( System.ComponentModel.ISupportInitialize )
( this.statusBarPanel2 ) ).EndInit ( ) ;
this.ResumeLayout ( false ) ;
}
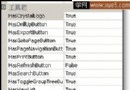
至此,【Visual C#實現網絡點對點通訊程序】項目的界面設計和功能實現的前期工作就完成了,設計界面如圖1所示:
圖1 項目的設計界面
6.在【解決方案資源管理器】窗口中,雙擊Form1.cs文件,進入Form1.cs文件的編輯界面。並在定義Form類成員代碼區中,加入下列代碼,下列代碼的作用是定義程序中使用的全局變量。
private Thread th ;
//創建線程,用以偵聽端口號,接收信息
private TcpListener tlListen1 ;
//用以偵聽端口號
private bool listenerRun = true ;
//設定標示位,判斷偵聽狀態
private NetworkStream tcpStream ;
//創建傳送/接收的基本數據流實例
private StreamWriter reqStreamW ;
//用以實現向遠程主機傳送信息
private TcpClIEnt tcpc ;
//用以創建對遠程主機的連接
private Socket skSocket ;
//用以接收遠程主機傳送來的數據
7.用下列代碼替換Form1.cs中的button1組件的"Click"事件對應的代碼,下列代碼的作用是向遠程計算機提出連接申請,如果連接建立,則獲得傳送數據的數據源:
private void button1_Click (object sender, System.EventArgs e)
{
try
{
tcpc = new TcpClIEnt ( textBox1.Text ,
Int32.Parse ( textBox3.Text ) ) ;
//向遠程計算機提出連接申請
tcpStream = tcpc.GetStream ( ) ;
//如果連接申請建立,則獲得用以傳送數據的數據流
statusBar1.Panels[0].Text="成功連接遠程計算機!" ;
button2.Enabled = true ;
button1.Enabled = false ;
button4.Enabled = true ;
}
catch ( Exception )
{
statusBar1.Panels[0].Text = "目標計算機拒絕連接請求!" ;
}
}
8.在Form1.cs中的Main函數之後,添加下列代碼,下面代碼是定義一個名稱為"Listen"的過程:
private void Listen ( )
{
try
{
tlListen1 = new TcpListener ( Int32.Parse(textBox2.Text));
tlListen1.Start ( ) ;
//偵聽指定端口號
statusBar1.Panels[1].Text = "正在監聽..." ;
//接受遠程計算機的連接請求,並獲得用以接收數據的Socket實例
skSocket = tlListen1.AcceptSocket ( ) ;
//獲得遠程計算機對應的網絡遠程終結點
EndPoint tempRemoteEP = skSocket.RemoteEndPoint ;
IPEndPoint tempRemoteIP = ( IPEndPoint )tempRemoteEP ;
IPHostEntry host = Dns.GetHostByAddress
( tempRemoteIP.Address ) ;
string HostName = host.HostName ;
//根據獲得的遠程計算機對應的網絡遠程終結點獲得遠程計算機的名稱
statusBar1.Panels[1].Text = "'" + HostName +"' " +
"遠程計算機正確連接!" ;
//循環偵聽
while ( listenerRun )
{
Byte[] stream = new Byte[80] ;
//定義從遠程計算機接收到數據存放的數據緩沖區
string time = DateTime.Now.ToString ( ) ;
//獲得當前的時間
int i = skSocket.ReceiveFrom ( stream,
ref tempRemoteEP ) ;
//接收數據,並存放到定義的緩沖區中
string sMessage = System.Text.Encoding.UTF8.
GetString ( stream ) ;
//以指定的編碼,從緩沖區中解析出內容
listBox2.Items.Add(time+""+HostName+":");
listBox2.Items.Add ( sMessage ) ;
//顯示接收到的數據
}
}
catch ( System.Security.SecurityException )
{
MessageBox.Show ( "防火牆安全錯誤!" ,"錯誤" ,
MessageBoxButtons.OK , MessageBoxIcon.Exclamation) ;
}
}
9.用下列代碼替換Form1.cs中的button2組件的Click事件對應的處理代碼,下列代碼的作用是斷開當前的連接:
private void button2_Click ( object sender, System.EventArgs e)
{
listenerRun = false ;
tcpc.Close ( ) ;
statusBar1.Panels[0].Text = "斷開連接!" ;
button1.Enabled = true ;
button2.Enabled = false ;
button4.Enabled = false ;
}
10.用下列代碼替換Form1.cs中的button3組件的Click事件對應的處理代碼,下列代碼的作用是以上面定義的Listen過程來初始化線程實例,並啟動線程,達到偵聽端口的目的:
private void button3_Click (object sender , System.EventArgs e)
{
th = new Thread ( new ThreadStart ( Listen ) ) ;
//以Listen過程來初始化線程實例
th.Start ( ) ;
//啟動此線程
}
11.用下列代碼替換Form1.cs中的button4組件的Click事件對應的處理代碼,下列代碼的作用是向遠程計算機的指定端口號發送信息。
private void button4_Click ( object sender,System.EventArgs e)
{
try
{
string sMsg = textBox4.Text ;
string MyName = Dns.GetHostName ( ) ;
//以特定的編碼往向數據流中寫入數據,
//默認為UTF8Encoding 的實例
reqStreamW = new StreamWriter ( tcpStream ) ;
//將字符串寫入數據流中
reqStreamW.Write ( sMsg ) ;
//清理當前編寫器的所有緩沖區,並使所有緩沖數據寫入基礎流
reqStreamW.Flush ( ) ;
string time = DateTime.Now.ToString ( ) ;
//顯示傳送的數據和時間
listBox1.Items.Add ( time +" " + MyName +":" ) ;
listBox1.Items.Add (sMsg ) ; textBox4.Clear ( ) ;
}
//異常處理
catch ( Exception )
{
statusBar1.Panels[0].Text = "無法發送信息到目標計算機!";
}
}
12.用下列代碼替換Form1.cs中的"Dispose"過程對應的處理代碼,下列代碼的作用是在程序退出後,清除沒有回收的資源:
protected override void Dispose ( bool disposing )
{
try
{
listenerRun = false ;
th.Abort ( ) ;
th = null ;
tlListen1.Stop ( ) ;
skSocket.Close ( ) ;
tcpc.Close ( ) ;
}
catch { }
if ( disposing )
{
if ( components != null )
{
components.Dispose ( ) ;
}
}
base.Dispose ( disposing ) ;
}
13.運行程序,實現網絡點對點通訊:
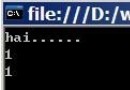
單擊快捷鍵F5編譯成功後,把此程序分發到網絡中的二台計算機中。在正確輸入偵聽端口號、遠程計算機IP地址、遠程端口號輸入正確後,單擊【偵聽端口】和【連接遠程機】按鈕建立聊天的連接。就通過【發送信息】按鈕進行聊天了。圖2是通訊時運行界面。
圖2 運行界面
五.總結:
網絡點對點通訊程序並不像客戶端/服務器端模型程序那樣,分成客戶端程序和服務器端程序。它是集客戶端程序和服務器端程序與一身,所以在具體的程序設計中就相對麻煩一點。上面介紹的在用Visual C#實現網絡點對點通訊的示例雖然結構並不復雜,但涉及的知識面卻比較廣泛。如示例中涉及到許多很多網絡功能的實現,如:偵聽端口號、建立連接、發送數據和接收數據等,還涉及到線程的處理、資源的回收等。了解、掌握這些問題的處理方法對編寫更復雜的網絡應用程序是十分必要的。