會飛的魚前段時間寫了篇文章,介紹如何實現類似QQ表情對話框的功能,具 體描述見文章《c# 類似於QQ表情彈出框功能的二種實現方法》。剛好最近我也 有類似的需求,我剛開始的想法是在Panel中動態創建PictureBox來加載QQ表情 ,如:
private void InitImageControl(int colCount, int  rowCount)

     {

       for (int i = 0; i < rowCount; i++)

       {

         for (int j = 0; j < colCount; j++)

         {

           PictureBox picBox = new PictureBox();

           picBox.SizeMode =  PictureBoxSizeMode.CenterImage;

           picBox.Image = @"d:\qqface\1.gif"; //從文件 中加載圖片

             Size controlSize = new Size(imgWidth,  imgHeight);

           picBox.Size = controlSize;

           int controlLoctionX = controlSize.Width *  j;

           int controlLoctionY = controlSize.Height *  i;

           picBox.Location = new Point(controlLoctionX,  controlLoctionY);

           picBox.MouseHover += new EventHandler (picBox_MouseHover);

           panel1.Controls.Add(picBox);

         }

       }

     }
這樣實現的方式比較簡單,但是速度卻非常慢,於是就放棄了這個想法。突 然想到,利用網頁來加載圖片,效率可能會高很多的(事實證明也是如此),於 是考慮在Panel中加載個WebBrowser,然後動態的加載網頁來實現。
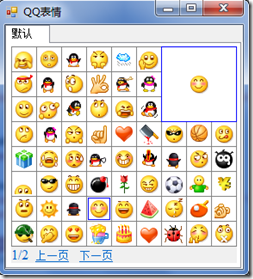
首先制作了類似QQ表情對話框展示效果的網頁,截圖如下:
由於代碼比較簡單,就直接貼代碼了:
加載QQ表情
private int currentPageIndex = 1;//當前頁代碼
private int pageSize = 0;//總共頁數
///<summary>
/// 加載QQ表情
/// </summary>
/// <param name="currentPage">當前頁 </param>
/// <param name="rowCount">每頁顯示表情的行 數</param>
/// <param name="colCount">每頁顯示表情的列 數</param>
private void LoadQQFace(int currentPage,int rowCount,int colCount)
{
currentPageIndex = currentPage;
string _template = string.Empty;
string templateFile = Application.StartupPath + @"\template.html";//網頁模版
_template = File.ReadAllText (templateFile);
//圖像的配置文件
string _configInfo = string.Empty;
string configFile = Application.StartupPath + @"\face.xml";
DataSet ds = new DataSet();
ds.ReadXml(configFile);
DataTable dtFaces = ds.Tables[0];
int totalCount =dtFaces.Rows.Count;
pageSize = totalCount % (rowCount * colCount) == 0 ? totalCount / (rowCount * colCount) : totalCount / (rowCount * colCount)+1;
//加載表格
string tableRowContent=string.Empty;
for (int i = 1; i <=rowCount; i++)
{
string tableRow = "<tr>";
for (int j= 1; j <=colCount; j++)
{
int faceRowIndex=(i-1) *colCount+(currentPageIndex-1)*rowCount*colCount+j;
if (faceRowIndex <totalCount)
{
string imgPath = dtFaces.Rows[faceRowIndex][0].ToString();
imgPath = Application.StartupPath + @"\faces\" + imgPath;
tableRow += "<td><p><a href='#' onmouseover='showBig (this)'><img src='" + imgPath + "'/></a></td>";
}
else
{
tableRow += "<td></td>";
}
}
tableRow += "</tr>";
tableRowContent += tableRow;
}
int LeftLimt = 29 * (colCount / 2);
int RightLimt = (colCount - 3) * 29;
_template = _template.Replace ("$TableRow$", tableRowContent).Replace ("$LeftLimt$",LeftLimt.ToString()).Replace ("$RightLimt$",RightLimt.ToString());
//設置網頁的背景色和窗體的一致
Color bgColor = this.BackColor;
string webBgColor = ColorTranslator.ToHtml(bgColor);
_template = _template.Replace ("$BgColor$", webBgColor);
//設置導航
string pageStr = currentPage + "/" + pageSize;
string navigation = "<div id='navigation'>"+pageStr+" <a href='#' id='linkPrev'>上一頁</a> <a href='#' id='linkNext'>下一頁</a></div>";
_template = _template.Replace ("$Navigation$", navigation);
//存到臨時文件
string tempHtmlFile = Path.GetTempPath() + "tempHtmlFile.html";
File.WriteAllText(tempHtmlFile, _template);
webBrowser1.Navigate(tempHtmlFile);
webBrowser1.DocumentCompleted += new WebBrowserDocumentCompletedEventHandler (webBrowser1_DocumentCompleted);
this.Width =29*colCount+21;
this.Height = 29 * rowCount+80;
}
當網頁加載完畢後,給分頁鏈接注冊事件
/// <summary>

         /// 當網頁加載完畢後,給分頁鏈接注冊事件

         /// </summary>

         /// <param name="sender"></param>

         /// <param name="e"></param>

         void webBrowser1_DocumentCompleted(object sender,  WebBrowserDocumentCompletedEventArgs e)

         {

             //注冊翻頁事件

             HtmlDocument htmlDoc =  webBrowser1.Document;

             HtmlElement linkPrev =  htmlDoc.GetElementById("linkPrev");

             if (linkPrev != null)

             {

                 linkPrev.Click -= new  HtmlElementEventHandler(linkPrev_Click);

                 if (currentPageIndex>1)

                    linkPrev.Click+=new  HtmlElementEventHandler(linkPrev_Click);

             }

             HtmlElement linkNext =  htmlDoc.GetElementById("linkNext");

             if (linkNext != null)

             {

                 linkNext.Click -= new  HtmlElementEventHandler(linkNext_Click);

                 if(currentPageIndex<pageSize)

                 linkNext.Click += new  HtmlElementEventHandler(linkNext_Click);

             }

         }
分頁事件
void linkPrev_Click(object sender, HtmlElementEventArgs  e)

         {

             LoadQQFace(currentPageIndex -1 , 8,  9);

         }

         void linkNext_Click(object sender,  HtmlElementEventArgs e)

         {

             LoadQQFace(currentPageIndex+1, 8, 9);

         }
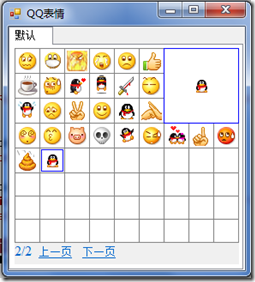
這樣就基本實現了QQ表情彈出框的需求了,最終截圖如下:
留下的問題:
如何通過點擊QQ表情向聊天對話框發送表情了?如果有人感興趣,可以和我 交流。
源碼下載: http://files.cnblogs.com/coding1016/QQFace.rar