7.在類的構造器的下面,添加下面的讀取關聯數據的方法:
public string Read()

{

  return _dataConnector.RetrieveTruckInfo(InstanceID, TruckID);

}
8.最後添加事件實現的代碼:
事件實現的代碼
public void RaiseTruckLeavingEvent(Int32 truckID,

                  Int32 startingX,

                  Int32 startingY)

{

  if (_workflowRuntime == null)

    _workflowRuntime = new WorkflowRuntime();

  // Loads persisted workflow instances.

  _workflowRuntime.GetWorkflow(_instanceID);

  if (TruckLeaving != null)

  {

    TruckLeaving(this, new TruckActivityEventArgs(_instanceID,

                           truckID,

                           startingX,

                           startingY));

  } // if

}

public void RaiseRouteUpdatedEvent(Int32 truckID,

                  Int32 X,

                  Int32 Y)

{

  if (_workflowRuntime == null)

    _workflowRuntime = new WorkflowRuntime();

  // Loads persisted workflow instances.

  _workflowRuntime.GetWorkflow(_instanceID);

  if (RouteUpdated != null)

  {

    RouteUpdated(this, new TruckActivityEventArgs(_instanceID,

                           truckID,

                           X, Y));

  } // if

}

public void RaiseTruckArrivedEvent(Int32 truckID)

{

  if (_workflowRuntime == null)

    _workflowRuntime = new WorkflowRuntime();

  // Loads persisted workflow instances.

  _workflowRuntime.GetWorkflow(_instanceID);

  if (TruckArrived != null)

  {

    TruckArrived(this, new TruckActivityEventArgs(_instanceID,

                           truckID));

  } // if

}
9.保存該文件並編譯該TruckService項目。如果存在編譯錯誤,請糾正任何出現的編譯錯誤。
服務類的代碼就全部完成了,列表17-3展示了該類的完整代碼。TruckSercie本地通信服務可以准備使用了。我們還沒有一個工作流來使用該服務。我們也需要使用可信賴的wca.exe工具來為我們創建自定義的CallExternalMethod和HandleExternalEvent活動。
列表17-3 WorkflowTruckTrackingDataService.cs的完整代碼
WorkflowTruckTrackingDataService類的完整代碼
using System;

using System.Collections.Generic;

using System.Text;

using System.Workflow.Activities;

using System.Workflow.Runtime;

namespace TruckService

{

  public class WorkflowTruckTrackingDataService

  {

    private static WorkflowRuntime _workflowRuntime = null;

    private static ExternalDataExchangeService _dataExchangeService = null;

    private static TruckServiceDataConnector _dataConnector = null;

    private static object _syncRoot = new object();

    public event EventHandler<TruckActivityEventArgs> TruckLeaving;

    public event EventHandler<TruckActivityEventArgs> RouteUpdated;

    public event EventHandler<TruckActivityEventArgs> TruckArrived;

    private Guid _instanceID = Guid.Empty;

    public Guid InstanceID

    {

      get { return _instanceID; }

      set { _instanceID = value; }

    }

    private Int32 _truckID = -1;

    public Int32 TruckID

    {

      get { return _truckID; }

      set { _truckID = value; }

    }

    public static WorkflowTruckTrackingDataService CreateDataService(Guid instanceID, WorkflowRuntime workflowRuntime, Int32 truckID)

    {

      lock (_syncRoot)

      {

        // If we're just starting, save a copy of the workflow runtime reference

        if (_workflowRuntime == null)

        {

          _workflowRuntime = workflowRuntime;

        } // if

        // If we're just starting, plug in ExternalDataExchange service

        if (_dataExchangeService == null)

        {

          _dataExchangeService = new ExternalDataExchangeService();

          _workflowRuntime.AddService(_dataExchangeService);

        } // if

        // Check to see if we have already added this data exchange service

        TruckServiceDataConnector dataConnector = (TruckServiceDataConnector)workflowRuntime.GetService(typeof(TruckServiceDataConnector));

        if (dataConnector == null)

        {

          _dataConnector = new TruckServiceDataConnector();

          _dataExchangeService.AddService(_dataConnector);

        } // if

        else

        {

          _dataConnector = dataConnector;

        } // else

        // Pull the service instance we registered with the connection object

        return WorkflowTruckTrackingDataService.GetRegisteredWorkflowDataService(instanceID, truckID);

      } // lock

    }

    public static WorkflowTruckTrackingDataService GetRegisteredWorkflowDataService(Guid instanceID, Int32 truckID)

    {

      lock (_syncRoot)

      {

        WorkflowTruckTrackingDataService workflowDataService = TruckServiceDataConnector.GetRegisteredWorkflowDataService(instanceID, truckID);

        if (workflowDataService == null)

        {

          workflowDataService = new WorkflowTruckTrackingDataService(instanceID, truckID);

          TruckServiceDataConnector.RegisterDataService(workflowDataService);

        } // if

        return workflowDataService;

      } // lock

    }

    private WorkflowTruckTrackingDataService(Guid instanceID, Int32 truckID)

    {

      this._instanceID = instanceID;

      this._truckID = truckID;

    }

    ~WorkflowTruckTrackingDataService()

    {

      // Clean up

      _workflowRuntime = null;

      _dataExchangeService = null;

      _dataConnector = null;

    }

    public string Read()

    {

      return _dataConnector.RetrieveTruckInfo(InstanceID, TruckID);

    }

    public void RaiseTruckLeavingEvent(Int32 truckID, Int32 startingX, Int32 startingY)

    {

      if (_workflowRuntime == null)

        _workflowRuntime = new WorkflowRuntime();

      _workflowRuntime.GetWorkflow(_instanceID); // loads persisted workflow instances

      if (TruckLeaving != null)

      {

        TruckLeaving(this, new TruckActivityEventArgs(_instanceID, truckID, startingX, startingY));

      } // if

    }

    public void RaiseRouteUpdatedEvent(Int32 truckID, Int32 X, Int32 Y)

    {

      if (_workflowRuntime == null)

        _workflowRuntime = new WorkflowRuntime();

      _workflowRuntime.GetWorkflow(_instanceID); // loads persisted workflow instances

      if (RouteUpdated != null)

      {

        RouteUpdated(this, new TruckActivityEventArgs(_instanceID, truckID, X, Y));

      } // if

    }

    public void RaiseTruckArrivedEvent(Int32 truckID)

    {

      if (_workflowRuntime == null)

        _workflowRuntime = new WorkflowRuntime();

      _workflowRuntime.GetWorkflow(_instanceID); // loads persisted workflow instances

      if (TruckArrived != null)

      {

        TruckArrived(this, new TruckActivityEventArgs(_instanceID, truckID));

      } // if

    }

  }

}
創建關聯數據交換的工作流
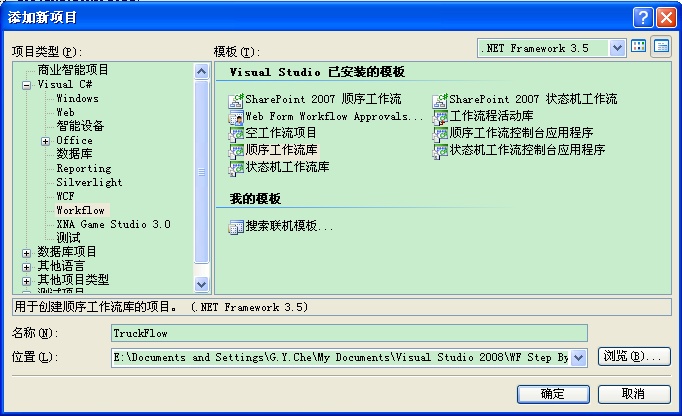
在本例中創建的這個工作流和你以前創建的工作流項目是有所不同的。在Visual Studio的解決方案資源管理器中簡單地右鍵點擊TruckTracker解決方案的名稱,然後選擇“添加”,選擇“新建項目”。當“添加新項目”對話框打開後,如果Visual C#樹狀控件節點沒有展開的話,就展開Visual C#樹狀控件節點。從模板列表中選擇“順序工作流庫”。在“名稱”字段中輸入“TruckFlow”,最後點擊“確定”。
創建了工作流項目後,我們現在就能使用wca.exe工具去生成我們需要在工作流和宿主應用程序之間進行通信所需的自定義活動,反之亦然。我們打算遵循我們在第8章“創建通信活動”中使用過的相同的方法步驟。
創建自定義數據交換活動
1.在你開始創建之前,你需要確認你沒有跳過上一節的第9步“編譯相關數據服務”這一過程。當wca.exe工具執行後,它需要一個已經編譯好的程序集。
2.點擊“開始”按鈕,然後點擊“運行”菜單打開“運行”對話框。
3.“運行”對話框打開後,輸入“cmd”,然後點擊“確定”,這將進入Windows的命令提示符。
4.更改當前目錄以便你能直接訪問到你先前創建的TruckService程序集。通常,你輸入的命令和下面的差不多:
cd "\Chapter17\TruckTracker\TruckService\bin\Debug"
但是,你指定的目錄根據你的實際情況可能會有所不同。
5.接下來通過在命令提示符中輸入下面的文本來執行wca.exe工具(注意要包括雙引號):
"C:\Program Files\Microsoft SDKs\Windows\v6.0A\Bin\Wca.exe" TruckService.dll /n:TruckFlow
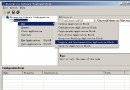
然後按下回車鍵。該工具的輸出結果應該和下面的相似:
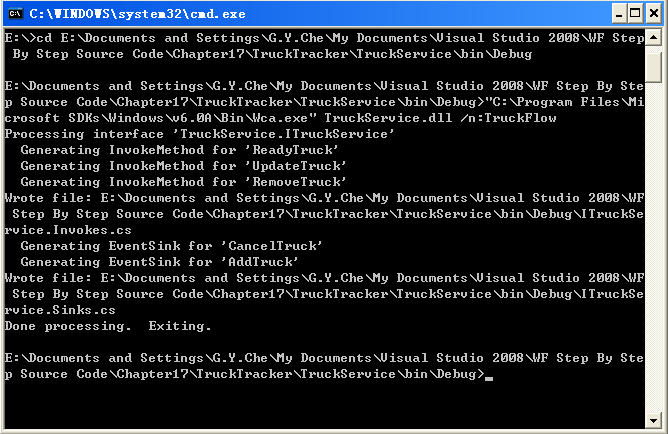
6.wca.exe工具會為你生成兩個文件,你需要對它們進行重新命名並移動到工作流目錄下。因此,在命令提示符中輸入ren ITruckService.Invokes.cs ExternalEventActivities.cs,然後按下回車鍵。這個文件包含了所生成的CallExternalEvent活動。
7.因為我們剛才重命名的文件是一個工作流活動,因此我們需要把它從當前目錄下移到TruckFlow目錄中以便進行編譯並使用。在命令提示符中輸入move ExternalEventActivities.cs ..\..\..\TruckFlow並按下回車鍵。
8.對於外部事件活動來說,我們現在仍將使用相同的方式。在命令提示符中輸入ren ITruckService.Sinks.cs ExternalEventHandlers.cs,然後按下回車鍵對文件進行重命名。這個文件包含了所生成的CallExternalEvent活動。
9.為了對文件進行移動,我們需要在命令提示符中輸入move ExternalEventHandlers.cs ..\..\..\TruckFlow並按下回車鍵。
10.外部數據交換活動現在都創建好了。在這最後一步中,我們要把它們都添加到該工作流項目中。在解決方案資源管理器中右鍵點擊TruckFlow項目,然後選擇“添加”,選中“現有項”。當彈出“添加現有項”對話框後,從列表中選擇這兩個外部事件活動並點擊“添加”。

簡要地回顧一下,你創建了一個接口,它包含了工作流和應用程序將用來進行信息通信的方法和事件。該接口使用了關聯特性來進行修飾,因此每一個方法和事件必須以某種方式來傳送關聯參數。然後你創建了你將用來在宿主和工作流之間進行信息通信的本地通信服務。最後,你運行了wca.exe工具來生成你可用在你的工作流中去執行數據通信的自定義活動。現在是該創建工作流本身的時候了。
完成相關工作流(correlated workflow)
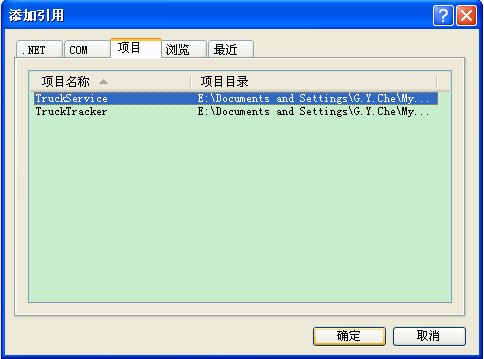
1.外部數據通信活動現在已是你工作流項目的一部分了,接下來你需要做的第一件事是添加對於通信服務項目的項目級引用。在解決方案資源管理器中右鍵點擊TruckFlow項目,然後選擇“添加引用”。在“項目”選項卡的列表中選中TruckService並點擊“確定”。
2.編譯該工作流項目(注意不是整個解決方案),以便把這些自定義活動加載進Visual Studio的工具箱中方便在工作流視圖設計器中使用。
3.確保工作流視圖設計器界面已被激活。
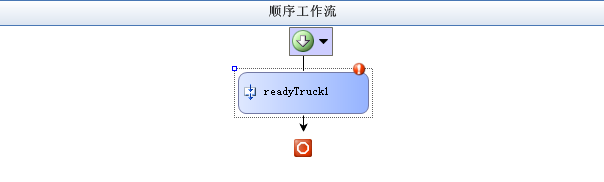
4.要放入你的工作流中的第一個活動是ReadyTruck活動。因此從Visual Studio的工具箱中把它拖拽進你的工作流中。
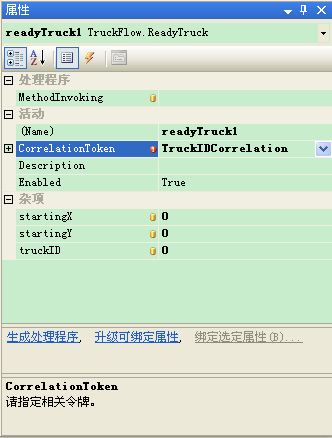
5.你需要為這個活動設置幾個屬性,第一個是和相關令牌(correlation token)有關的信息。在屬性面板中的CorrelationToken屬性中輸入TruckIDCorrelation,然後按下回車鍵。
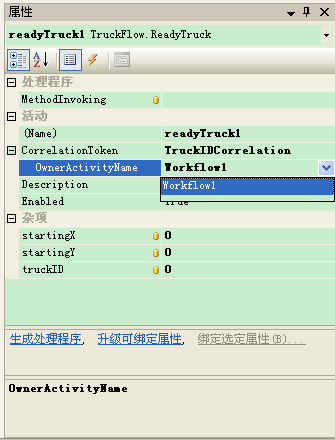
6.在屬性窗口中點擊“加號”(+),然後CorrelationToken屬性將展開OwnerActivityName屬性。點擊下拉列表框的箭頭,從中選中Workflow1(對於本范例應用程序來說僅有這一個選項)。
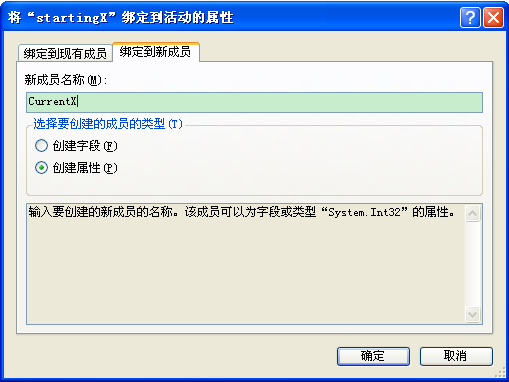
7.你需要綁定一些數據屬性,首先從startingX屬性開始。在屬性面板中選中startingX屬性,然後點擊浏覽(...)按鈕,這將彈出“將‘startingX’屬性綁定到活動的屬性”對話框。選擇“綁定到新成員”選項卡,在“新成員名稱”字段中輸入CurrentX。最後點擊“確定”。
8.對於startingY屬性所做的工作也一樣。點擊startingY屬性,然後點擊浏覽(...)按鈕,打開“將‘startingY’綁定到活動的屬性”對話框。選擇“綁定到新成員”選項卡,在“新成員名稱”字段中輸入CurrentY。最後點擊“確定”。

9.最後,再次在屬性面板中選擇truckID屬性對其進行綁定。點擊浏覽(...)按鈕打開“將‘truckID’綁定到活動的屬性”對話框。選擇“綁定到新成員”選項卡,在“新成員名稱”字段中輸入TruckID,然後點擊“確定”。

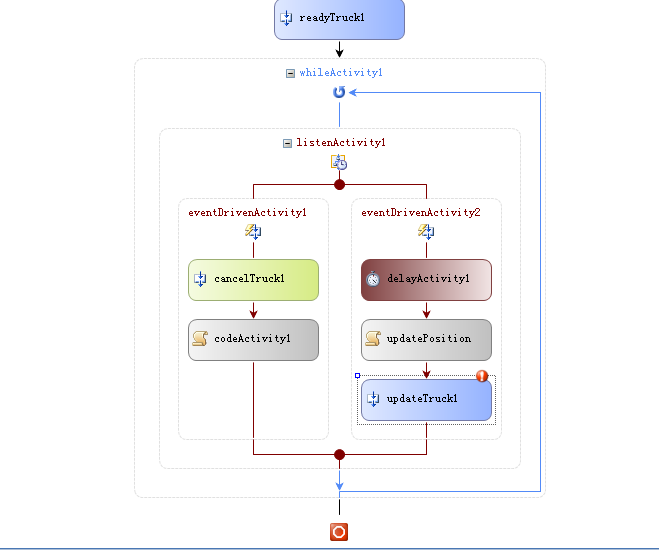
10.回到工作流視圖設計器,拖拽一個While活動到設計器界面上,把它放到你剛才放入的readyTruck1活動的下面。
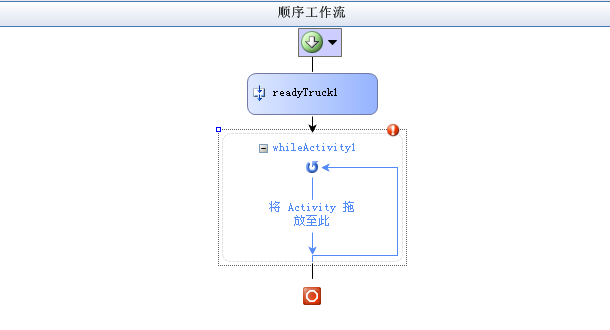
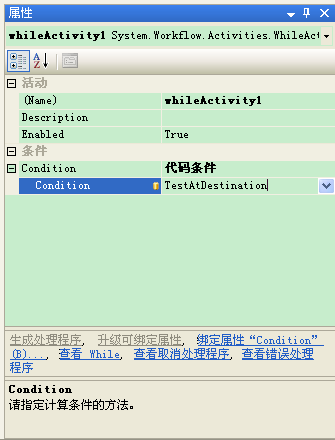
11.你需要添加一個條件表達式,因此選中Condition屬性並從列表中選擇“代碼條件”。展開“條件”屬性後面的加號(+),在第二個“條件”屬性編輯框中輸入TestAtDestination然後按下回車鍵。Visual Studio就插入了TestAtDestination方法並自動為你切換到代碼視圖界面下。我們需要返回到工作流視圖設計器界面上來。
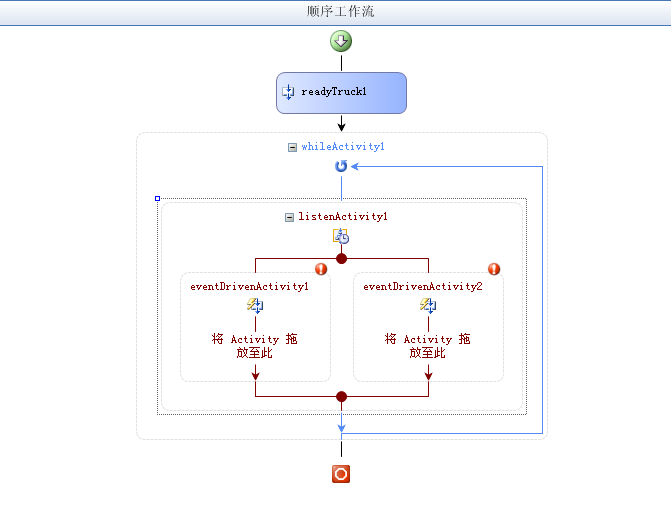
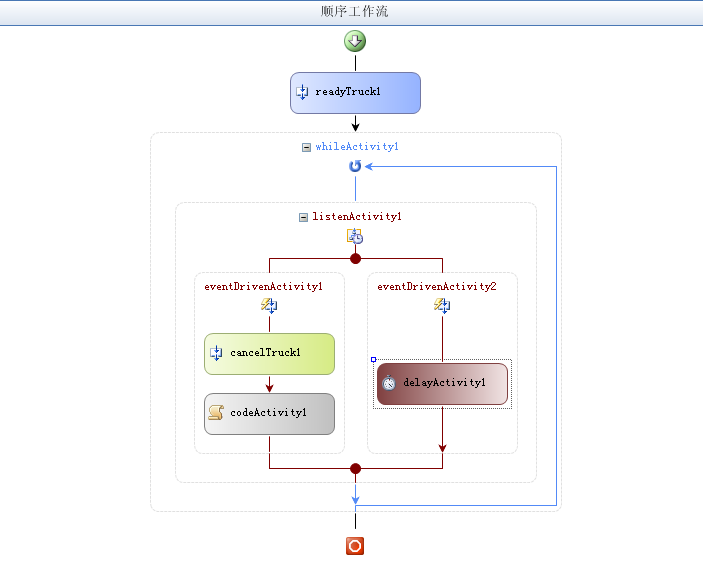
12.拖拽一個Listen活動到工作流視圖設計器界面上,把它放到whileActivity1內部。
13.你剛才添加的這個Listen活動執行兩個功能。其中你將在這裡開始第一個功能的完成工作。從工具箱中拖拽一個CancelTruck並把它放進左邊的EventDriven活動(即eventDrivenActivity1)中。
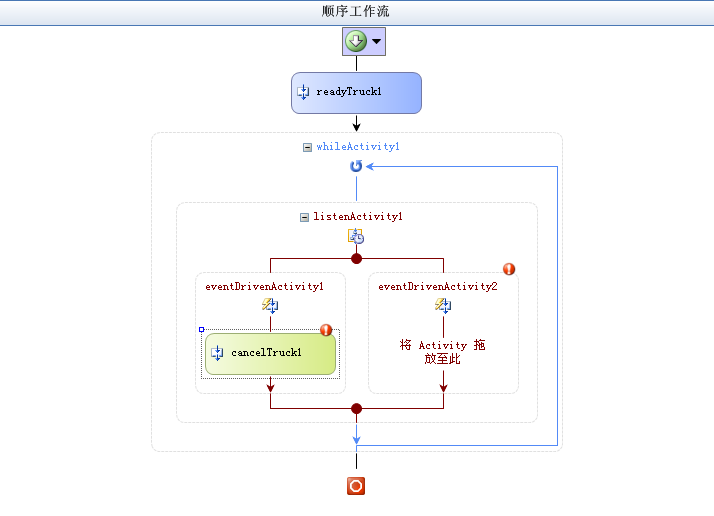
14.你需要為cancelTruck1創建相關令牌。為此,簡單地點擊cancelTruck1的CorrelatonToken屬性的下拉箭頭然後選擇TruckIDCorrelation選項。假如箭頭沒有顯示,可選中CorrelationToken屬性來去激活它。
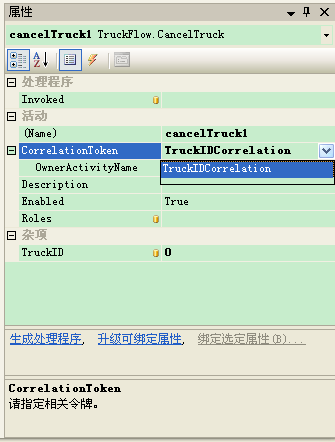
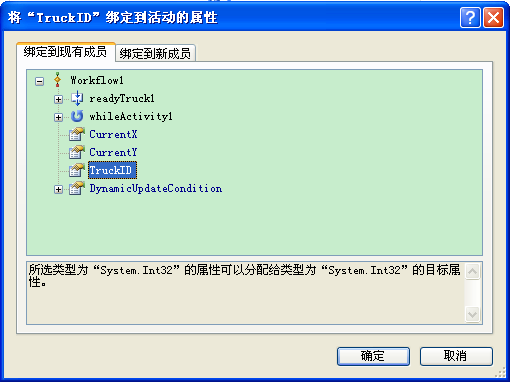
15.cancelTruck1需要有已經創建的卡車標識符,因此在truckID屬性中點擊浏覽(...)按鈕。假如浏覽(...)按鈕不存在的話,可再次點擊該屬性來激活它,就像你剛才可能在相關令牌屬性上做過的一樣。在“將‘truckID’綁定到活動的屬性”對話框打開後,從現有屬性列表中選擇TruckID,然後點擊“確定”。
16.為了在處理CancelTruck事件後執行一些處理過程,你需要拖拽一個Code活動到設計器界面上,把它放到你剛剛添加的cancelTruck1活動的下面。

17.在codeActivity1的ExecuteCode屬性中輸入CancelTruck,然後按下回車鍵。在Visual Studio為你添加了CancelTruck方法後回到工作流視圖設計器界面上來。
18.回到工作流視圖設計器界面後,拖拽一個Delay活動到右邊的EventDriven活動(eventDrivenActivity2)中。這就是Listen活動的第二個功能,它執行了GPS卡車定位掃描的模擬任務。
19.設置delayActivity1的TimeoutDuration為1秒。這代表了你的工作流將用來對用戶界面進行更新的刷新頻率。
20.拖拽一個Code活動到設計器界面上,把它放到你剛剛放入的Delay延時活動的下面。把它的名稱更改為updatePosition,在它的ExecuteCode屬性中輸入UpdateTruckPosition並按下回車鍵。
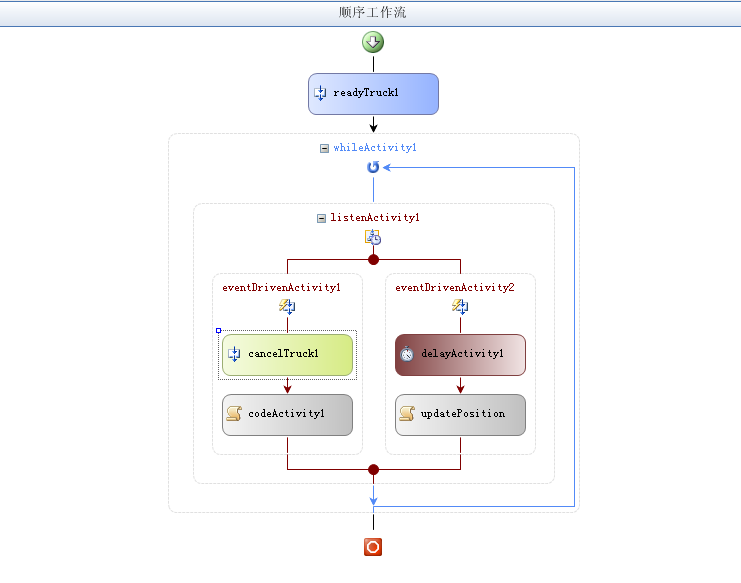
21.回到工作流視圖設計器界面上來。該updatePosition Code活動執行了卡車位置測定的模擬任務,其結果就是需要把視覺處理結果傳給宿主應用程序。為了把結果傳給宿主應用程序,需要拖拽一個UpdateTruck活動到設計器界面上並把它放到updatePosition活動的下面。
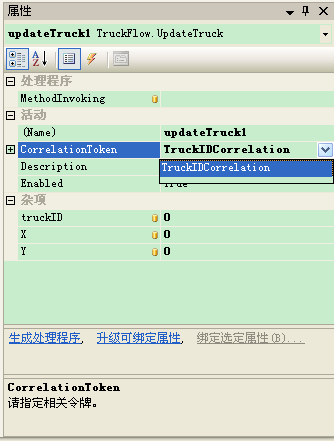
22.通過點擊updateTruck1屬性的下拉箭頭,在其選擇列表中選擇CorrelationToken屬性。當單擊鼠標激活下拉箭頭後你可能只有一個CorrelationToken屬性供你選擇。
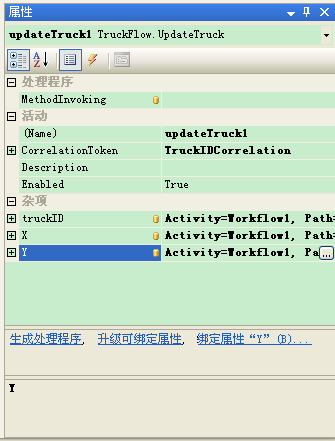
23.在激活浏覽(...)按鈕後點擊truckID屬性以便你能為updateTruck1活動指定關聯的卡車標識符。點擊該按鈕,在“將‘truckID’綁定到活動的屬性”對話框中的現有屬性列表中選擇TruckID,然後點擊“確定”。

24.為了設置updateTruck1的X屬性,需要再次點擊浏覽(...)按鈕把X綁定到已存在的CurrentX屬性。對於Y屬性也做同樣的工作,把它綁定到CurrentY屬性。
25.在你取消對一輛卡車的模擬或者卡車抵達了它的終點之前,模擬過程會一直運行。前面的任何一個條件都會導致whileActivity1終止它的循環。在此時,用戶界面需要把該卡車移除。因此,拖拽一個RemoveTruck活動到工作流視圖設計器界面上,並把它放到whileActivity1的下面。
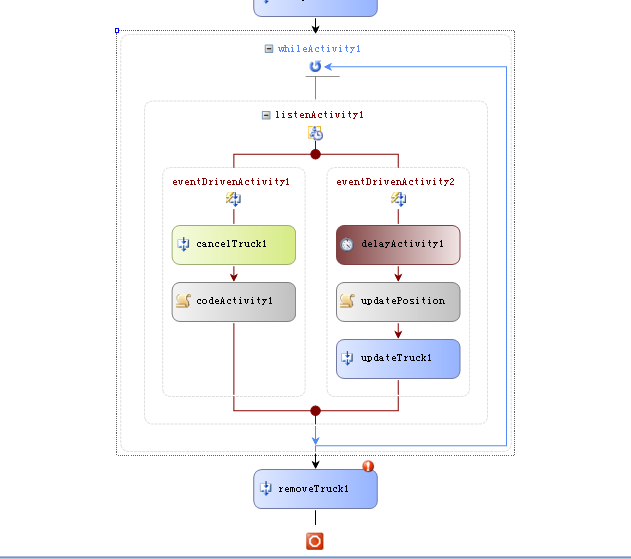
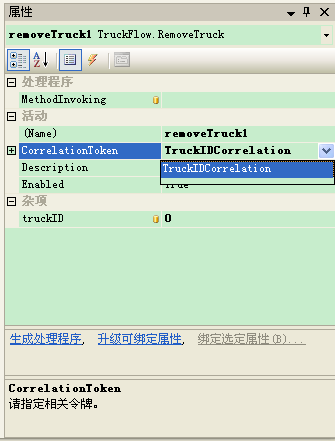
26.選擇removeTruck1的CorrelationToken屬性去激活它的下拉箭頭。點擊該下拉箭頭將顯示令牌選擇列表,把該令牌設置為TruckIDCorrelation。
27.同樣選中removeTruck1的truckID屬性以便激活相似的浏覽(...)按鈕。點擊該浏覽按鈕,從現有屬性列表中選擇TruckID,然後點擊“確定”。
28.完成了這最後一個屬性,工作流視圖設計器上的工作你就已經完成了。現在該是添加代碼的時候了。在解決方案資源管理器中選中Workflow1.cs文件,然後點擊“查看代碼”進入代碼編輯器界面。
29.打開Workflow1.cs文件後,在該文件頂部的現有的using語句清單的下面添加如下的using語句。
using System.IO;

using System.Xml;

using System.Xml.Serialization;
30.定位到源代碼中Workflow1的構造器。在構造器的下面,添加這些字段:
private bool _cancelTruck = false;

private TruckService.RouteInfo _routes = null;

private TruckService.Truck _myTruck = null;

private TruckService.Route _myRoute = null;

private TruckService.Destination _currentOrigin = null;

private TruckService.Destination _currentDestination = null;
31.在你剛剛添加的字段的下面,你需要添加工作流初始化時要用到的兩個屬性:
Routes屬性和TrackedTruck屬性
public string Routes

{

  set

  {

    // Deserialize route information

    using (StringReader rdr = new StringReader(value))

    {

      XmlSerializer serializer =

        new XmlSerializer(typeof(TruckService.RouteInfo));

      _routes = (TruckService.RouteInfo)serializer.Deserialize(rdr);

    }

  }

}

public string TrackedTruck

{

  set

  {

    // Deserialize truck information

    using (StringReader rdr = new StringReader(value))

    {

      XmlSerializer serializer =

        new XmlSerializer(typeof(TruckService.Truck));

      _myTruck = (TruckService.Truck)serializer.Deserialize(rdr);

    }

    // Assign the truck ID

    TruckID = _myTruck.ID;

    // Pull the route so we can retrieve the starting coordinates

    foreach (TruckService.Route route in _routes.Routes)

    {

      // Check this route to see if it's ours

      if (route.ID == _myTruck.RouteID)

      {

        // Ours, so save

        _myRoute = route;

        break;

      } // if

    }

    // Pull origin

    _currentOrigin = FindDestination(_myRoute.Start);

    // Pull destination or first waypoint

    if (_myRoute.Waypoints.Length > 0)

    {

      // Pull first waypoint

      _currentDestination =

            FindDestination(_myRoute.Waypoints[0].ID);

    }

    else

    {

      // No waypoints

      _currentDestination = FindDestination(_myRoute.Stop);

    }

    // Assign the X and Y coordinates

    CurrentX = _currentOrigin.X;

    CurrentY = _currentOrigin.Y;

  }

}
32.TrackedTruck屬性的設置器(setter)使用了一個名稱為FindDestination方法。添加該方法到TrackedTruck下面:
FindDestination方法
private TruckService.Destination FindDestination(Int32 id)

{

  // Loop through the route destinations, looking for the

  // one we want

  TruckService.Destination retVal = null;

  foreach (TruckService.Destination destination in _routes.Destinations)

  {

    // Check this destination

    if (destination.ID == id)

    {

      // Got it

      retVal = destination;

      break;

    } // if

  }

  return retVal;

}
33.定位到TestAtDestination方法,為該方法添加如下代碼:
TestAtDestination方法的代碼
// Check for cancel

if (_cancelTruck)

{

  // Cancel immediately

  e.Result = false;

}

else

{

  // If the truck is within 3 pixels for both X and Y, we're at the

  // destination

  e.Result = true;

  if (Math.Abs((double)_currentDestination.X - (double)CurrentX) < 3.0 &&

    Math.Abs((double)_currentDestination.Y - (double)CurrentY) < 3.0)

  {

    // Check for waypoints

    if (_currentDestination.ID != _myRoute.Stop)

    {

      // Copy former destination to origin, and then

      // look up next waypoint destination

      _currentOrigin = _currentDestination;

      TruckService.Waypoint waypoint = null;

      for (Int32 i = 0; i < _myRoute.Waypoints.Length; i++)

      {

        // Check to see if this is the current waypoint

        waypoint = _myRoute.Waypoints[i];

        if (waypoint.ID == _currentOrigin.ID)

        {

          // Found the current waypoint, so assign the next

          // waypoint to be the new destination.

          if ((i + 1) == _myRoute.Waypoints.Length)

          {

            // Last waypoint, head to true destination

            _currentDestination =

              FindDestination(_myRoute.Stop);

          }

          else

          {

            // Next waypoint

            _currentDestination =

              FindDestination(_myRoute.Waypoints[i + 1].ID);

          }

          break;

        }

      }

    }

    else

    {

      // We've arrived

      e.Result = false;

    }

  }

}
34.對於CancelTruck方法,為其添加下面的代碼:
//Setthecancelflag

_cancelTruck=true;

  35.最後,為UpdateTruckPosition添加下面進行模擬所需的代碼:

//Calculateslopeforlinearinterpolation

//   Y1-Y2

//m= -------

//   X1-X2

//

//Solveforb:y=mx+b,sob=y-mx

doublem=((double)_currentDestination.Y-(double)_currentOrigin.Y)/

       ((double)_currentDestination.X-(double)_currentOrigin.X);

doubleb=(double)_currentDestination.Y-

       (m*(double)_currentDestination.X);

//Withslopeandintercept,weincrementxtofindthenewy.

Int32multiplier=(_currentDestination.X-_currentOrigin.X)<0?-1:1;

CurrentX+=(multiplier*2);

CurrentY=(Int32)((m*(double)CurrentX)+b);
36.保存所有打開的文件。
37.工作流現在就完成了,對你來說最後一項任務就是去執行該應用程序。TruckTracker主應用程序需要對該工作流進行引用。因此右鍵點擊TruckTracker項目,然後選擇“添加引用”。從“項目”選項卡中選擇TruckFlow,然後點擊“確定”
38.現在你可以對整個解決方案進行編譯。糾正任何你可能遇到的編譯錯誤。
39.按下Shift+F5執行該應用程序或者在調試模式下按下F5來運行該應用程序。通過點擊“Add Truck”來添加一輛卡車、選擇路線、然後點擊“OK”。你可以隨意添加許多的卡車。對於卡車的移除,可以在listview控件中選中它然後點擊“Cancel Truck”。
該應用程序的代碼和你在第8章及第10章中看到的代碼大不一樣。其中一個區別是在訪問指定卡車的數據的時候,你需要為該車輛傳入卡車標識符。在有些情況下,事件在其參數中為你提供了它。