MainActivity.java
package com.example.ch02_dialogdemo;
import android.app.Activity;
import android.app.AlertDialog;
import android.content.DialogInterface;
import android.os.Bundle;
import android.view.LayoutInflater;
import android.view.Menu;
import android.view.MenuItem;
import android.view.View;
import android.view.View.OnClickListener;
import android.widget.Button;
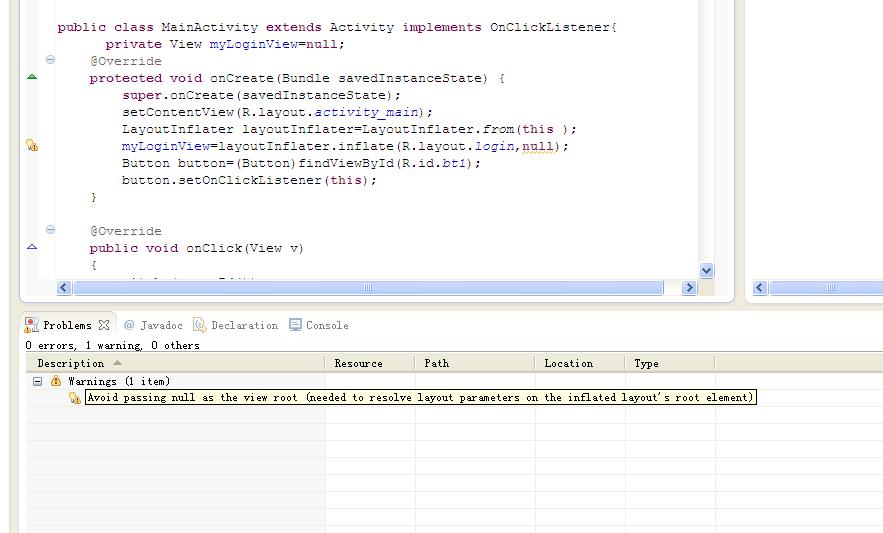
public class MainActivity extends Activity implements OnClickListener{
private View myLoginView=null;
@Override
protected void onCreate(Bundle savedInstanceState) {
super.onCreate(savedInstanceState);
setContentView(R.layout.activity_main);
LayoutInflater layoutInflater=LayoutInflater.from(this );
myLoginView=layoutInflater.inflate(R.layout.login,null);
Button button=(Button)findViewById(R.id.bt1);
button.setOnClickListener(this);
}
@Override
public void onClick(View v)
{
switch (v.getId())
{
case R.id.bt1:
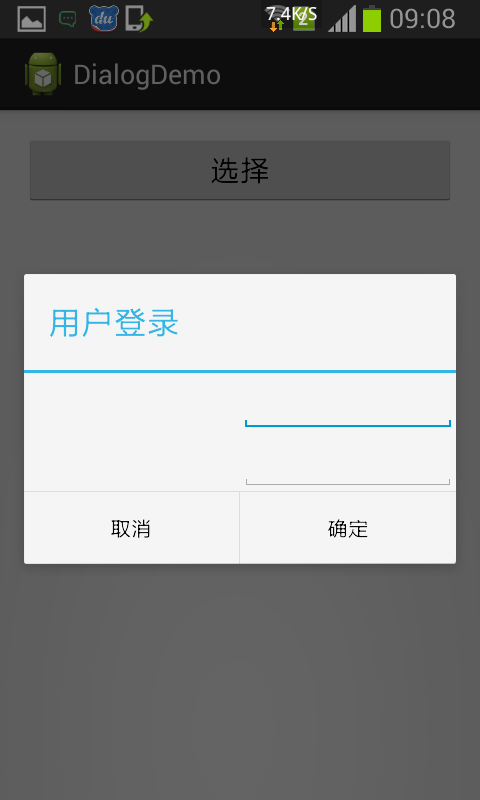
AlertDialog alertDialog=new AlertDialog.Builder(this ).create();
alertDialog.setTitle("用戶登錄");
alertDialog.setView(myLoginView);
alertDialog.setButton(AlertDialog.BUTTON_POSITIVE,"確定",listener);
alertDialog.setButton(AlertDialog.BUTTON_NEGATIVE,"取消",liss);
alertDialog.show();
}
}
DialogInterface.OnClickListener listener=new DialogInterface.OnClickListener()
{
public void onClick(DialogInterface dialog,int which)
{
}
};
DialogInterface.OnClickListener liss=new DialogInterface.OnClickListener()
{
public void onClick(DialogInterface dialog,int which)
{
}
};
@Override
public boolean onCreateOptionsMenu(Menu menu) {
// Inflate the menu; this adds items to the action bar if it is present.
getMenuInflater().inflate(R.menu.main, menu);
return true;
}
@Override
public boolean onOptionsItemSelected(MenuItem item) {
// Handle action bar item clicks here. The action bar will
// automatically handle clicks on the Home/Up button, so long
// as you specify a parent activity in AndroidManifest.xml.
int id = item.getItemId();
if (id == R.id.action_settings) {
return true;
}
return super.onOptionsItemSelected(item);
}
}
activity_main.xml
 <RelativeLayout xmlns:android="http://schemas.android.com/apk/res/android"
    xmlns:tools="http://schemas.android.com/tools"
    android:layout_width="match_parent"
    android:layout_height="match_parent"
    android:paddingBottom="@dimen/activity_vertical_margin"
    android:paddingLeft="@dimen/activity_horizontal_margin"
    android:paddingRight="@dimen/activity_horizontal_margin"
    android:paddingTop="@dimen/activity_vertical_margin"
    tools:context="com.example.ch02_dialogdemo.MainActivity" >

    <Button
        android:id="@+id/bt1"
        android:layout_width="fill_parent"
        android:layout_height="wrap_content"
        android:text="@string/xuan"
         android:textSize="20sp"/>

</RelativeLayout>
login.xml
 <?xml version="1.0" encoding="utf-8"?>
<LinearLayout xmlns:android="http://schemas.android.com/apk/res/android"
    android:layout_width="match_parent"
    android:layout_height="match_parent"
    android:orientation="vertical" >


    <LinearLayout
        android:layout_width="fill_parent"
        android:layout_height="wrap_content"
        android:gravity="center">
        <TextView
            android:layout_width="0dip"
            android:layout_height="wrap_content"
            android:layout_weight="1" />
        <EditText
            android:inputType="text"
           android:layout_width="0dip"
            android:layout_height="wrap_content"
            android:layout_weight="1" />
     </LinearLayout>


</LinearLayout>
strings.xml
 <?xml version="1.0" encoding="utf-8"?>
<resources>

    <string name="app_name">DialogDemo</string>
    <string name="hello_world">Hello world!</string>
    <string name="action_settings">Settings</string>
    <string name="xuan">選擇</string>
</resources>
1。dialog創建之前做個判斷
switch (v.getId())
{
case R.id.bt1:
            if(mAlertDialog==null){
            mAlertDialog = new AlertDialog.Builder(this ).create();
            }