本篇文章的主要開發環境是Visual Studio 2008,Visual Studio系列產品一直以來都提供了強大的控件功能,然而我們利用這些控件可以編寫出功能強大的應用程序。本文主要利用微軟的最新.net開發工具為大家展示窗體特效的應用方法,為大家介紹創建炫酷的透明化窗體以及浮動型窗體的一些技巧。很適合.net開發工具的初學者,具有一定的實用價值。
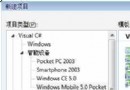
打開 Visual Studio 2008在文件 (File) 菜單上,單擊新建項目 (New Project)。 在新建項目 (New Project) 對話框的模板 (Templates) 窗格中,單擊 Windows 應用程序(Windows Application)。單擊確定 (OK)
窗體應用技巧一,創建浮動窗體。
創建新工程後,選擇Form1窗體,添加Timer1和Timer2控件。為窗體選擇一個好看的背景,當然你也可以使用系統默認的背景。
進入代碼編輯器,輸入代碼:
Public Class Form1
Inherits System.Windows.Forms.Form
Private Sub Form1_Load(ByVal sender As System.Object, ByVal e As System.EventArgs) Handles MyBase.Load
Dim pos As Point = New Point(100, 50) '設置窗體初始位置
Me.DesktopLocation = pos
Timer1.Interval = 10 '設置Timer的值
Timer1.Enabled = True
Timer2.Interval = 10
Timer2.Enabled = False
End Sub
進入Timer1_Tick事件
Private Sub Timer1_Tick(ByVal sender As System.Object, ByVal e As System.EventArgs) Handles Timer1.Tick
Dim pos As Point = New Point(Me.DesktopLocation.X + 2, Me.DesktopLocation.Y + 1) '窗體左上方橫坐標的timer1加
If pos.X < 600 Or pos.Y < 400 Then
Me.DesktopLocation = pos
Else
Timer1.Enabled = False
Timer2.Enabled = True
End If
End Sub
進入Timer2_Tick事件
Private Sub Timer2_Tick(ByVal sender As System.Object, ByVal e As System.EventArgs) Handles Timer2.Tick
Dim pos As Point = New Point(Me.DesktopLocation.X - 2, Me.DesktopLocation.Y - 1) '窗體的左上方橫坐標隨著timer2減一
If pos.X > 100 Or pos.Y > 50 Then
Me.DesktopLocation = pos
Else
Timer1.Enabled = True
Timer2.Enabled = False
End If
End Sub
創建完成後我們來運行程序測試一下,測試成功,程序在屏幕中不斷地來回走動了。
窗體應用技巧二,創建透明的窗體。
創建新工程後,選擇Form1窗體,添加Label1、TrackBar1、Timer1控件。為了突出效果為窗體選擇一個好看的背景。
相關的屬性設置如下:
TrackBar1 Value屬性:
TickFrequency: 屬性:
Maximum屬性: 100
10
100
Label1 Text屬性: 選擇窗體的透明度:
Timer1 Interval屬性: 100
進入代碼編輯器,輸入代碼:
首先進行聲明:
Public Class Form1
Inherits System.Windows.Forms.Form
Dim tps As Integer
Dim bol As Boolean
進入TrackBar1_Scroll事件
Private Sub TrackBar1_Scroll(ByVal sender As Object, ByVal e As System.EventArgs) Handles TrackBar1.Scroll
Me.Opacity = TrackBar1.Value / 100
Label1.Text = "窗體透明度:" & CStr(Me.Opacity * 100) & "%"
End Sub
進入Timer1_Tick事件
Private Sub Timer1_Tick(ByVal sender As Object, ByVal e As System.EventArgs) Handles Timer1.Tick
If bol = False Then
tps = tps + 1
Me.Opacity = tps / 100
If Me.Opacity >= 1 Then
Timer1.Enabled = False
bol = True
End If
Else
tps = tps - 1
Me.Opacity = tps / 100
If Me.Opacity <= 0 Then
Timer1.Enabled = False
bol = False
End If
End If
End Sub
進入Form1_Load事件
Private Sub Form1_Load(ByVal sender As System.Object, ByVal e As System.EventArgs) Handles MyBase.Load
Timer1.Enabled = True
End Sub
進入Form1_Closing事件
Private Sub Form1_Closing(ByVal sender As Object, ByVal e As System.ComponentModel.CancelEventArgs) Handles MyBase.Closing
Timer1.Enabled = True
If MsgBox("你確實要關閉窗體嗎?", MsgBoxStyle.OkCancel) = MsgBoxResult.Ok Then
e.Cancel = False
Else
Timer1.Enabled = False
Me.Opacity = 1
tps = 100
bol = True
e.Cancel = True
End If
End Sub
創建完成後我們來運行程序測試一下,測試成功,程序窗體是不是變得透明了,通過調節滾動條我們甚至可以使得窗體消失達到完全隱形的目的。這是不是很神奇呢?