lately ppt Typesetting is too troublesome , I have to post screenshots every time , It's not easy to align , It also looks uncomfortable , Once the results are updated , I have to paste the screenshot again , I think it's too troublesome , I have known this before python-pptx, Can I automatically typeset the pictures , The answer is yes , Here are my study records , Make a note of
There are many tutorials on the Internet , Don't say ,
https://blog.csdn.net/weixin_42750611/article/details/108029796
https://zhuanlan.zhihu.com/p/344862384
from pptx import Presentation
ppt=Presentation()
ppt.slides.add_slide(ppt.slide_layouts[0])
ppt.save(" test 1.pptx")
## Added a light change sheet
from pptx import Presentation
prs = Presentation('test_template.pptx')
for slide in prs.slides:
print(slide)
from pptx import Presentation
prs = Presentation('test_template.pptx')
for slide in prs.slides:
for shape in slide.shapes:
print(shape)
# Get all Slide The content in
from pptx import Presentation
prs = Presentation('test_template.pptx')
for slide in prs.slides:
for shape in slide.shapes:
if shape.has_text_frame:
text_frame = shape.text_frame
print(text_frame.text)
# Get a page Slide The content in
from pptx import Presentation
prs = Presentation('test_template.pptx')
for i, slide in enumerate(prs.slides):
if i == 2:
for shape in slide.shapes:
if shape.has_text_frame:
text_frame = shape.text_frame
print(text_frame.text)
<pptx.slide.Slide object at 0x7fdd3d46b340>
<pptx.slide.Slide object at 0x7fdd3d3b5970>
<pptx.shapes.placeholder.SlidePlaceholder object at 0x7fdd3d3b5790>
<pptx.shapes.graphfrm.GraphicFrame object at 0x7fdd3d3b5b80>
<pptx.shapes.graphfrm.GraphicFrame object at 0x7fdd3d3b50d0>
<pptx.shapes.placeholder.SlidePlaceholder object at 0x7fdd3d3b5340>
<pptx.shapes.graphfrm.GraphicFrame object at 0x7fdd3d3b50a0>
<pptx.shapes.graphfrm.GraphicFrame object at 0x7fdd3d3b5130>
The report
The report
#!/usr/bin/env python3
# -*- coding: utf-8 -*-
from pptx import Presentation
prs = Presentation()
title_slide_layout = prs.slide_layouts[0]
slide = prs.slides.add_slide(title_slide_layout)
title = slide.shapes.title
subtitle = slide.placeholders[1]
title.text = "Hello, World!"
subtitle.text = "python-pptx It's easy to make powerpoint!"
prs.save('test1.pptx')
[ Failed to transfer the external chain picture , The origin station may have anti-theft chain mechanism , It is suggested to save the pictures and upload them directly (img-u5hI1tJt-1657114192007)(attachment:image.png)]
from pptx import Presentation
prs = Presentation()
bullet_slide_layout = prs.slide_layouts[1]
slide = prs.slides.add_slide(bullet_slide_layout)
shapes = slide.shapes
title_shape = shapes.title
body_shape = shapes.placeholders[1]
title_shape.text = 'Adding a Bullet Slide'
tf = body_shape.text_frame
tf.text = 'Find the bullet slide layout'
p = tf.add_paragraph()
p.text = 'Use _TextFrame.text for first bullet'
p.level = 1
p = tf.add_paragraph()
p.text = 'Use _TextFrame.add_paragraph() for subsequent bullets'
p.level = 2
prs.save('test2.pptx')
[ Failed to transfer the external chain picture , The origin station may have anti-theft chain mechanism , It is suggested to save the pictures and upload them directly (img-yZO45EeS-1657114192008)(attachment:image.png)]
from pptx import Presentation
from pptx.util import Pt,Cm
from pptx.dml.color import RGBColor
from pptx.enum.text import PP_ALIGN
from pptx.enum.shapes import MSO_SHAPE
ppt = Presentation(r' test 1.pptx')
slide = ppt.slides[0]# Change the first
# Add rectangle
# Set the location and size
left, top, width, height = Cm(0), Cm(0), Cm(2), Cm(2)
# Add shape
rectangle = slide.shapes.add_shape(MSO_SHAPE.RECTANGLE, left, top, width, height)
# Set background fill
rectangle.fill.solid()
# Set the background color
rectangle.fill.fore_color.rgb = RGBColor(34, 134, 165)
# Set border color
rectangle.line.color.rgb = RGBColor(34, 134, 165)
ppt.save(' test 1.pptx')
[ Failed to transfer the external chain picture , The origin station may have anti-theft chain mechanism , It is suggested to save the pictures and upload them directly (img-YkTq828L-1657114192008)(attachment:image.png)]
from pptx import Presentation
# ppt = Presentation(r' test 1.pptx')
# slide=ppt.slides.add_slide(ppt.slide_layouts[0])
# left = top = Cm(3)
# pic = slide.shapes.add_picture('./0.png',left,top)
ppt = Presentation(r' test 1.pptx')# The picture is too big
slide = ppt.slides[1]# Change the first
left = top = Cm(0)
pic = slide.shapes.add_picture('./0.png',left,top)
ppt.save(" test 1.pptx")
## Added a light change sheet
############ Change location
from pptx import Presentation
# ppt = Presentation(r' test 1.pptx')
# slide=ppt.slides.add_slide(ppt.slide_layouts[0])
# left = top = Cm(3)
# pic = slide.shapes.add_picture('./0.png',left,top)
ppt = Presentation(r' test 1.pptx')# The picture is too big
slide = ppt.slides[2]# Change the first
left = top = Cm(0)
height=Cm(3)
pic = slide.shapes.add_picture('./0.png',left,top,height=height)
ppt.save(" test 1.pptx")
## Added a light change sheet
from pptx import Presentation
ppt = Presentation(r' test 1.pptx')
slide=ppt.slides.add_slide(ppt.slide_layouts[0])
left = top = Cm(3)
width=Cm(5)
height=Cm(1)
pic = slide.shapes.add_picture('./0.png',left,top,width=width,height=height)
ppt.save(" test 1.pptx")
ppt = Presentation(r' test 1.pptx')
slide=ppt.slides.add_slide(ppt.slide_layouts[0])
rows,cols = 4,2
left = top =Cm(5)
width = Cm(18)
height = Cm(3)
table = slide.shapes.add_table(rows,cols,left,top,width,height).table
# You can modify the column width 、 Row height
table.columns[0].width = Cm(6)
table.columns[1].width = Cm(4)
table.rows[0].height =Cm(2)
data = [
[' full name ',' achievement '],
[' Li lei ',99],
[' Han Meimei ', 92],
[' Ma Dongmei ', 92],
]
for row in range(rows):
for col in range(cols):
table.cell(row,col).text =str(data[row][col])
ppt.save(" test 1.pptx")
########################################################
ppt = Presentation(r' test 1.pptx')
slide=ppt.slides.add_slide(ppt.slide_layouts[0])
rows,cols = 4,2
left = top =Cm(5)
width = Cm(18)
height = Cm(3)
table = slide.shapes.add_table(rows,cols,left,top,width,height).table
# You can modify the column width 、 Row height
# table.columns[0].width = Cm(6)
# table.columns[1].width = Cm(4)
table.rows[0].height =Cm(2)
data = [
[' full name ',' achievement '],
[' Li lei ',99],
[' Han Meimei ', 92],
[' Ma Dongmei ', 92],
]
for row in range(rows):
for col in range(cols):
table.cell(row,col).text =str(data[row][col])
ppt.save(" test 1.pptx")
# Load the library
import os
from pptx import Presentation
from pptx.util import Cm, Inches, Pt
from pptx.enum.text import PP_ALIGN
from pptx.dml.color import RGBColor
# Set the path
# Instantiation ppt Document object
prs = Presentation()
# Insert slide
blank_slide = prs.slide_layouts[6]
slide_1 = prs.slides.add_slide(blank_slide)
# Add images
img_name = 'shenma.jpeg'
## Central master
pic = slide_1.shapes.add_picture(image_file=img_name,
left=Inches(1),
top=Inches(1),
width=Inches(8),
height=Inches(5)
)
## Small picture in the upper left corner
slide_1.shapes.add_picture(image_file=img_name,
left=Inches(0.5),
top=Inches(0.5),
width=Inches(3),
height=Inches(1.5)
)
## Small picture in the upper right corner
slide_1.shapes.add_picture(image_file=img_name,
left=Inches(7.5),
top=Inches(0.5),
width=Inches(3),
height=Inches(1.5)
)
## Small picture in the lower left corner
slide_1.shapes.add_picture(image_file=img_name,
left=Inches(0.5),
top=Inches(5),
width=Inches(3),
height=Inches(1.5)
)
# Small picture in the lower right corner
slide_1.shapes.add_picture(image_file=img_name,
left=Inches(7.5),
top=Inches(5),
width=Inches(3),
height=Inches(1.5)
)
# Add text box
textbox= slide_1.shapes.add_textbox(left=Inches(1),
top=Inches(6),
width=Inches(8),
height=Inches(2)
)
## Add text to the text box
tf = textbox.text_frame
para = tf.add_paragraph() # Add paragraph
para.text = ' Everything is nothing !!!'
para.alignment = PP_ALIGN.CENTER # In the middle
## Set the font
font = para.font
font.size = Pt(36) # size
font.name = ' Chinese color cloud ' # typeface
font.bold = True # In bold
font.italic = True # tilt
font.color.rgb = RGBColor(225, 225, 0) # yellow
# preservation ppt
prs.save(' test 3.pptx')
[ Failed to transfer the external chain picture , The origin station may have anti-theft chain mechanism , It is suggested to save the pictures and upload them directly (img-7zcwtkv4-1657114192008)(attachment:image.png)]
# Load the library
import os
from pptx import Presentation
from pptx.util import Cm, Inches, Pt
from pptx.enum.text import PP_ALIGN
from pptx.dml.color import RGBColor
# Set the path
# Instantiation ppt Document object
prs = Presentation()
# Insert slide
blank_slide = prs.slide_layouts[6]
slide_1 = prs.slides.add_slide(blank_slide)
# Add images
img_name = 'shenma.jpeg'
## Central master
## Small picture in the upper left corner
slide_1.shapes.add_picture(image_file=img_name,
left=Cm(0),
top=Cm(0.5),
width=Cm(10),
height=Cm(3)
)
slide_1.shapes.add_picture(image_file=img_name,
left=Cm(0),
top=Cm(4),
width=Cm(10),
height=Cm(3)
)
slide_1.shapes.add_picture(image_file=img_name,
left=Cm(11),
top=Cm(0.5),
width=Cm(10),
height=Cm(3)
)
slide_1.shapes.add_picture(image_file=img_name,
left=Cm(11),
top=Cm(4),
width=Cm(10),
height=Cm(3)
)
# Add text box
# textbox= slide_1.shapes.add_textbox(left=Cm(0),
# top=Cm(0),
# width=Cm(10),
# height=Cm(0.5)
# )
## Add text to the text box
left = top = Cm(0)
width=Cm(10)
height=Cm(0.5)
txBox = slide_1.shapes.add_textbox(left, top, width, height)
tf = txBox.text_frame
p = tf.paragraphs[0]
run = p.add_run()
run.text = "Hello World"
font = run.font
#font.name = 'Calibri'
font.name="Times New Roman"
font.bold = True # In bold
font.size = Pt(6)
left= Cm(11)
top = Cm(0)
width=Cm(10)
height=Cm(0.5)
txBox = slide_1.shapes.add_textbox(left, top, width, height)
tf = txBox.text_frame
p = tf.paragraphs[0]
run = p.add_run()
run.text = "Hello World2"
font = run.font
#font.name = 'Calibri'
font.name="Times New Roman"
font.bold = True # In bold
font.size = Pt(6)
# preservation ppt
prs.save(' test 4.pptx')
import os
from pptx import Presentation
from pptx.util import Inches, Pt
prs = Presentation()
blank_slide_layout = prs.slide_layouts[6]
slide = prs.slides.add_slide(blank_slide_layout)
shapes = slide.shapes
left = top = Cm(0)
width=Cm(10)
height=Cm(0.5)
txBox = slide.shapes.add_textbox(left, top, width, height)
tf = txBox.text_frame
p = tf.paragraphs[0]
run = p.add_run()
run.text = "Hello World"
font = run.font
font.name = 'Times New Roman'
font.size = Pt(6)
prs.save(' test 5.pptx')
# Load the library
import os
from pptx import Presentation
from pptx.util import Cm, Inches, Pt
from pptx.enum.text import PP_ALIGN
from pptx.dml.color import RGBColor
# Set the path
# Instantiation ppt Document object
prs = Presentation()
blank_slide = prs.slide_layouts[6]
ppt = prs.slides.add_slide(blank_slide)
# Template image
img_name = 'shenma.jpeg'
######################### setting parmeters #######################
nrow=5
ncol=3
textbox_height=0.5
textbox_width=10
pic_height=10
pic_width=10
margin_width=1
margin_height=0.5
box_left=0
box_top =0
##############################################
text_list=["method"+str(i) for i in range(1,nrow*ncol+1)]
print(text_list)
for i in range(nrow):
for j in range(ncol):
ind=i*ncol+j
print(ind)
print("====================")
left=Cm(j*textbox_width+j*margin_width)
top=Cm(i*textbox_height+i*margin_height+i*pic_height)## Add the height of the picture
width=Cm(textbox_width)
height=Cm(textbox_height)
txBox = ppt.shapes.add_textbox(left, top, width, height)
tf = txBox.text_frame
p = tf.paragraphs[0]
run = p.add_run()
run.text = "Hello World2"
font = run.font
#font.name = 'Calibri'
font.name="Times New Roman"
font.bold = True # In bold
font.size = Pt(6)
# add picture
# ppt.shapes.add_picture(image_file=img_name,
# left=Cm(11),
# top=Cm(4),
# width=Cm(10),
# height=Cm(3)
# )
prs.save(' Test text box .pptx')
[ Failed to transfer the external chain picture , The origin station may have anti-theft chain mechanism , It is suggested to save the pictures and upload them directly (img-x8aNqwLS-1657114192009)(attachment:image.png)]
# Load the library
import os
from pptx import Presentation
from pptx.util import Cm, Inches, Pt
from pptx.enum.text import PP_ALIGN
from pptx.dml.color import RGBColor
# Set the path
# Instantiation ppt Document object
prs = Presentation()
blank_slide = prs.slide_layouts[6]
ppt = prs.slides.add_slide(blank_slide)
# Template image
img_name = 'shenma.jpeg'
######################### setting parmeters #######################
nrow=5
ncol=2
textbox_height=0.5
textbox_width=10
pic_height=3.2
pic_width=10
margin_width=0.5
margin_height=0
box_left=0
box_top =0
##############################################
text_list=["method"+str(i) for i in range(1,nrow*ncol+1)]
#print(text_list)
for i in range(nrow):
for j in range(ncol):
ind=i*ncol+j
left=Cm(j*textbox_width+j*margin_width)
top=Cm(i*textbox_height+i*margin_height+i*pic_height)## Add the height of the picture
width=Cm(textbox_width)
height=Cm(textbox_height)
txBox = ppt.shapes.add_textbox(left, top, width, height)
tf = txBox.text_frame
p = tf.paragraphs[0]
run = p.add_run()
run.text = text_list[ind]
font = run.font
font.name="Times New Roman"
font.bold = True # In bold
font.size = Pt(6)
#add picture
left=Cm(j*pic_width+j*margin_width)
top=Cm(i*pic_height+i*margin_height+(i+1)*textbox_height)## Add the height of the picture
width=Cm(pic_width)
height=Cm(pic_height)
ppt.shapes.add_picture(image_file=img_name,
left=left,
top=top,
width=width,
height=height
)
prs.save(' Test text boxes and pictures .ppt')
## In order to run on the server , Remember to save it as ppt form , Don't save as pptx form
## I did another test later , Discovery does not have to be saved as ppt Format ,pptx It's OK, too , I don't know what I did , I remember at the beginning
## no , Now it's OK
## Of
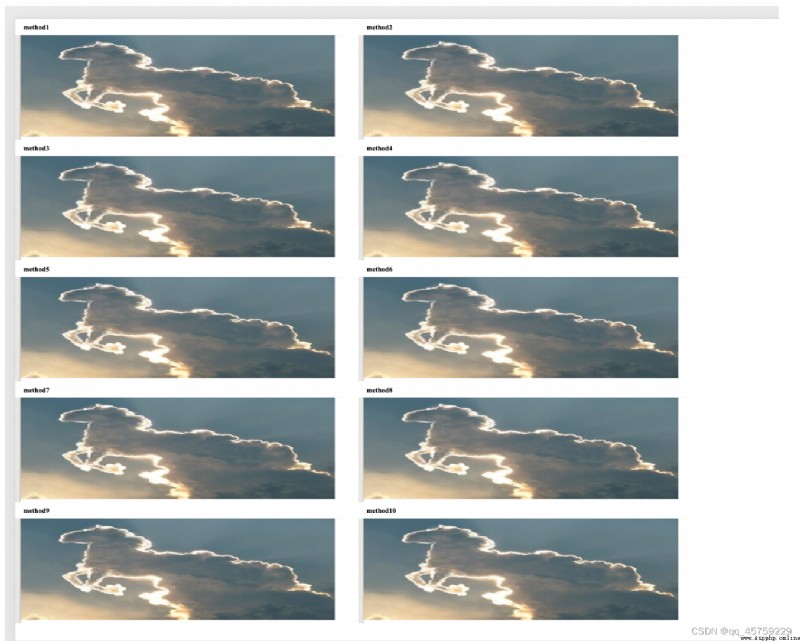
This result is what I want , very nice
In order to view the results instantly on the server , Need to put ppt File conversion to pdf, The conversion command is as follows
soffice --headless --convert-to pdf Test text boxes and pictures .ppt
perhaps
soffice --headless --convert-to pdf Test text boxes and pictures .pptx
soffice --headless --convert-to pdf test.docx (word turn pdf)
soffice Switch to libreoffice Can also be the
 【Anaconda】輕松解決Spyder 因 pandas numexpr 版本不匹配導致的kernel報錯Python代碼無法運行的問題
問題描述An error ocurred while sta
 Python+opencv to realize image edge detection (sliding adjustment threshold)
Python+OpenCv Realize image ed