1. join()介紹
join() 定義在Thread.java中。
join() 的作用:讓“主線程”等待“子線程 ”結束之後才能繼續運行。這句話可能有點晦澀,我們還是通過例子去理解:
// 主線程
public class Father extends Thread {
    public void run() {
        Son s = new Son();
        s.start();
        s.join();
        ...
    }
}
// 子線程
public class Son extends Thread {
    public void run() {
        ...
    }
}
說明:
上面的有兩個類Father(主線程類)和Son(子線程類)。因為Son是在Father中創建並啟動的, 所以,Father是主線程類,Son是子線程類。
在Father主線程中,通過new Son()新建“子線程 s”。接著通過s.start()啟動“子線程s”,並且調用s.join()。在調用s.join()之後, Father主線程會一直等待,直到“子線程s”運行完畢;在“子線程s”運行完畢之 後,Father主線程才能接著運行。 這也就是我們所說的“join()的作用,是讓主線程會等待子線程 結束之後才能繼續運行”!
2. join()源碼分析(基於JDK1.7.0_40)
public final void join() throws InterruptedException {
    join(0);
}

public final synchronized void join(long millis)
throws InterruptedException {
    long base = System.currentTimeMillis();
    long now = 0;

    if (millis < 0) {
        throw new IllegalArgumentException("timeout value is negative");
    }

    if (millis == 0) {
        while (isAlive()) {
            wait(0);
        }
    } else {
        while (isAlive()) {
            long delay = millis - now;
            if (delay <= 0) {
                break;
            }
            wait(delay);
            now = System.currentTimeMillis() - base;
        }
    }
}
說明:
從代碼中,我們可以發現。當millis==0時,會進入while(isAlive())循環;即只要子線程 是活的,主線程就不停的等待。
我們根據上面解釋join()作用時的代碼來理解join()的用法!
問題 :
雖然s.join()被調用的地方是發生在“Father主線程”中,但是s.join()是通過“ 子線程s”去調用的join()。那麼,join()方法中的isAlive()應該是判斷“子線程s”是 不是Alive狀態;對應的wait(0)也應該是“讓子線程s”等待才對。但如果是這樣的話, s.join()的作用怎麼可能是“讓主線程等待,直到子線程s完成為止”呢,應該是讓"子 線程等待才對(因為調用子線程對象s的wait方法嘛)"?
答案:wait()的作用是讓“當前線 程”等待,而這裡的“當前線程”是指當前在CPU上運行的線程。所以,雖然是調用子線 程的wait()方法,但是它是通過“主線程”去調用的;所以,休眠的是主線程,而不是 “子線程”!
3. join()示例
在理解join()的作用之後,接下來通過示例查看join()的用法。
// JoinTest.java的源碼
public class JoinTest{

    public static void main(String[] args){
        try {
            ThreadA t1 = new ThreadA("t1"); // 新建“線程t1”

            t1.start();                     // 啟動“線程t1”
            t1.join();                        // 將“線程t1”加入到“主線程main”中,並且“主線程main()會等待它的完成”
            System.out.printf("%s finish\n", Thread.currentThread().getName());
        } catch (InterruptedException e) {
            e.printStackTrace();
        }
    }

    static class ThreadA extends Thread{

        public ThreadA(String name){
            super(name);
        }
        public void run(){
            System.out.printf("%s start\n", this.getName());

            // 延時操作
            for(int i=0; i <1000000; i++)
               ;

            System.out.printf("%s finish\n", this.getName());
        }
    }
}
運行結果:
t1 start
t1 finish
main finish
結果說明:
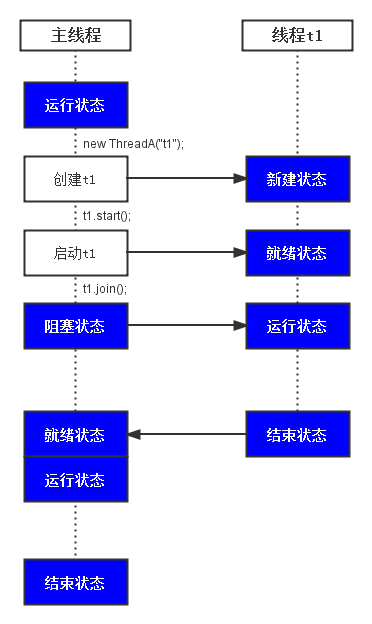
運行流程如圖
(01) 在“主線程main”中通過 new ThreadA("t1") 新建“線程t1”。 接著,通過 t1.start() 啟動“線程 t1”,並執行t1.join()。
(02) 執行t1.join()之後,“主線程main”會進入“ 阻塞狀態”等待t1運行結束。“子線程t1”結束之後,會喚醒“主線程 main”,“主線程”重新獲取cpu執行權,繼續運行。
查看本欄目