如何理解和使用 Eclipse Production Configuration
本文提供了逐步指南,幫助您利用 Eclipse 的 Production Configuration 和 PDE,將 Rich Client Platform (RCP) 應用程序作為具有您自己品牌的產品進行打包和管理。除了一些常見概念,如 splash Screen 和圖標文件的顏色和大小,本文還介紹了 production configuration 的高級品牌推廣方面:RCP 可執行文件及其配置文件、進度條和消息、RCP 窗口圖像、About 對話框和歡迎頁面(如介紹)。通過本文,您能夠掌握將 RCP 應用程序封裝為獨立於 Eclipse 平台的可分布產品的要領。
在 Eclipse V3.1 引入 Production Configuration 之前,RCP 開發人員面臨著如何有效且高效地打包和交付具有必要插件的 RCP 項目的問題。此問題實際上是影響到使用率的問題,因為它本質上決定了其軟件的分布和可用性。多虧了 Eclipse V3.1 的新 Production Configuration 功能,現在您可以輕松將其應用程序與依賴項和品牌推廣元素輕松地打包在一起了。本文詳細介紹了如何利用 Eclipse Product Configuration 制作一個樣例 RCP 應用程序:一個名為 Frog Across River 的游戲。
要從本文中獲得最大的收益,您需要 Eclipse 開發環境和樣例代碼。如果還沒有安裝 Eclipse,請從此地址下載:
JRE V1.5.0 or later;運行 Eclipse 需要 Java 運行時環境(Java Runtime Environment,JRE)
Eclipse Platform 或 IBM Rational Software Development Platform V7.X
樣例代碼在 Download 部分
先決條件:RCP 應用程序
Eclipse Product Configuration 的前提是已有 RCP 應用程序。您需要它作為產品的引導入口。在本節中,您將使用以下說明,開發一個作為 RCP 應用程序的游戲:Frog Across River。此 RCP 應用程序是一個插件項目,可以擴展 org.eclipse.core.runtime.applications 擴展並在產品中發揮入口的作用。您也可以選擇跳過本節,通過本文附帶的下載內容導入整個項目(參見 下載 部分),獲得後面場景的樣例 RCP 程序。
創建樣例 RCP 插件
首先,按以下步驟,生成一個插件項目。啟動 Eclipse,通過選擇 Window > Open Perspective > Other... > Plug-in Development 切換到插件開發透視圖。
從 Eclipse 菜單中,選擇 File > New > Project... > Plug-in Development > Plug-in Project 並單擊 Next。
在 Plug-in Project 向導頁面,輸入 com.example.zyx 作為項目名稱並單擊 Next。
在 Plug-in Content 向導頁面,接受所有默認設置並為 "Would you like to create a rich client application?" 選項單擊 Yes,然後單擊 Next。
在 Templates 向導頁面,選擇 Hello RCP 模板並單擊 Finish。然後,將會看到一個名為 com.example.zyx 的項目出現在工作區中。
導入 RCP 游戲源代碼
從 com.example.zyx.zip 復制所有 Java 源文件 (.java files) 到工作區,替換現有文件:
Application.java
ApplicationActionBarAdvisor.java
ApplicationworkbenchAdvisor.java
ApplicationWorkbenchWindowAdvisor.java
Perspective.java
GameView.java
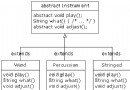
此 RCP 項目將創建具有 GUI 視圖的 Frog Across River 游戲,使其能夠使用鼠標和鍵盤在菜單欄和畫布上輸入。它的設計架構如圖 1 所示。
圖 1. RCP 應用程序類圖
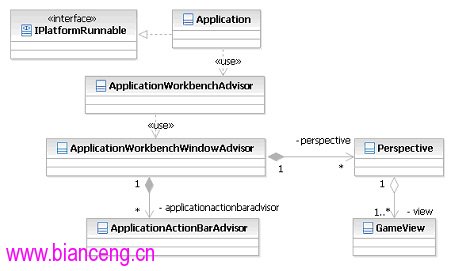
其中,Application.java 必須實現 IPlatformRunnable 接口,因為該 plugin.xml 文件已經擴展了 org.eclipse.core.runtime.applications 的擴展點。這意味著您應該實現 IPlatformRunnable 的 run() 方法,負責創建 SWT 顯示和啟動工作台。
清單 1. Application.java
public class Application implements IPlatformRunnable {
  public Object run(Object args) throws Exception {
    int returnCode = PlatformUI.createAndRunWorkbench(display,
             new ApplicationWorkbenchAdvisor());
    ...
  }
}
ApplicationActionBarAdvisor.java 用於創建和顯示菜單欄。
清單 2. ApplicationActionBarAdvisor.java
public class ApplicationActionBarAdvisor extends ActionBarAdvisor {
  ...
  private IWorkbenchAction exitAction;
  private IAction gameAction;
  ...
  protected void fillMenuBar(IMenuManager menuBar) {
  IMenuManager viewMenu = new MenuManager("&Game","Game");
  menuBar.add(viewMenu);
     viewMenu.add(gameAction);
     viewMenu.add(exitAction);
  }
}
GameView.java 是 RCP 游戲的核心。它加載圖像、渲染顯示、響應用戶動作(鼠標和鍵盤事件)並控制游戲的整個進程。
應用了雙緩沖技術來防止動畫期間屏幕閃爍。這樣做的原因是當您指示 JVM 顯示動畫時,JVM 將清除屏幕,顯示窗口,繪制屏幕並再次顯示。這會使應用的外觀降級。雙緩沖通過繪制離屏圖像提高性能,然後將圖像轉儲到顯示。
清單 3. GameView.java
public class GameView extends ViewPart {
  ...
  public void createPartControl(final Composite parent) {
  ...
  canvas.addMouseListener(new MouseAdapter() {
    public void mouseDoubleClick(MouseEvent e) {

  }
  });
  canvas.addKeyListener(new KeyAdapter() {
  public void keyPressed(KeyEvent e) {
  ...
  }
  canvas.addPaintListener(new PaintListener() {
  public void paintControl(PaintEvent event) {
      final Image image = new Image(parent.getDisplay(), canvas.getBounds());
      final GC gcImage = new GC(image);
      ...
      event.gc.drawImage(image, 0, 0);
      ...
}
將以下代碼清單復制到 plugin.xml 文件中,因為您的 RCP 游戲將作為 GUI 視圖顯示以與用戶進行交互。
清單 4. plugin.xml
<extension point="org.eclipse.ui.views">
   <category id="com.example.zyx.browser"
        name="Browser Example"/>
   <view id="com.example.zyx.GameView"
      name="Browser"
      icon="icons/window16x16.gif"
      class="com.example.zyx.GameView"
      category="com.example.zyx.browser"/>
</extension>
在 Eclipse 中啟動 RCP 游戲
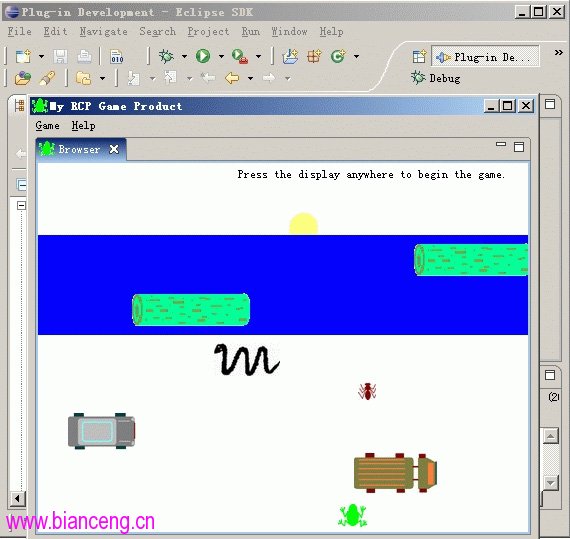
要在 Eclipse 中執行 RCP 游戲應用程序,切換到 plugin.xml 的 Overview 選項卡並單擊 Launch an Eclipse application。一個新的 Eclipse 應用程序啟動配置將被創建,您會看到 RCP 游戲的執行結果,如圖 2 所示。
圖 2. 樣例 RCP 應用程序的執行
創建您的產品配置
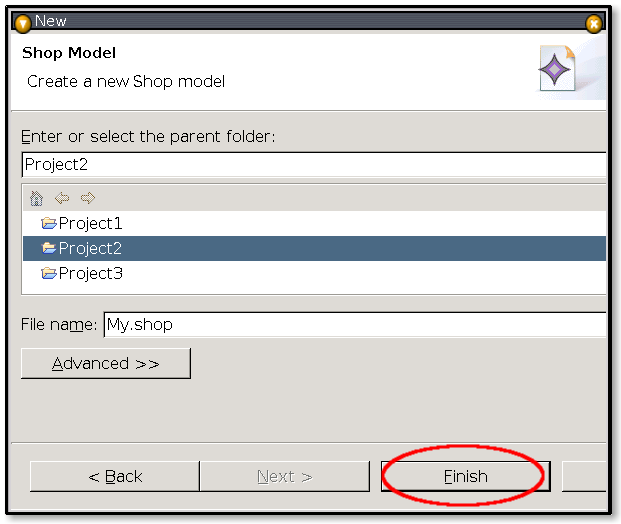
您將要創建 Product Configuration 文件 (.product) 來將 Frog Across River RCP 應用程序包裝為產品。可以將它放置在任何項目或文件夾中。
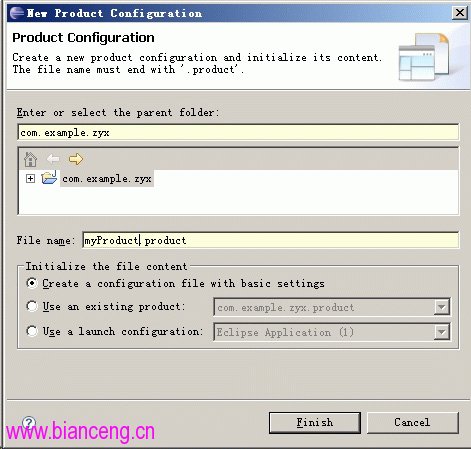
要生成 Product Configuration 文件,選擇 File > New > Other > Plug-in Development > Product Configuration,然後單擊 Next。當 Product Configuration 向導頁面出現時,選擇 com.example.zyx 插件項目作為其父文件夾,輸入 myProduct.product 作為文件名,選擇 "Create a configuration file with basic settings" 並單擊 Finish (參見圖 3)。
圖 3. 創建新 Product Configuration 向導
配置
本節中,我們將介紹在創建了您的 .product 文件後,如何定義和定制與 RCP 應用程序一起發布的產品。在您設置 Product Configuration 之前,需要從 com.example.zyx.zip 導入一些文件和文件夾到您的插件項目。它們列在圖 4 中。
圖 4. 導入的資源
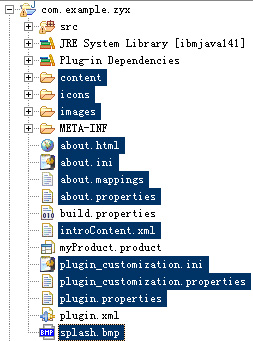
下表提供了這些資源的說明。
表 1. 資源說明
File/folder name Function splash.bmp 產品啟動時出現 plugin_customization.ini 定義默認首選項值 plugin_customization.properties 為 plugin_customization.ini 文件包含外部化字符串 plugin.properties 包含從 plugin.xml 文件中轉換的值 intoContent.xml 配置歡迎頁面 content 包含歡迎頁面資源 icon 包含有用的圖標等 image 包含有用的圖像資源,如窗口圖像等 about.html 提供有關宿主插件的信息;插件必須提供此文件Overview 選項卡
首先,單擊 Overview 選項卡(參見圖 5)。在這裡設置 Product Definition。產品定義包含 Product Name、Product ID 和與 Product ID 相關聯的 Application。而且,還要在這裡指定產品配置單元是基於插件還是基於功能的。
圖 5. Overview 選項卡
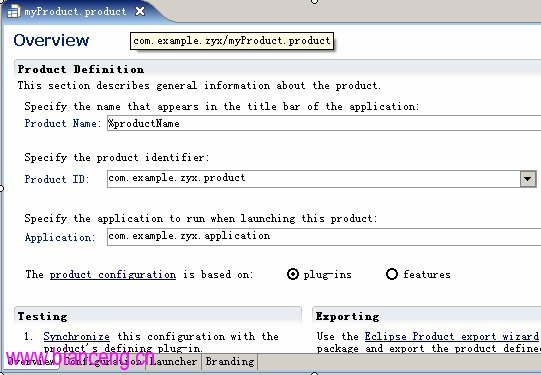
Product Name 定義產品的名稱,該名稱將出現在標題欄。在 Product Name 文本字段輸入 %productName,它將根據語言環自動引用 plugin.properties 文件中的值。Product ID 定義產品 ID 及與其相關聯的 Application ID。單擊 Product ID 右側的 New...。當 Product Definition 窗口彈出時,選擇 com.example.zyx 作為 Defining Plug-in,然後選擇 com.example.zyx.application 作為其相關聯的應用程序並使用 product 作為其產品 ID。單擊 Finish 返回 Overview 選項卡。在 "The product configuration is based on" 部分,選擇 plug-ins 單選按鈕。
在啟動產品時可以在標題欄看到產品名稱,如下所示。
圖 6. 產品標題欄上的產品名稱

Configuration 選項卡
單擊 Configuration 選項卡。您將定義產品和配置文件中的各個元素。"Plug-ins and Fragments section" 列出了所有將要打包在您的產品中的插件和片段。
圖 7. Configuration 選項卡
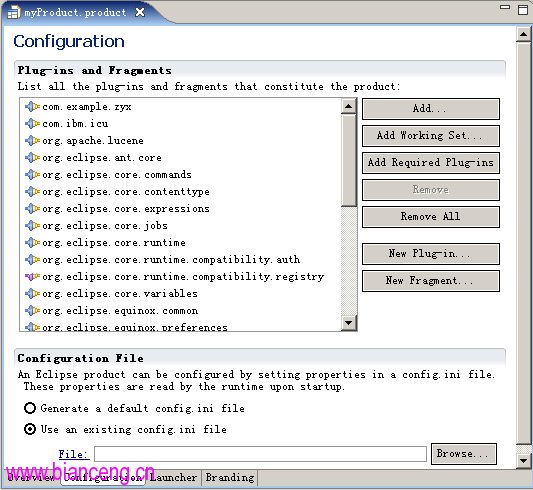
單擊 Plug-ins and Fragments 列表右側的 Add...,然後選擇 com.example.zyx 插件,並單擊 OK。單擊 Add Required Plug-ins 按鈕,添加所有必需的插件和片段。"Configuration File" 部分用於設置產品運行時信息。此文件必須命名為 config.ini。可以接受其默認設置,這將在導出產品時在配置文件夾中生成一個默認 config.ini 文件。以下是該文件內容的樣例。
清單 5. config.ini 的內容
#Product Runtime Configuration File
osgi.splashPath=platform:/base/plugins/com.example.zyx
eclipse.product=com.example.zyx.product
osgi.bundles=org.eclipse.equinox.common@2:start,org.eclipse.update.configurator@3:start,
org.eclipse.core.runtime@start
osgi.bundles.defaultStartLevel=4
第一行決定 splash Screen 的位置,它將在產品啟動時顯示。第二行定義產品名稱。
在最後兩行中,StartLevel 是產品用來在插件成功安裝和解析後啟動插件的。換句話說,StartLevel 定義這些核心插件的啟動順序。start level 定義為非負整數。產品將先啟動 Start Level 0 的插件。之後,啟動所有 start level 1 的插件。此過程不會結束,直到它到達指定的 start level:defaultStartLevel 或 osgi.startLevel。在此樣例 config.ini 文件中,defaultStartLevel 為 4。osgi.startLevel 屬性的默認值為 6。
Launcher 選項卡
單擊 Launcher 選項卡,在這裡設置 Program Launcher 和 Launching Arguments。
圖 8. Launcher 選項卡
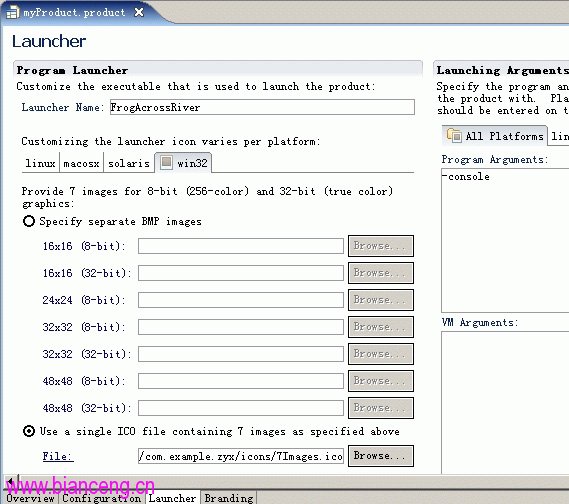
Program Launcher 用於指定啟動程序名稱和啟動程序圖標,對於 Windows® 用 .exe 文件的形式,在導出產品後,啟動您的產品。在 Launcher Name 文本字段輸入 FrogAcrossRiver。單擊 Use a single ICO file containing 7 images as specified above 單選按鈕,然後單擊 Browse... 並導航到圖標文件夾選擇 7Images.ico 文件。可以生成並使用您自己的圖標文件或通過單擊 Specify separate BMP images 使用 BMP 圖像。
.ico 文件是一個容器,為其主應用程序包括不同大小和顏色模式的必需的圖像文件。Windows 選擇它需要使用的圖像,基於用戶的顯示設置。如果圖標不包含合適的大小或顏色模式,Windows 將采用最接近的大小和分辨率並渲染圖標使其適合顯示。
表 2. Icon 屬性
Icon 屬性 值 用法 大小 16x16 像素 當視圖為 Detail 或 Small Icons 模式時,它用在程序窗口的左上角,Windows 任務欄、“開始”菜單及 Windows 資源管理器或“我的電腦”中。 24x24 像素 這用在 Windows XP 中“開始”菜單的左側。 32x32 像素 當視圖為 Icon 視圖模式時,它用於 Windows 桌面和 Windows 資源管理器。 48x48 像素 當視圖為 Large Icons 模式時使用它。 色深 4 位(16 色) 低品質,用在安全模式下。 8 位(256 色) 中品質,用於顯示 16 位或更高的色深。 32 位(帶有 8 位透明通道的 24 位全色) 高品質帶有平滑反走樣功能並且可以選擇半透明投影;Windows XP 中支持它。
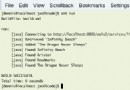
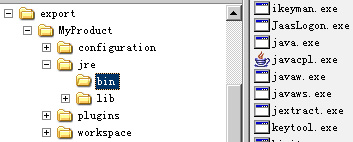
啟動參數提供產品啟動時的默認程序參數和 VM 參數。在這一過程中,在導出文件夾的根目錄下將生成一個與啟動程序同名的 .ini 文件記錄這些參數。在 Program Arguments 文本字段,輸入 -console,這將在您的產品啟動時打開控制台窗口。在導出產品後,轉到導出文件夾,可以找到如下所示的 .exe 和 .ini 文件。
圖 9. 可執行文件和配置文件

splash Screen
splash Screen 在產品啟動時出現。此文件必須位於根文件夾並命名為 splash.bmp。否則,產品在運行時將無法找到它。
圖 10. Branding 選項卡中的 Splash Screen 配置
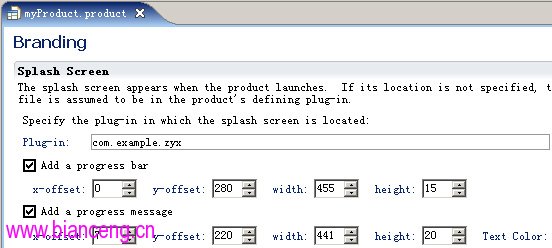
單擊 Plug-in 文本字段右側的 Browse... 並選擇 splash 文件駐留的插件項目。進度條和進度消息用於表示 splash Screen 的進程狀態。添加以下值到 plugin_customization.ini 文件中。
org.eclipse.ui/SHOW_PROGRESS_ON_STARTUP=true
下面,添加以下屬性到 plugin.xml 文件的產品擴展部分。
<property name="preferenceCustomization" value="plugin_customization.ini">
</property>
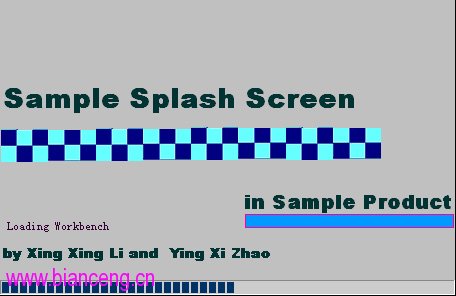
然後,選擇 Add a progress bar。為 x-offset 和 y-offset 輸入 0 和 280,並為 width 和 height 輸入 455 和 15。然後,選擇 Add a progress message。為 x-offset 和 y-offset 輸入 7 和 220,並為 width 和 height 輸入 441 和 20。在 Text Color 中為進度信息選擇最喜歡的顏色。在啟動產品時,能夠看到 splash Screen 出現,並且出現進度條和進度信息。
圖 11. 產品啟動時的進度條和進度信息
窗口圖像
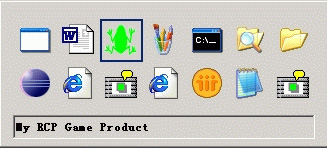
用作應用程序窗口的圖像在本節中配置(參見圖 12)。這些圖像必須是 GIF 格式。大小為 16x16 時出現在窗口左上角和任務欄。大小為 32x32 的圖像出現在 Alt+Tab 應用程序切換器中。
圖 12. 在 Branding 選項卡中進行窗口圖像配置
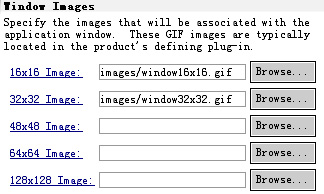
使用 Browse... 按鈕,從項目的圖標文件夾中選擇需要的 16x16 和 32x32 圖像。然後轉到 plugin.xml 文件用以下聲明確認配置:
<property name="windowImages" value="icons/alt_window_16.gif,icons/alt_window_32.gif">
</property>
在啟動產品後,將會看到如圖 13 所示的圖像。
圖 13. Alt+Tab 應用程序切換器中的 32x32 圖像
About 對話框
About 對話框包含左側的 about 圖像和簡要介紹產品的 about 文本。您將在本節中管理這兩項。
圖 14. 在 Branding 選項卡中配置 About 對話框
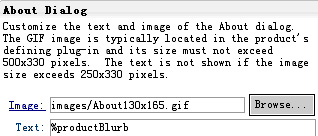
單擊 Image 文本字段右側的 Browse... 並從圖標文件夾中選擇一個 GIF 文件。
有兩種定義 about 文本的方式。一種是 Text 字段直接輸入;另一種是在 plugin.properties 文件中定義鍵值對並在 Text 字段中引用鍵。假設要使用第二種,只需在 Text 字段中輸入 %productBlurb,如圖 14 所示。productBlurb 是在 plugin.properties 文件中定義的鍵,如下所示。
清單 6. plugin.properties
pluginName=Frog Across River

providerName=Xing Xing Li and Ying Xi Zhao

productName=My Product

productBlurb=My Product based on Eclipse Platform\n\

\n\

Version: 1.0.0\n\

Build id: M20061124-1422 \n\

\n\

Welcome to my Product based on Eclipse Product Configuration. \n\

A RCP game is encapsulated in it with customized branding elements.\n\

\n\

This product is developed by Xing Xing Li and Ying Xi Zhao \n\

(c) Copyright by authors. All rights reserved\n\
您需要添加一個動作,使 About 對話框的菜單項出現在產品菜單欄中,如 Help > About。打開 ApplicationActionBarAdvisor.java 文件並刪除 comment 標記以激活以下代碼。
清單 7. ApplicationActionBarAdvisor.java
public class ApplicationActionBarAdvisor extends ActionBarAdvisor {
  ...
  private IWorkbenchAction aboutAction;
  protected void makeActions(final IWorkbenchWindow window) {
    ...
  aboutAction = ActionFactory.ABOUT.create(window);
  register(aboutAction);
    ...
  }
  protected void fillMenuBar(IMenuManager menuBar) {
  //Help
  MenuManager helpMenu = new MenuManager("&Help",IWorkbenchActionConstants.M_HELP);
  menuBar.add(helpMenu);
  // About > Help
  helpMenu.add(new Separator());
  helpMenu.add(aboutAction);
    ...
  }
}
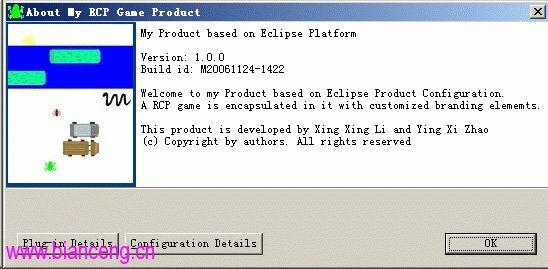
在啟動產品並選擇 Help > About 之後,將出現 About 對話框。
圖 15. About 對話框樣例
歡迎頁面
歡迎頁面用於介紹產品信息,對於新用戶尤其有用。您可以通過歡迎頁面介紹您產品的所有功能、用法和提示。
圖 16. Branding 選項卡中的歡迎頁面配置

要在產品中啟用歡迎頁面,您將擴展兩個擴展:org.eclipse.ui.intro 和 org.eclipse.ui.intro.config。添加以下代碼到 plugin.xml 文件。
清單 8. plugin.xml 中的 Intro 配置
<extension
         point="org.eclipse.ui.intro">
         <intro
               class="org.eclipse.ui.intro.config.CustomizableIntroPart"
               icon="icons/alt_window_16.gif"
               id="com.example.zyx.intro">
      </intro>
      <introProductBinding
            introId="com.example.zyx.intro"
            productId="com.example.zyx.product">
      </introProductBinding>
   </extension>
<extension
         point="org.eclipse.ui.intro.config">
      <config
            content="introContent.xml"
            id="com.example.zyx.configId"
            introId="com.example.zyx.intro">
            <presentation
               home-page-id="root">
            <implementation
                  kind="html"
                  os="win32,linux,macosx">
            </implementation>
         </presentation>
         </config>
   </extension>
下面,通過選擇 Help > Welcome 在菜單欄中添加動作。再次打開 ApplicationActionBarAdvisor.java 文件並刪除以下代碼的 comment 標記。
清單 9. ApplicationActionBarAdvisor.java
public class ApplicationActionBarAdvisor extends ActionBarAdvisor {
    ...
    private IWorkbenchAction introAction;
    protected void makeActions(final IWorkbenchWindow window) {
         ...
	introAction = ActionFactory.INTRO.create(window);
	register(introAction);
    }
    protected void fillMenuBar(IMenuManager menuBar) {
	...
	helpMenu.add(introAction);
         ...
    }
}
啟動產品時,您將看到以下歡迎頁面。
圖 17. 歡迎頁面樣例

發布您的 RCP 產品
發布前的測試
返回到 Overview 選項卡並找到 Testing 部分。當您更改產品名稱、窗口圖像、about 圖像和 about 文本等時,單擊 Synchronize 鏈接向 plugin.xml 反映您的變更以確保插件 manifest 保持最新。在導出前單擊 Launch the product 測試您的產品。
這裡有一個示例說明 Synchronize 鏈接的工作原理。將產品名稱從 %productName 更改為 my product,然後單擊 Synchronize。轉到 plugin.xml 文件並確認產品名稱值是否更改為 my product。之後,將其改回 %productName 並單擊 Synchronize,然後單擊 Launch the product,啟動您的產品。
導出產品
找到 Overview 選項卡中的 Exporting 部分,這裡有一個導出產品的鏈接。單擊 Eclipse Product export wizard。在彈出的導出對話框中,指定 MyProduct 作為根目錄而 C:\export 作為目標目錄。
在單擊 Finish 後,導航到 C:\export\MyProduct 目錄確認導出結果。您會找到 FrogAcrossRiver.exe 和 FrogAcrossRiver.ini 文件,其中記錄著您的啟動參數。您還要確認 FrogAcrossRiver.exe 文件的圖標是您需要的。
圖 18. 文件系統中導出的 RCP 產品
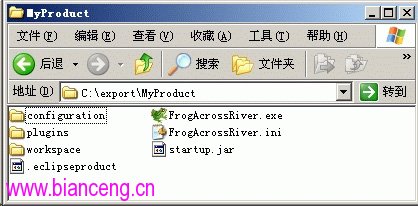
如果已經安裝了 JRE,雙擊 FrogAcrossRiver.exe 啟動產品。
祝賀您!您已經成功地配置並發布了您的 RCP 應用程序產品。
JRE
此提示可幫助您在非 JRE OS 中發布您的產品:只需找到安裝了 JRE 的平台,將 JRE 目錄復制到導出產品的根文件夾即可,如下所示。
圖 19. 添加到導出 RCP 產品的 JRE
雙擊 FrogAcrossRiver.exe,成功啟動您的 RCP 產品。
故障排除
1.如果您的 .ico 文件不包括需要的指定大小或色深的圖像文件,您將會收到錯誤消息:[Program Launcher] The launcher may not get branded correctly, .ico file is missing its image。同樣,如果您在 .product 文件中指定了無效的圖像,您會得到以下警告消息:[About Dialog] Image: path/ImageName — is not a path to a valid file。
2.如果在 Program Arguments 中添加了 -clean 並且從導出文件夾啟動產品,將看不到 splash Screen。然而,在從 Launch the product 鏈接啟動時卻可以看到它。
結束語
本文說明了如何通過利用 Eclipse 的 Product Configuration 和 PDE 創建和打包品牌化的 Eclipse 產品。盡管可以使用腳本完成這個工作,但是我們介紹了一個更為有效且高效的方法來生成產品,並且可以配置和管理所有的 branding 信息和元素。最重要的是,本文顯示了在 Eclipse Production Configuration 功能的幫助下 RCP 世界的無限可能性。
本文配套源碼