上一篇已經講了Spring2.5的配置,這章講的就是怎麼在Spring2.5上集成Struts.
三,在Spring2.5 集成 Struts2
3.1 修改現有的web.xml .
加上下面兩段代碼:
<filter>

        <filter-name>struts2</filter-name>

        <filter-class>org.apache.struts2.dispatcher.FilterDispatcher</filter-class>

 </filter>

<filter-mapping>

        <filter-name>struts2</filter-name>

        <url-pattern>/*</url-pattern>

    </filter-mapping>
3.2 完整的web.xml代碼
<?xml version="1.0" encoding="UTF-8"?>

<web-app id="WebApp_ID" version="2.4" xmlns="http://java.sun.com/xml/ns/j2ee"

xmlns:xsi="http://www.w3.org/2001/XMLSchema-instance"

xsi:schemaLocation="http://java.sun.com/xml/ns/j2ee http://java.sun.com/xml/ns/j2ee/web-

app_2_4.xsd">

    <!-- ###################################### -->

    <!-- ##########  Struts2  ################## -->

    <!-- ###################################### -->

    <!--

     * Struts2的主要的Filter,負責四個方面的功能:

     * (1)執行Actions

     * (2)清除ActionContext

     * (3)維護靜態內容

     * (4)清除request生命周期內的XWork的interceptors

     * 另注:該過濾器應該過濾所有的請求URL。一般被設置為/*

     ************ -->

    <filter>

        <filter-name>struts2</filter-name>

        <filter-

class>org.apache.struts2.dispatcher.FilterDispatcher</filter-class>

    </filter>

    <!-- ###################################### -->

    <!-- ##########  Spring2  ################## -->

    <!-- ###################################### -->

    <!--

     * [ <context-param></context-param ] =>用來設定web站台的環境參數

     * [ <param-name></param-name> ]  (子元素)=> 用來指定參數的名稱

     * [ <param-value></param-value> ] (子元素)=> 用來設定參數值

     * ************

     * 從類路徑下加載spring的配置文件, 多個配置文件可以用逗號和空格區分

     * classpath:  關鍵字特指類路徑下加載

     ******************** -->

    <context-param>

        <param-name>contextConfigLocation</param-name>

        <param-value>classpath:applicationContext*.xml</param-value>

    </context-param>

    <!--

     * [<listener></listener>]=>用來設定監聽接口

     * [<listener-class></listener-class>](子元素)=>定義Listener的類名稱

     * *******

     * 負責啟動spring的監聽器

     * 它將引用處的上下文參數獲得spring配置文件地址

     * 指定Spring提供的ContextLoaderListener Web 容器監聽器,

     * 該監聽器在web容器啟動時自動運行並且根據ContextLoaderListener參數

     * 獲取Spring配置文件,並啟動Spring容器。

     ************** -->

    <listener>

        <listener-class>

            org.springframework.web.context.ContextLoaderListener

        </listener-class>

    </listener>

    <filter-mapping>

        <filter-name>struts2</filter-name>

        <url-pattern>/*</url-pattern>

    </filter-mapping>

    <display-name>miziStudy</display-name>

    <welcome-file-list>

        <welcome-file>index.html</welcome-file>

        <welcome-file>index.htm</welcome-file>

        <welcome-file>index.jsp</welcome-file>

        <welcome-file>default.html</welcome-file>

        <welcome-file>default.htm</welcome-file>

        <welcome-file>default.jsp</welcome-file>

    </welcome-file-list>

</web-app>
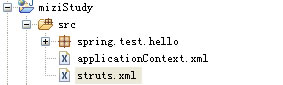
3.3 在src下面新建struts.xml
3.4 修改struts.xml內容修改為
<?xml version="1.0" encoding="UTF-8" ?>

<!DOCTYPE struts PUBLIC

    "-//Apache Software Foundation//DTD Struts Configuration 2.0//EN"

    "http://struts.apache.org/dtds/struts-2.0.dtd">

<struts>

    <!-- ############################# -->

    <!-- ############ 通過這個配置指定使用struts-plugin.xml中的

StrutsSpringObjectFactory作為創建Action的工廠類################# -->

    <!-- ############################# -->

     <constant name= "struts.objectFactory" value="spring" />

</struts>
3.5 導入struts2包
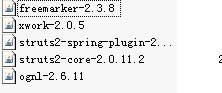
要注意的是 struts2-spring-plugin-2.0.11.1.jar 有了它,struts2就可以與spring整合了
3.6 測試struts2 與spring 整合成功。
OK,我們就來仿照之前我們測試spring的例子( 忽然發現我包名起的不好,之後我會專門列出一篇來 講命名規范,現在也只能將錯就錯了 )
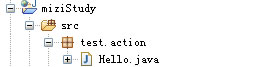
3.6.1 在src下面建一個叫test.action的包並創建一個叫Hello.java的文件
並修改Hello.java的內容如下:
package test.action;

import com.opensymphony.xwork2.ActionSupport;

@SuppressWarnings("serial")

public class Hello extends ActionSupport {

    //獲得表單參數值

    private String username;

    private int age;

    private String sex;

    public String getUsername() {

        return username;

    }

    public void setUsername(String username) {

        this.username = username;

    }

    public int getAge() {

        return age;

    }

    public void setAge(int age) {

        this.age = age;

    }

    public String getSex() {

        return sex;

    }

    public void setSex(String sex) {

        this.sex = sex;

    }
    private String hello;

    public void setHello(String hello) {

        this.hello = hello;

    }
    public String getHello() {

        return hello;

    }

    @Override

    public String execute() throws Exception {

        hello = "Hello:" + username + ";u is " + age + " age; and u is a " + sex;

        return SUCCESS;

    }

}
3.6.2 在application.xml加上bean:(把昨天做的例子刪掉,要不tomcat啟動不起來)
<?xml version="1.0" encoding="UTF-8"?>

<beans xmlns="http://www.springframework.org/schema/beans"

       xmlns:xsi="http://www.w3.org/2001/XMLSchema-instance"

       xmlns:p="http://www.springframework.org/schema/p"

       xmlns:aop="http://www.springframework.org/schema/aop"

       xmlns:tx="http://www.springframework.org/schema/tx"

       xsi:schemaLocation="http://www.springframework.org/schema/beans

http://www.springframework.org/schema/beans/spring-beans-2.5.xsd

       http://www.springframework.org/schema/aop

http://www.springframework.org/schema/aop/spring-aop-2.5.xsd

       http://www.springframework.org/schema/tx

http://www.springframework.org/schema/tx/spring-tx-2.5.xsd">

        <!--

        * 這裡bean的ID對應的是 struts.xml action的class

        ****************-->

        <bean id="Hello" class="test.action.Hello"

scope="prototype"></bean>

</beans>
3.6.3 修改struts.xml 內容:
<?xml version="1.0" encoding="UTF-8" ?>

<!DOCTYPE struts PUBLIC

    "-//Apache Software Foundation//DTD Struts Configuration 2.0//EN"

    "http://struts.apache.org/dtds/struts-2.0.dtd">

<struts>

    <!-- ############################# -->

    <!-- ############ 通過這個配置指定使用struts-plugin.xml中的

StrutsSpringObjectFactory作為創建Action的工廠類################# -->

    <!-- ############################# -->

     <constant name= "struts.objectFactory" value="spring" />


    <package name="mizi" namespace="" extends="struts-default">

     <!-- ############################# -->

    <!-- ############ 注意,現在action的class屬性不再是類的名字了,而是在spring中的bean

的id ################# -->

    <!-- ############################# -->

        <action name="Hello" class="Hello">

            <result>/hello.jsp</result>

        </action>

    </package>

</struts>
3.6.4 在webContent目錄下創建兩個jsp頁面

3.6.4.1 index.jsp
  <%@ page contentType="text/html; charset=UTF-8" %>

<%@ taglib prefix="s" uri="/struts-tags" %>

<!DOCTYPE HTML PUBLIC "-//W3C//DTD HTML 4.01 Transitional//EN">

<html>

    <body>

        <s:form action="Hello">

            <s:textfield name="username"  label="u name"/>

            <s:textfield name="age" label="u age" />

            <s:textfield name="sex" label="u sex" />

               <s:submit />

        </s:form>

    </body>

</html>    3.6.4.2   hello.jsp

<%@ page contentType="text/html; charset=UTF-8" %>

<%@ taglib prefix="s" uri="/struts-tags" %>

<!DOCTYPE HTML PUBLIC "-//W3C//DTD HTML 4.01 Transitional//EN">

<html>

    <body>

        <s:property value="hello"/>

    </body>

</html>
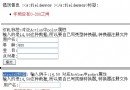
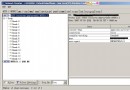
3.6.5 在浏覽器中輸入 http://localhost/miziStudy
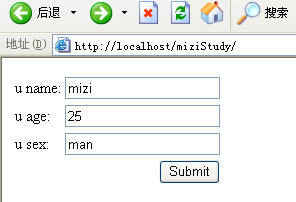
並在輸入框輸入信息, 注意age為整數
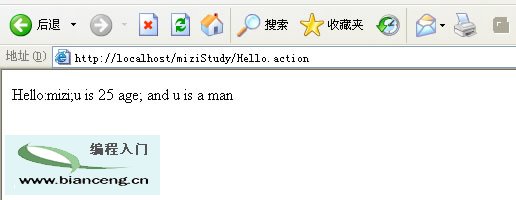
如果你最後得出的結果和我一致,那麼恭喜你,string struts 集成成功
OK , 今天到此為止, 下次我們將繼續集成 Hibernate
本文配套源碼:http://www.bianceng.net/java/201212/826.htm