在上一個教程中,你已經看到如何處理兩個簡單項目之間的依賴。
這個教程將引導你完成在一個更加復雜的環境下的ivy使用。這個教程的所有源文件在ivy發行包的 src/example/multi-project下可以得到。
1) 上下文
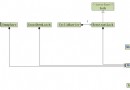
這裡是這個教程涉及到得項目的概況:
* version 幫助通過版本列表來標識模塊
* list 獲取目錄下的文件列表(遞歸地)
* size 獲取目錄下的所有文件或者一個文件集合的總大小
* find 在一個給定目錄或者文件列表之間查找匹配給定名稱的文件
* sizewhere 給出在一個目錄下配置名稱的文件的總大小
* console 通過簡單的控制台應用提供入口給所有其他模塊特性
可以肯定的是這不是旨在展示如何開發一個復雜的應用或者提供高級算法的指示。
而是給出一個簡單的理解,關於ant + ivy如何使用來開發一個被分割為多個模塊的應用。
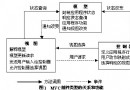
現在,這是這些模塊如何關聯到其他模塊:
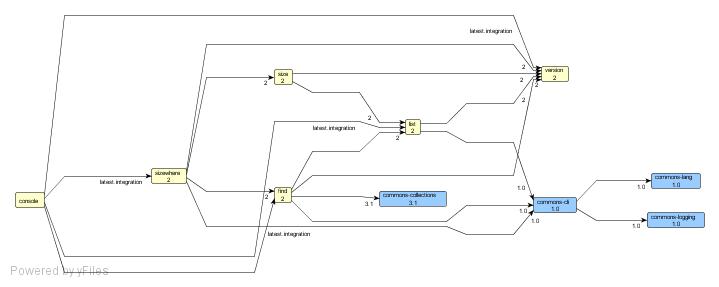
黃色的模塊是在這個教程中要講述的模塊,而藍色的模塊是外部依賴(我們將在這個教程中看到如何生 成這個圖形)。
如你所見,我們在這裡有一個優美關聯的彼此相互依賴的模塊,每個都依賴其他的最新版本。
2) 示例文件
這個教程的源文件可以在ivy發行包的src/example/multi-project下找到。在這個目錄中,你將發現 下面的文件:
* build.xml
這是根構建文件,將被所有模塊用來調用target,按照他們的依賴的順序(例如,確保在一個模塊的構 建通常在任何依賴它的模塊之
前)
* common
o common.xml
每個項目的build.xml都會導入的通用構建文件。這個構建定義了被所有項目使用的target。
o build.properties
對所有項目通用的一些屬性
* projects
包含所有模塊,每個模塊一個目錄,每個目錄下
o ivy.xml
模塊的ivy文件,描述它的對其他模塊和/或外部模塊的依賴。
例如:
<ivy-module version="1.0">

     <info

         organisation="org.apache.ivy.example"

         module="find"

         status="integration"/>

     <configurations>

       <conf name="core"/>

       <conf name="standalone" extends="core"/>

     </configurations>

     <publications>

       <artifact name="find" type="jar" conf="core" />

     </publications>

     <dependencies>

       <dependency name="version" rev="latest.integration" conf="core->default" />

       <dependency name="list" rev="latest.integration" conf="core" />

       <dependency org="commons-collections" name="commons-collections" rev="3.1"  conf="core->default" />

       <dependency org="commons-cli" name="commons-cli" rev="1.0" conf="standalone- >default" />

     </dependencies>

</ivy-module>
o build.xml
項目的構建文件,主要由一個common構建文件和一個項目特殊屬性文件的導入組成:
<project name="find" default="compile">

     <property file="build.properties"/>


     <import file="${common.dir}/common.xml"/>

</project>
o build.properties
模塊特殊屬性 + 查找通用構建文件的屬性
projects.dir = ${basedir}/..

wkspace.dir = ${projects.dir}/..

common.dir = ${wkspace.dir}/common
o src
源文件目錄,有所有java源文件
注意這裡不展示通常的軟件開發的良好實踐,尤其是你將發現在這些例子中沒有任何單元測試,即使 我們認為單元測試非常重要。但是這不是這個教程的目標。
現在你對結構有一點更多的了解了,讓我們看一下這個教程最重要的部分:通用構建文件。實際上, 你已經看到,所有模塊的構建文件都僅僅是導入這個通用構建文件,並在他們的ivy文件(你應該開始熟悉 )中定義他們的依賴。
因此,這裡是這個通用構建文件的一些方面:
1. ivy 設置
<!-- setup ivy default configuration with some custom info -->

<property name="ivy.local.default.root" value="${repository.dir}/local"/>

<property name="ivy.shared.default.root" value="${repository.dir}/shared"/>

<!-- here is how we would have configured ivy if we had our own ivysettings  file

<ivy:settings file="${common.dir}/ivysettings.xml" id="ivy.instance" />

-->
這個聲明只為ivy配置了兩個屬性: 本地倉庫的位置和共享倉庫的位置。這是僅為這裡進行的配置,因 為ivy默認是配置為在團隊環境下工作(關於這個的詳情請看默認配置教程)。可以肯定的是在實際環境中 共享倉庫位置將會是在團隊共享目錄(或者在一個更加復雜的倉庫中,再次查看默認設置教程來了解如何 使用實際上不同的東西)。你可以從注釋中看到如果默認設置不符合你的目標時如何進行設置。
2. 解析依賴
<target name="resolve" depends="clean-lib, load-ivy" description="-->  resolve and retrieve dependencies with ivy">

     <mkdir dir="${lib.dir}"/> <!-- not usually necessary, ivy creates the  directory IF there are dependencies -->


     <!-- the call to resolve is not mandatory, retrieve makes an implicit call  if we don't -->

     <ivy:resolve file="${ivy.file}"/>

     <ivy:retrieve pattern="${lib.dir}/[artifact].[ext]" />

</target>
你應該開始熟悉這種ivy的使用方法。我們顯式調用resolve來使用ivy文件配置(默認就足夠了),然後 調用retrieve來從緩存中復制解析的依賴制品到本地lib目錄(不帶版本號),在IDE中這樣使用非常簡單, 當制品版本更改時IDE配置不會改變。
3. ivy-new-version
<target name="ivy-new-version" depends="load-ivy"  unless="ivy.new.revision">

     <!-- default module version prefix value -->

     <property name="module.version.prefix" value="${module.version.target}-dev- b" />


     <!-- asks to ivy an available version number -->

     <ivy:info file="${ivy.file}" />

     <ivy:buildnumber

         organisation="${ivy.organisation}" module="${ivy.module}"

         revision="${module.version.prefix}" defaultBuildNumber="1"  revSep=""/>

</target>
這個target使用ivy來查找模塊的新版本。為了獲取關於我們正在處理的模塊的詳情,我們直接使用在 ivy文件中通過ivy:info任務找到的信息。然後buildnumber 任務用來獲取一個新的版本,基於我們通過 屬性設置前綴,默認它將會是1.0-dev-b(在通用構建屬性文件中看一下 module.version.target的默認值 )。每個被這個通用構建文件構建的模塊都可以很容易的通過在它的模塊特有的 build.properties中設置 一個不同的module.version.target,或者設置覆蓋 module.version.prefix.來覆蓋這個。為了獲取新的 修訂版本,ivy掃描倉庫來獲取最新的帶有給定前綴的可用版本,並在這個版本上增加1.
4. publish
<target name="publish" depends="clean-build, jar" description="-->  publish this project in the ivy repository">

     <ivy:publish artifactspattern="${build.dir}/[artifact].[ext]"

                        resolver="shared"

                        pubrevision="${version}"

                        status="release"

     />

     <echo message="project ${ant.project.name} released with version  ${version}" />

</target>
這個target在共享倉庫中發布模塊,使用在version屬性中找到的修訂版本,這是在其他target中設置 的(在上面我們已經看到是基於ivy- new-version)。當模塊到達一個特定的裡程碑時,或者任何你想團隊 可以從模塊的一個新版本中獲益的時它可以被使用。
5. publish-local
<target name="publish-local" depends="local-version, jar" description="-- > publish this project in the local ivy

repository">

     <ivy:publish artifactspattern="${build.dir}/[artifact].[ext]"

                     resolver="local"

                     pubrevision="${version}"

                     pubdate="${now}"

                     status="integration"

                     forcedeliver="true"

     />

     <echo message="project ${ant.project.name} published locally with version  ${version}" />

</target>
這個和publish任務非常相像,除了這個是在本地倉庫中發布修訂版本,這僅僅在你的環境下使用不會 打擾團隊。當你在一個模塊中修改一些東西並且想在其他模塊中從這些修改中獲益,你可以簡單的調用在 這個模塊中調研用publish-local,然後你的其他模塊的下一次構建將自動得到這個本地版本。
6. clean-local
<target name="clean-local" description="--> cleans the local repository  for the current module">

    <delete dir="${ivy.local.default.root}/${ant.project.name}"/>

</target>
這個target在當你不想再使用你的本地版本時使用,例如當你發型一個新的版本到整個團隊時,或者 拋棄你的本地修改並想從團隊的新版本中獲益時。
7. report
<target name="report" depends="resolve" description="--> generates a  report of dependencies">

     <ivy:report todir="${build.dir}"/>

</target>
同時生成html報告和圖形報告。
例如,為了生成類似這個教程開頭展示的那樣的圖形,你僅僅需要遵循這裡給出的說明,graphml文件 你將在這裡找到
projects/console/build/
在項目的控制台調用report之後,就這樣,你得到了所有你的應用的依賴的清晰的概況。
3) Playing with the projects
你可以使用正規ant命令來玩這個教程。在這個教程的基礎目錄(src/example/multi-project)下開始 ,運行ant -p:
Buildfile: build.xml

Main targets:

  clean        clean tutorial: delete repository, ivy cache, and all  projects

  clean-all    clean all projects

  publish-all  compile, jar and publish all projects in the right  order
這裡給出你可以在這裡做什麼的注意。為了確認所有你的模塊在你的倉庫中都至少發布了一個版本(被 依賴於其他模塊的模塊構建要求),你可以運行ant publish-all (這裡是示例的日志)。
你將可以看到ivy在所有模塊上調用publish target,按照依賴的順序,因此被依賴的總是在依賴它的 前面構建和發布。隨意修改一個模塊的源文件(例如修改一個方法名稱)和使用這個方法的模塊,然後調用 publish-all看被依賴的是如何首先編譯,發布,然後依賴它的模塊可以得到它並成功編譯。
然後你可以進入示例項目目錄的其中一個(如 projects/find for instance),並運行ant -p:
Buildfile: build.xml

Main targets:

  clean          --> clean the project

  clean-build    --> clean the project built files

  clean-lib      --> clean the project libraries directory (dependencies)

  clean-local    --> cleans the local repository for the current  module

  compile        --> compile the project

  jar            --> make a jar file for this project

  publish        --> publish this project in the ivy repository

  publish-local  --> publish this project in the local ivy repository

  report         --> generates a report of dependencies

  resolve        --> resolve and retrieve dependencies with ivy

  run            --> compile and run the project

Default target: compile
你可以看到可用的target,感謝common.xml構建文件的導入。通過調用resolve, publish玩這個項目 ,並且當你在其他項目中同樣做後
看發生了什麼。舉例來說一個有趣的事情是修改項目的依賴:如果現在模塊版本依賴於一個新的通用類 庫,你將看到一旦這個版本的項目被發布,所有其他依賴於版本的項目都將得到這個類庫作為他們間接依 賴的一部分。非常簡單!如果一個項目引入一些新變化導致依賴於它的項目不穩定,你可以非常簡單的修 改依賴它的項目的依賴,從latest.integration 到一個固定的穩定版本(可能是這個修改之前的最後版本 )。現在保持你的模塊可控式非常容易的!
你將非常熟悉使用ivy進行多項目開發,我們希望你能欣賞它的能力和彈性!這些教程僅僅是你的ivy 旅程的開始,游覽參考文檔來學習關於這些特性的更多內容,加入郵件列表來分享你的經驗並在社區中提 問。浏覽源文件,打開jira問題,提交補丁,加入並幫助ivy成為最好的依賴管理工具!