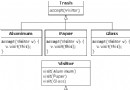
在過去幾期的 精通 Grails 文章中,您一直在逐步構建一個小型的博客服務(Blogito)。在這篇文 章中,Blogito 將最終完工,成為一個實用的博客應用程序。您將為博客條目主體實現文件上傳功能,並 添加自己制作的用於聚合的 Atom feed。
但是,在開始之前,請注意在上一篇文章(“身份驗證和授權”)中,我加入的認證使 UI 中出現一 個細小的 bug。在加入新的特性之前,應該修復這個 bug。
修復隱藏的 bug
啟動 Grails 時,grails-app/conf/Bootstrap.groovy 增加 2 個用戶和 4 個新的博客條目。但是, 如果嘗試通過 Web 界面增加博客條目,會發生什麼?可以使用下面的步驟試試看:
以用戶名 jsmith 和密碼 wordpass 登錄。
單擊 New Entry。
添加標題和摘要。
單擊 Create。
您將看到以下錯誤:Property [author] of class [class Entry] cannot be null。那麼,這個 bug 是如何引入到應用程序中的?畢竟,bootstrap 代碼還能正常工作。
在第一篇 Blogito 文章(“改變 Grails 應用程序的外觀”)中,我讓您通過輸入 grails generate-views Entry 生成 Groovy Server Pages(GSP)視圖。在隨後的文章中,我更改了 domain 類 ,但是從未讓您再回過頭來生成視圖。當我添加 Entry 與 User 之間的 1:M 關系時,磁盤上的 create.gsp 視圖一直不變,如清單 1 所示。(還記得嗎,belongsTo 創建一個名為 author 的字段,該 字段的類型為 User)。
清單 1. 打破 GSP 的 1:M 關系
class Entry {

  static belongsTo = [author:User]


  String title

  String summary

  Date dateCreated

  Date lastUpdated

}
不得不說,要使一切同步,最安全的方式還是通過動態腳手架生成視圖 — 特別是在開發的早期,域 模型不斷變化的時候,更是如此。當然,不能僅僅依靠通過腳手架生成的視圖,但是,當您在磁盤上生成 GSP 時,使它們保持最新的責任就從 Grails 轉移到您自己身上。
如果現在為 Entry 類生成視圖的話,Grails 會提供一個組合框,其中顯示一個 Author 列表,如清 單 2 所示。您自己不要 這樣做 — 這只是為了演示。稍後我將提供兩種不同的選項。
清單 2. 為 1:M 關系生成的組合框
<g:form action="save" method="post" >

  <div class="dialog">

   <table>

    <tbody>

     <!-- SNIP -->

     <tr class="prop">

      <td valign="top" class="name">

       <label for="author">Author:</label>

      </td>

      <td valign="top"

        class="value ${hasErrors(bean:entryInstance,

                     field:'author','errors')}">

       <g:select optionKey="id"

            from="${User.list()}"

            name="author.id"

            value="${entryInstance?.author?.id}" ></g:select>

      </td>

     </tr>

     <!-- SNIP -->

    </tbody>

   </table>

  </div>

</g:form>
注意 <g:select> 元素。字段名為 author.id。在 “GORM - 有趣的名稱,嚴肅的技術” 中可 以了解到,列表中顯示的文本來自 User.toString() 方法。該文本通常也是表單提交時作為字段值發回 到服務器的值。在這裡,optionKey 屬性覆蓋字段值,從而發回 Author 的 id。
為 EntryController.groovy 提供 author.id 字段的最快方式是將一個隱藏字段添加到表單中,如清 單 3 所示。由於執行 create 動作前必須登錄,而登錄的 User 是博客條目的 author,因此對於這個值 可以安全地使用 session.user.id。
清單 3. 從表單傳遞 author.id 字段
<g:form action="save" method="post" >

  <input type="hidden" name="author.id" value="${session.user.id}" />

  <!-- SNIP -->

</g:form>
對於像 Blogito 這樣的簡單的應用程序,這樣也許就足夠了。但是,這樣做留下了一個漏洞,使客戶 端的黑客有機會為 author.id 注入不同的值。為確保徹底的安全,可以在 save 閉包中添加 Entry.author,如清單 4 所示:
清單 4. 將 author.id 保存在服務器上
def save = {

   def entryInstance = new Entry(params)

   entryInstance.author = User.get(session.user.id)

   if(!entryInstance.hasErrors() && entryInstance.save()) {

     flash.message = "Entry ${entryInstance.id} created"

     redirect(action:show,id:entryInstance.id)

   }

   else {

     render(view:'create',model:[entryInstance:entryInstance])

   }

}
這是生成控制器時得到的標准 save 閉包,再加上一行定制的代碼。entryInstance.author 行根據 session.user.id 值從數據庫獲取 User,並填充 Entry.author 字段。
在下一節中,您將定制 save 閉包,以處理文件上傳,所以您仍可能在安全性方面犯錯誤,將 清單 4 中的代碼添加到 EntryController.groovy 中。重新啟動 Grails,確保可以通過 HTML 表單成功地添加 新的 Entry。
文件上傳
現在又可以創建 Entry,接下來該添加另一個特性。我希望用戶在創建新的 Entry 時可以上傳文件。 這種文件可以是包含整個博客條目的 HTML,也可以是圖像或任何其他文件。為實現該特性,需要涉及到 Entry domain 類、EntryController 和 GSP 視圖 — 並且要增加一個新的 TagLib。
首先,看看 grails-app/views/entry/create.gsp。添加一個新字段,用於上傳文件,如清單 5 所示 :
清單 5. 添加一個用於文件上傳的字段
<g:uploadForm action="save" method="post" >

  <!-- SNIP -->

  <tr class="prop">

   <td valign="top" class="name">

    <label for="payload">File:</label>

   </td>

   <td valign="top">

    <input type="file" id="payload" name="payload"/>

   </td>

  </tr>

</g:uploadForm>
注意,<g:form> 標記已經被改為 <g:uploadForm>。這樣便支持從 HTML 表單上傳文件 。實際上,也可以保留 <g:form> 標記,並增加一個 enctype="multipart/form-data" 屬性。( 用於 HTML 表單的默認 enctype 是 application/x-www-form-urlencoded)。
如果正確設置了表單的 enctype(或者使用 <g:uploadForm>),就可以添加 <input type="file" /> 字段。這樣便為用戶提供了一個按鈕,用於浏覽本地文件系統,並選擇上傳的文件, 如圖 1 所示。我的例子使用 Grails 徽標;您也可以使用任何自己喜歡的圖像。
圖 1. 包含文件上傳字段的 Create Entry 表單

現在,客戶端表單已經做好了,接下來可以調整服務器端代碼,以便用上傳的文件做有用的事情。在 文本編輯器中打開 grails-app/controllers/EntryController.groovy,將清單 6 中的代碼添加到 save 閉包中:
清單 6. 顯示關於上傳的文件的信息
def save = {
    def entryInstance = new Entry(params)
    entryInstance.author =

User.get(session.user.id)
    //handle uploaded file
    def uploadedFile =

request.getFile('payload')
    if(!uploadedFile.empty){
      println "Class:

${uploadedFile.class}"
      println "Name: ${uploadedFile.name}"


println "OriginalFileName: ${uploadedFile.originalFilename}"
      println

"Size: ${uploadedFile.size}"
      println "ContentType:

${uploadedFile.contentType}"
    }
    if(!entryInstance.hasErrors() &&

entryInstance.save()) {
        flash.message = "Entry ${entryInstance.id}

created"
        redirect(action:show,id:entryInstance.id)
    }
    else

{
        render(view:'create',model:[entryInstance:entryInstance])
    }
}
注意,這裡使用 request.getFile() 方法獲得上傳的文件的引用。有了該引用後,便可以對它進行各 種類型的內省。清單 7 顯示上傳 Grails 徽標後的控制台輸出:
清單 7. 上傳文件後的控制台輸出
Class: class org.springframework.web.multipart.commons.CommonsMultipartFile

Name: payload

OriginalFileName: Grails_logo.jpg

Size: 8065

ContentType: image/jpeg
如果知道 Grails 在幕後使用 Spring MVC 框架,那麼對此不應感到奇怪:上傳的文件是作為 CommonsMultipartFile 對象提供給控制器的。除了公布 HTML 表單字段的名稱外,這個類還允許訪問原 始文件名、文件大小(單位為字節)和文件的 MIME 類型。
接下來的步驟是將上傳的文件保存到某個地方。在 save 閉包中添加幾行代碼,如清單 8 所示:
清單 8. 將上傳的文件保存到磁盤
def save = {
    def entryInstance = new Entry(params)
    entryInstance.author =

User.get(session.user.id)
    //handle uploaded file
    def uploadedFile =

request.getFile('payload')
    if(!uploadedFile.empty){
      println "Class:

${uploadedFile.class}"
      println "Name: ${uploadedFile.name}"


println "OriginalFileName: ${uploadedFile.originalFilename}"
      println

"Size: ${uploadedFile.size}"
      println "ContentType:

${uploadedFile.contentType}"
      def webRootDir = servletContext.getRealPath

("/")
      def userDir = new File(webRootDir, "/payload/

${session.user.login}")
      userDir.mkdirs()
      uploadedFile.transferTo( new

File( userDir, uploadedFile.originalFilename))
    }
    if(!entryInstance.hasErrors()

&& entryInstance.save()) {
        flash.message = "Entry

${entryInstance.id} created"
        redirect(action:show,id:entryInstance.id)


 }
    else {
        render(view:'create',model:[entryInstance:entryInstance])


}
}
在 Web root 下創建 payload/jsmith 目錄後,就可以使用 uploadedFile.transferTo() 方法將文件 保存到磁盤。File.mkdirs() 方法是無損的,所以可以多次調用該方法,而不必擔心當目錄已經存在時會 丟失已有的文件。
接下來,將一個 String 字段添加到 Entry 類,以存儲 filename,如清單 9 所示。注意要添加一個 約束,使這個新字段同時為 blank(在 HTML 表單中)和 nullable(在數據庫中)。
清單 9. 將 filename 字段添加到 Entry 中
class Entry {
  static constraints = {
    title()
    summary(maxSize:1000)


    filename(blank:true, nullable:true)
    dateCreated()
    lastUpdated()


}
  static mapping = {
    sort "lastUpdated":"desc"
  }


static belongsTo = [author:User]
  String title
  String summary
  String

filename
  Date dateCreated
  Date lastUpdated
}
最後,將 filename 添加到 save 閉包中的 Entry 對象中。清單 10 顯示完整的 save 閉包:
清單 10. 將 filename 存儲在 Entry 中
def save = {
    def entryInstance = new Entry(params)
    entryInstance.author =

User.get(session.user.id)
    //handle uploaded file
    def uploadedFile =

request.getFile('payload')
    if(!uploadedFile.empty){
      println "Class:

${uploadedFile.class}"
      println "Name: ${uploadedFile.name}"


println "OriginalFileName: ${uploadedFile.originalFilename}"
      println

"Size: ${uploadedFile.size}"
      println "ContentType:

${uploadedFile.contentType}"
      def webRootDir = servletContext.getRealPath

("/")
      def userDir = new File(webRootDir, "/payload/

${session.user.login}")
      userDir.mkdirs()
      uploadedFile.transferTo( new

File( userDir, uploadedFile.originalFilename))
      entryInstance.filename =

uploadedFile.originalFilename
    }
    if(!entryInstance.hasErrors() &&

entryInstance.save()) {
        flash.message = "Entry ${entryInstance.id}

created"
        redirect(action:show,id:entryInstance.id)
    }
    else

{
        render(view:'create',model:[entryInstance:entryInstance])
    }
}
將上傳的文件保存到文件系統的另一種方法是將它們直接存儲在數據庫中。如果在 Entry 中創建一個 名為 payload 的 byte[] 字段,那麼可以完全繞過前面添加到 save 閉包的所有定制代碼。但是,如果 那樣做的話,您將錯過下一節中所有的趣事。
顯示上傳的文件
如果不將上傳的文件在某個地方顯示出來,那有何意義呢?打開 grails- app/views/entry/_entry.gsp,添加清單 11 中的代碼:
清單 11. 用於顯示上傳的圖像的 GSP 代碼
<div class="entry">
  <span class="entry-date">


    <g:longDate>${entryInstance.lastUpdated}</g:longDate> :

${entryInstance.author}
  </span>
  <h2><g:link action="show"

id="${entryInstance.id}">${entryInstance.title}</g:link></h2>


<p>${entryInstance.summary}</p>
  <g:if

test="${entryInstance.filename}">
    <p>
      <img

src="${createLinkTo(dir:'payload/'+entryInstance.author.login,


         file:''+entryInstance.filename)}"


alt="${entryInstance.filename}"


title="${entryInstance.filename}" />
    </p>


</g:if>
</div>
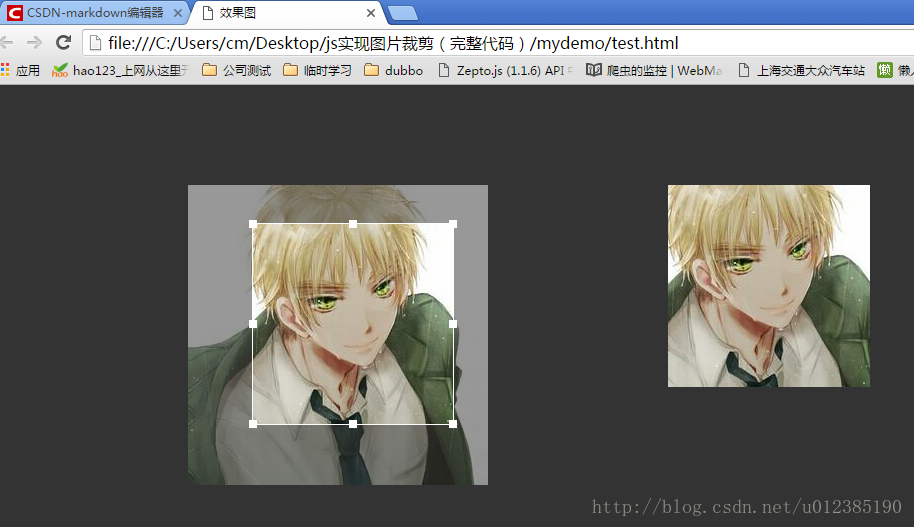
由於上傳文件是可選的,我將輸出包含在一個 <g:if> 塊中。如果 entryInstance.filename 字段被填充,則在一個 <img> 標記中顯示結果。
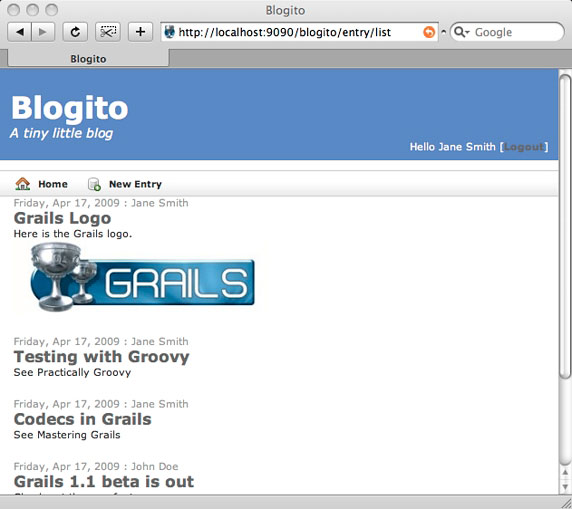
圖 2 顯示新的列表,同時還在顯眼的地方顯示上傳的 Grails 徽標:
圖 2. 顯示上傳的圖像
但是,如果用戶上傳其他東西,而不是圖像呢?這時就不是將更多的邏輯放入到 GSP 中了,最好的地 方是一個定制的 TagLib。
創建 TagLib
Blogito 在 grails-app/taglib 中已經有兩個 TagLib:DateTagLib.groovy 和 LoginTagLib.groovy 。在一個 TagLib 中可以定義任意數量的定制標記,但是這一次我建議創建一個新的 TagLib,以便按語 義將標記分組。在命令提示符下輸入 grails create-tag-lib Entry,並添加清單 12 中的代碼:
清單 12. 創建 displayFile 標記
class EntryTagLib {
  def displayFile = {attrs, body->
    def user = attrs

["user"]
    def filename = attrs["filename"]
    if(filename)

{
      def extension = filename.split("\\.")[-1]
      def userDir =

"payload/${user}"
      switch(extension.toUpperCase()){
        case

["JPG", "PNG", "GIF"]:
             def html =

"""
             <p>
               <img

src="${createLinkTo(dir:''+userDir,


file:''+filename)}"
                    alt="${filename}"


      title="${filename}" />
             </p>


"""
             out << html
             break
        case

"HTML":
             out << "p>html</p>"


  break
        default:
             out <<

"<p>file</p>"
             break
      }
    }else{


out << "<!-- no file -->"
    }
  }
}
不久後可以看到,該代碼創建一個 <g:displayFile> 標記,該標記需要兩個屬性:user 和 filename。如果 filename 屬性被填充,則取得文件擴展名,並將其轉換為大寫形式。
Groovy 中的 Switch 語句比 Java 中的對等物的靈活性要大得多。首先,可以在 String 上進行切換 (而 Java 語言只能在 int 上進行切換)。更令人驚奇的是,case 既可以指定一個條件列表 List,也 可以指定單個的條件。
有了這個 TagLib 後,可以大大簡化 _entry.gsp 局部模板,如清單 13 所示:
清單 13. 簡化的局部模板
<div class="entry">
  <span class="entry-date">


    <g:longDate>${entryInstance.lastUpdated}</g:longDate> :

${entryInstance.author}
  </span>
  <h2><g:link action="show"

id="${entryInstance.id}">${entryInstance.title}</g:link></h2>


<p>${entryInstance.summary}</p>
  <g:displayFile

filename="${entryInstance.filename}"


user="${entryInstance.author.login}" />
</div>
重新啟動 Grails,並再次上傳 Grails 徽標。在添加對其他文件類型的支持之前,應該確保 TagLib 重構沒有破壞已有的功能。
現在,可以確信仍可以上傳圖像。接下來就是添加對其他文件類型的支持,這只需在 switch 塊中實 現適當的 case。清單 14 演示如何處理上傳的 HTML 文件,以及為默認的 case 創建一個鏈接來下載該 文件:
清單 14. 完整的 switch/case 塊
class EntryTagLib {
  def displayFile = {attrs, body->
    def user = attrs

["user"]
    def filename = attrs["filename"]
    if(filename)

{
      def extension = filename.split("\\.")[-1]
      def userDir =

"payload/${user}"
      switch(extension.toUpperCase()){
        case

["JPG", "PNG", "GIF"]:
             //SNIP


break
        case "HTML":
             def webRootDir =

servletContext.getRealPath("/")
             out << new File

(webRootDir+"/"+userDir, filename).text
             break


default:
             def html = """
             <p>


      <a href="${createLinkTo(dir:''+userDir,


   file:''+filename)}">${filename}</a>
             </p>


   """
             out << html
             break
      }


   }else{
      out << "<!-- no file -->"
    }
  }
}
創建兩個新的文本文件,以便測試這個新的行為:一個名為 test.html,另一個名為 noextension。 將清單 15 中的內容添加到適當的文件中,上傳該文件,確認 TagLib 是否按預期顯示每個文件:
清單 15. 用於上傳的兩個示例文件
//test.html
<p>
This is some <b>test</b>

HTML.
</p>
<p>
Here is a link to the <a

href="http://grails.org">Grails</a>

homepage.
</p>
<p>
And here is a link to the
<img

src="http://grails.org/images/grails-logo.png">Grails

Logo</img>.
</p>
//noextension
This file doesn't have an

extension.
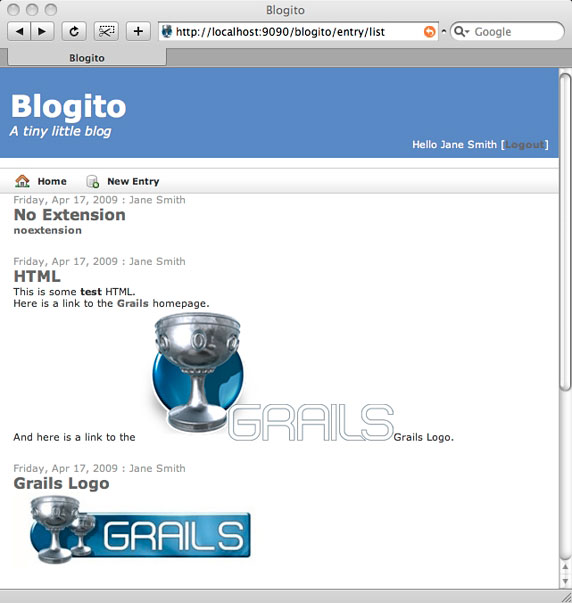
Web 浏覽器看上去應該如圖 3 所示:
圖 3. 顯示所有 3 種類型的上傳的文件
添加 Atom feed
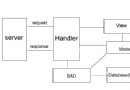
至此,您應該明白一種截然不同的模式構成。對於添加到 Grails 應用程序的每個新特性,很可能都 要涉及模型、視圖和控制器。您還可以額外添加局部模板或 TagLib。
將 Atom feed 添加到 Blogito 同樣也遵從該模式。雖然不要求更改模型,但最終要做所有其他的事 情。您將:
在 Entry 控制器中添加一個閉包,以處理 Atom 請求。
創建一個新的 GSP 頁面,用於以格式良好的 Atom 文檔的形式呈現結果。
創建一個新的局部模板和一個新的定制標記,以加快進程。
本來您可以安裝一個很好的 Feeds 插件,該插件可以為 Grails 應用程序添加 RSS 和 Atom 功能, 但是我認為您將發現,Atom 格式非常簡單,您自己完全可以應付。為證明這一點,您可以查看已有的 Atom feed 的源代碼,或者查看關於 Atom 的 Wikipedia 頁面最後的例子。您甚至可以閱讀 RFC 4287, 這是用於 Atom 格式的 IETF 規范。或者,您可以繼續閱讀本文,看看一個特定於 Grails 的解決方案。
首先,在 EntryController.groovy 中添加一個 atom 閉包,如清單 16 所示:
清單 16. 在 EntryController.groovy 中添加一個 atom 閉包
def atom = {

  if(!params.max) params.max = 10

  def list = Entry.list( params )

  def lastUpdated = list[0].lastUpdated

  [ entryInstanceList:list, lastUpdated:lastUpdated ]

}
這個閉包與標准的 list 閉包之間惟一的不同是增加了 lastUpdated 字段。由於該列表已經按 lastUpdated 排序(這要歸因於 Entry domain 類的 static mapping 塊中的 sort "lastUpdated":"desc" 設置),只需從該列表的第一個 Entry 中獲取該字段,就可以得到最近的日期。
接下來,創建 grails-app/views/entry/atom.gsp。添加清單 17 中的代碼:
清單 17. atom.gsp
<% response.setContentType("application/atom+xml")

%><feed xmlns="http://www.w3.org/2005/Atom">

  <title type="text">News from Blogito.org</title>

  <link rel="alternate" type="text/html" href="http://blogito.org/"/>

  <link rel="self" type="application/atom+xml"  href="http://blogito.org/entry/atom" />

  <updated><g:atomDate>${lastUpdated}</g:atomDate></updated>

  <author><name>Blogito.org</name></author>

  <id>tag:blogito.org,2009-01-01:entry/atom</id>

  <generator uri="http://blogito.org" version="0.1">Hand-rolled Grails  code</generator>


  <g:each in="${entryInstanceList}" status="i" var="entryInstance">

<g:render template="atomEntry" bean="${entryInstance}" var="entryInstance" />

  </g:each>


</feed>
可以看到,以上代碼做的第一件事是將 MIME 類型設置為 application/atom+xml。然後,提供關於該 feed 的一些基本的元數據:updated、author 和 generator 等。
如果想避免在整個 feed 中硬編碼 blogito.org,那麼可以讓 atom 閉包獲取 request.serverName, 將它賦給一個變量,並在響應 hashmap 中返回它,同時返回的還有 entryInstanceList 和 lastUpdated 。為了完全動態化,可以使用 request.scheme 返回 http,並使用 request.serverPort 返回 80。(唯 一要避免使用 request.serverName 變量的地方是在 id 中,稍後我將討論到這一點)。
對於 Atom feed 來說,以多種不同的格式提供鏈接並不少見。從 type 屬性可以看出,該 feed 提供 兩個鏈接:一個是 HTML 鏈接,另一個是 Atom 格式的指向它本身的鏈接。self 鏈接特別有用;如果有 一個不是自己下載的 Atom 文檔,那麼通過該鏈接就可以回溯到規范來源。
id 字段是 Atom feed 的惟一標識符,它不同於 URI 或可下載該 Atom feed 的當前位置。(您剛才 已經知道,<link> 元素提供 feed 的當前來源)。在這個例子中,我使用 Mark Pilgrim 提供的 技術生成一個惟一的、永久的 ID 字符串:將域名、feed 初次進入服務的日期和 URI 剩下的部分組合到 一起。
id 的各個部分遠不如整個字符串的惟一性重要。應確保這個 id 以後不會因為無意中傳入來自控制器 的變量而變化 — 對於 feed id,它應該既是惟一的,又是不變的。即使服務器的 address 發生變化, 如果 feed 的內容不變,那麼 feed id 也應該保持不變。
更新後的字段應該符合特定的格式 — 2003-12-13T18:30:02Z,或者確切地說是 RFC 3339。在已有的 grails-app/taglib/DateTagLib.groovy 文件中添加一個 atomDate 閉包,如清單 18 所示:
清單 18. 添加 atomDate 標記
import java.text.SimpleDateFormat


class DateTagLib {

  public static final String INCOMING_DATE_FORMAT = "yyyy-MM-dd hh:mm:ss"

  public static final String ATOM_DATE_FORMAT = "yyyy-MM-dd'T'HH:mm:ss'- 07:00'"


  def atomDate = {attrs, body ->

   def b = attrs.body ?: body()

   def d = new SimpleDateFormat(INCOMING_DATE_FORMAT).parse(b)

   out << new SimpleDateFormat(ATOM_DATE_FORMAT).format(d)

  }


  //SNIP

}
為了完成 Atom feed,創建 grails-app/views/entry/_atomEntry.gsp,並添加清單 19 中的代碼:
清單 19. _atomEntry.gsp 局部模板
<entry xmlns='http://www.w3.org/2005/Atom'>

  <author>

   <name>${entryInstance.author.name}</name>

  </author>

  <published><g:atomDate>${entryInstance.dateCreated} </g:atomDate></published>

  <updated><g:atomDate>${entryInstance.lastUpdated} </g:atomDate></updated>

  <link href="http://blogito.org/blog/${entryInstance.author.login}/

   ${entryInstance.title.encodeAsUnderscore()}" rel="alternate"

   title="${entryInstance.title}" type="text/html" />

  <id>tag:blogito.org,2009:/blog/${entryInstance.author.login}/

   ${entryInstance.title.encodeAsUnderscore()}</id>

  <title type="text">${entryInstance.title}</title>

  <content type="xhtml">

   <div xmlns="http://www.w3.org/1999/xhtml">

    ${entryInstance.summary}

   </div>

  </content>

</entry>
最後需要做的是向未經認證的用戶開放 Atom feed。調整 EntryController.groovy 中的 beforeInterceptor,如清單 20 所示:
清單 20. 向未經認證的用戶開放 Atom feed
class EntryController {


  def beforeInterceptor = [action:this.&auth, except:["index", "list",  "show", "atom"]]


  //SNIP

}
重新啟動 Grails,當訪問 http://localhost:9090/blogito/entry/atom 時,應該產生一個格式良好 的 Atom feed,如清單 21 所示:
清單 21. 格式良好的 Atom feed
<feed xmlns="http://www.w3.org/2005/Atom">

  <title type="text">News from Blogito.org</title>

  <link rel="alternate" type="text/html" href="http://blogito.org/"/>

  <link rel="self" type="application/atom+xml"  href="http://blogito.org/entry/atom" />

  <updated>2009-04-20T00:03:34-07:00</updated>

  <author><name>Blogito.org</name></author>

  <id>tag:blogito.org,2009-01-01:entry/atom</id>

  <generator uri="http://blogito.org" version="0.1">Hand-rolled Grails  code</generator>


<entry xmlns='http://www.w3.org/2005/Atom'>

  <author>

   <name>Jane Smith</name>

  </author>

  <published>2009-04-20T00:03:34-07:00</published>

  <updated>2009-04-20T00:03:34-07:00</updated>

  <link href="http://blogito.org/blog/jsmith/Testing_with_Groovy" rel="alternate"

   title="Testing with Groovy" type="text/html" />

  <id>tag:blogito.org,2009:/blog/jsmith/Testing_with_Groovy</id>

  <title type="text">Testing with Groovy</title>

  <content type="xhtml">

   <div xmlns="http://www.w3.org/1999/xhtml">

    See Practically Groovy

   </div>

  </content>


<!-- SNIP -->


</entry>

</feed>
雖然您對 Atom 的語義可能有點陌生,但使用 Grails 生成 Atom feed 的方法應該很簡單。
驗證 Atom feed
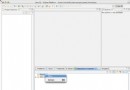
為了驗證這個 feed 是格式良好的 Atom,訪問 W3C 的在線 Feed Validator。如果 feed 在一個公共 可訪問的 URI 上,那麼可以將它粘貼到主頁上,並單擊 Check。您的 Atom feed 是在 localhost 上運 行的,所以單擊 Validate by Direct Input,並粘貼 feed 的輸出。結果如圖 4 所示:
圖 4. W3C 驗證器
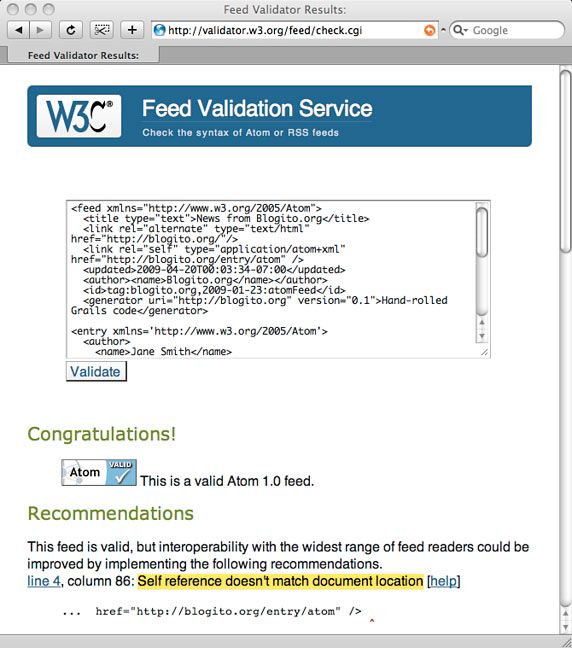
這裡沒有警告說 self 鏈接在提供的 URI 上不可用 — 事實顯然正是如此 — 您的 Atom feed 應該 被認定為是有效的、可生成的。
添加 feed 圖標
接下來再來個錦上添花,將該 feed 的鏈接添加到頭部。可以從網上很多地方下載無處不在的 feed 圖標;它是在開源 Mozilla 許可下發布的。
將該文件復制到 web-app/images 中,然後調整 grails-app/views/layouts/_header.gsp,如清單 22 所示:
清單 22. 將 feed 圖標添加到頭部
<div id="header">

  <p><g:link class="header-main"  controller="entry">Blogito</g:link></p>

  <p class="header-sub">

   <g:link controller="entry" action="atom">

   <img src="${createLinkTo(

     dir:'images',file:'feed-icon-28x28.png')}" alt="Subscribe"  title="Subscribe"/>

   </g:link>

   A tiny little blog

  </p>


  <div id="loginHeader">

   <g:loginControl />

  </div>

</div>
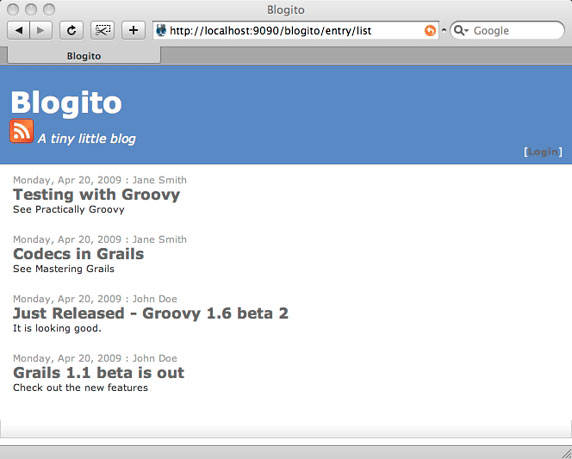
結果應該是一個如圖 5 所示的主頁:
圖 5. 含有 feed 圖標的 Blogito 主頁
結束語
在本文中,您添加了文件上傳功能,以及一個 Atom 聚合 feed。至此,Blogito 是一個可以使用的 非常小的博客服務器。它到底有多小?兩個 domain 類,兩個控制器,剛剛超過 250 行代碼。可以輸入 grails stats 進行驗證。清單 23 顯示了代碼的行數。
清單 23. Blogito 的大小
$ grails stats


  +----------------------+-------+-------+

  | Name         | Files | LOC |

  +----------------------+-------+-------+

  | Controllers     |   2 |  127 |

  | Domain Classes    |   2 |  34 |

  | Tag Libraries    |   3 |  66 |

  | Unit Tests      |   6 |  24 |

  | Integration Tests  |   1 |  10 |

  +----------------------+-------+-------+

  | Totals        |  14 |  261 |

  +----------------------+-------+-------+
雖然這個練習占用了 4 篇文章的篇幅,但是,如果您有較扎實的 Grails 方面的應用知識,實際上它 只需要一天的開發工作量。
希望您享受到將 Blogito 拼合起來的樂趣。下一次,您將通過相應的插件添加對評論、標簽等功能的 支持。在隨後一期文章中,我將進一步與您一起探索 Grails 插件。到那時,請享受精通 Grails 的樂趣 吧!