如果大家希望快速開發,一個類似Struts 2這樣的簡單方便的WEB框架必不可少。我們在開發DEMO使用的還是Struts 1.2.8,而且沒有不使用任何EL(表達式語言),導致頁面出現無數類似“<%= ((Integer) request.getAttribute("xx")).intValue()%6 %>”的代碼。Struts 1.x的Form Bean的麻煩使得有部分同事直接使用request.getParameter(String arg),繼而引入另一種麻煩。諸如此類的問題,在DEMO這樣時間緊迫的項目凸顯了Struts 1.x對快速開發的無能為力。不過沒辦法,由於我們項目中的幾個資深員工除了Struts 1.x外,對其它的WEB框架似乎不大感興趣。
言歸正傳,Interceptor(以下譯為攔截器)是Struts 2的一個強有力的工具,有許多功能(feature)都是構建於它之上,如國際化、轉換器,校驗等。
什麼是攔截器
攔截器,在AOP(Aspect-Oriented Programming)中用於在某個方法或字段被訪問之前,進行攔截然後在之前或之後加入某些操作。攔截是AOP的一種實現策略。
在Webwork的中文文檔的解釋為——攔截器是動態攔截Action調用的對象。它提供了一種機制可以使開發者可以定義在一個action執行的前後執行的代碼,也可以在一個action執行前阻止其執行。同時也是提供了一種可以提取action中可重用的部分的方式。
談到攔截器,還有一個詞大家應該知道——攔截器鏈(Interceptor Chain,在Struts 2中稱為攔截器棧Interceptor Stack)。攔截器鏈就是將攔截器按一定的順序聯結成一條鏈。在訪問被攔截的方法或字段時,攔截器鏈中的攔截器就會按其之前定義的順序被調用。
實現原理
Struts 2的攔截器實現相對簡單。當請求到達Struts 2的ServletDispatcher時,Struts 2會查找配置文件,並根據其配置實例化相對的攔截器對象,然後串成一個列表(list),最後一個一個地調用列表中的攔截器,如圖1所示。
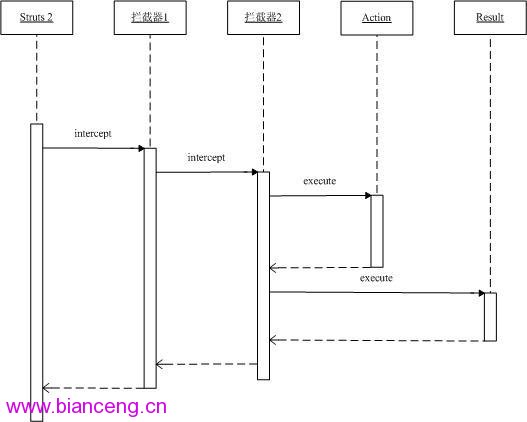
圖1 攔截器調用序列圖
已有的攔截器
Struts 2已經為您提供豐富多樣的,功能齊全的攔截器實現。大家可以到struts2-all-2.0.1.jar或struts2-core-2.0.1.jar包的struts-default.xml查看關於默認的攔截器與攔截器鏈的配置。
在本文使用是Struts 2的最新發布版本2.0.1。需要下載的朋友請點擊以下鏈接:
http://apache.justdn.org/struts/binaries/struts-2.0.1-all.zip
以下部分就是從struts-default.xml文件摘取的內容:
< interceptor name ="alias" class ="com.opensymphony.xwork2.interceptor.AliasInterceptor" />

< interceptor name ="autowiring" class ="com.opensymphony.xwork2.spring.interceptor.ActionAutowiringInterceptor" />

< interceptor name ="chain" class ="com.opensymphony.xwork2.interceptor.ChainingInterceptor" />

< interceptor name ="conversionError" class ="org.apache.struts2.interceptor.StrutsConversionErrorInterceptor" />

< interceptor name ="createSession" class ="org.apache.struts2.interceptor.CreateSessionInterceptor" />

< interceptor name ="debugging" class ="org.apache.struts2.interceptor.debugging.DebuggingInterceptor" />

< interceptor name ="external-ref" class ="com.opensymphony.xwork2.interceptor.ExternalReferencesInterceptor" />

< interceptor name ="execAndWait" class ="org.apache.struts2.interceptor.ExecuteAndWaitInterceptor" />

< interceptor name ="exception" class ="com.opensymphony.xwork2.interceptor.ExceptionMappingInterceptor" />

< interceptor name ="fileUpload" class ="org.apache.struts2.interceptor.FileUploadInterceptor" />

< interceptor name ="i18n" class ="com.opensymphony.xwork2.interceptor.I18nInterceptor" />

< interceptor name ="logger" class ="com.opensymphony.xwork2.interceptor.LoggingInterceptor" />

< interceptor name ="model-driven" class ="com.opensymphony.xwork2.interceptor.ModelDrivenInterceptor" />

< interceptor name ="scoped-model-driven" class ="com.opensymphony.xwork2.interceptor.ScopedModelDrivenInterceptor" />

< interceptor name ="params" class ="com.opensymphony.xwork2.interceptor.ParametersInterceptor" />

< interceptor name ="prepare" class ="com.opensymphony.xwork2.interceptor.PrepareInterceptor" />

< interceptor name ="static-params" class ="com.opensymphony.xwork2.interceptor.StaticParametersInterceptor" />

< interceptor name ="scope" class ="org.apache.struts2.interceptor.ScopeInterceptor" />

< interceptor name ="servlet-config" class ="org.apache.struts2.interceptor.ServletConfigInterceptor" />

< interceptor name ="sessionAutowiring" class ="org.apache.struts2.spring.interceptor.SessionContextAutowiringInterceptor" />

< interceptor name ="timer" class ="com.opensymphony.xwork2.interceptor.TimerInterceptor" />

< interceptor name ="token" class ="org.apache.struts2.interceptor.TokenInterceptor" />

< interceptor name ="token-session" class ="org.apache.struts2.interceptor.TokenSessionStoreInterceptor" />

< interceptor name ="validation" class ="com.opensymphony.xwork2.validator.ValidationInterceptor" />

< interceptor name ="workflow" class ="com.opensymphony.xwork2.interceptor.DefaultWorkflowInterceptor" />

< interceptor name ="store" class ="org.apache.struts2.interceptor.MessageStoreInterceptor" />

< interceptor name ="checkbox" class ="org.apache.struts2.interceptor.CheckboxInterceptor" />

< interceptor name ="profiling" class ="org.apache.struts2.interceptor.ProfilingActivationInterceptor" />
配置和使用攔截器
在struts-default.xml中已經配置了以上的攔截器。如果您想要使用上述攔截器,只需要在應用程序struts.xml文件中通過“<include file="struts-default.xml" />”將struts-default.xml文件包含進來,並繼承其中的struts-default包(package),最後在定義Action時,使用“<interceptor-ref name="xx" />”引用攔截器或攔截器棧(interceptor stack)。一旦您繼承了struts-default包(package),所有Action都會調用攔截器棧 ——defaultStack。當然,在Action配置中加入“<interceptor-ref name="xx" />”可以覆蓋defaultStack。
下面是關於攔截器timer使用的例子。首先,新建Action類tuotrial/TimerInterceptorAction.java,內容如下:
package tutorial;


import com.opensymphony.xwork2.ActionSupport;


public class TimerInterceptorAction extends ActionSupport {

   @Override

   public String execute() {

     try {

       // 模擬耗時的操作

       Thread.sleep( 500 );

     } catch (Exception e) {

       e.printStackTrace();

     }

     return SUCCESS;

   }

}
配置Action,名為Timer,配置文件如下:
<! DOCTYPE struts PUBLIC

     "-//Apache Software Foundation//DTD Struts Configuration 2.0//EN"

     "http://struts.apache.org/dtds/struts-2.0.dtd" >

< struts >

   < include file ="struts-default.xml" />

   < package name ="InterceptorDemo" extends ="struts-default" >

     < action name ="Timer" class ="tutorial.TimerInterceptorAction" >

       < interceptor-ref name ="timer" />

       < result > /Timer.jsp </ result >

     </ action >

   </ package >

</ struts >
至於Timer.jsp可以隨意寫些什麼到裡面。發布運行應用程序,在浏覽器的地址欄鍵入http://localhost:8080/Struts2_Interceptor/Timer.action,在出現Timer.jsp頁面後,查看服務器的後台輸出。
2006 - 12 - 6 14 : 27 : 32 com.opensymphony.xwork2.interceptor.TimerInterceptor doLog
信息: Executed action [ //Timer!execute ] took 2859 ms.
在您的環境中執行Timer!execute的耗時,可能上述的時間有些不同,這取決於您PC的性能。但是無論如何,2859 ms與500 ms還是相差太遠了。這是什麼原因呢?其實原因是第一次加載Timer時,需要進行一定的初始工作。當你重新請求Timer.action時,以上輸出會變為:
2006 - 12 - 6 14 : 29 : 18 com.opensymphony.xwork2.interceptor.TimerInterceptor doLog
信息: Executed action [ //Timer!execute ] took 500 ms.
OK,這正是我們期待的結果。上述例子演示了攔截器timer的用途——用於顯示執行某個action方法的耗時,在我們做一個粗略的性能調試時,這相當有用。
自定義攔截器
作為“框架(framework)”,可擴展性是不可或缺的,因為世上沒有放之四海而皆准的東西。雖然,Struts 2為我們提供如此豐富的攔截器實現,但是這並不意味我們失去創建自定義攔截器的能力,恰恰相反,在Struts 2自定義攔截器是相當容易的一件事。
大家在開始著手創建自定義攔截器前,切記以下原則:
攔截器必須是無狀態的,不要使用在API提供的ActionInvocation之外的任何東西。
要求攔截器是無狀態的原因是Struts 2不能保證為每一個請求或者action創建一個實例,所以如果攔截器帶有狀態,會引發並發問題。
所有的Struts 2的攔截器都直接或間接實現接口com.opensymphony.xwork2.interceptor.Interceptor。除此之外,大家可能更喜歡繼承類com.opensymphony.xwork2.interceptor.AbstractInterceptor。
以下例子演示通過繼承AbstractInterceptor,實現授權攔截器。
首先,創建授權攔截器類tutorial.AuthorizationInterceptor,代碼如下:
package tutorial;


import java.util.Map;


import com.opensymphony.xwork2.Action;

import com.opensymphony.xwork2.ActionInvocation;

import com.opensymphony.xwork2.interceptor.AbstractInterceptor;


public class AuthorizationInterceptor extends AbstractInterceptor {


   @Override

   public String intercept(ActionInvocation ai) throws Exception {

     Map session = ai.getInvocationContext().getSession();

     String role = (String) session.get( " ROLE " );

     if ( null != role) {

       Object o = ai.getAction();

       if (o instanceof RoleAware) {

         RoleAware action = (RoleAware) o;

         action.setRole(role);

       }

       return ai.invoke();

     } else {

       return Action.LOGIN;

     }

   }

}
以上代碼相當簡單,我們通過檢查session是否存在鍵為“ROLE”的字符串,判斷用戶是否登陸。如果用戶已經登陸,將角色放到Action中,調用Action;否則,攔截直接返回Action.LOGIN字段。為了方便將角色放入Action,我定義了接口tutorial.RoleAware,代碼如下:
package tutorial;


public interface RoleAware {

   void setRole(String role);

}
接著,創建Action類tutorial.AuthorizatedAccess模擬訪問受限資源,它作用就是通過實現RoleAware獲取角色,並將其顯示到ShowUser.jsp中,代碼如下:
package tutorial;


import com.opensymphony.xwork2.ActionSupport;


public class AuthorizatedAccess extends ActionSupport implements RoleAware {

   private String role;


   public void setRole(String role) {

     this .role = role;

   }


   public String getRole() {

     return role;

   }

   @Override

   public String execute() {

     return SUCCESS;

   }

}
以下是ShowUser.jsp的代碼:
<% @ page contentType = " text/html; charset=UTF-8 " %>

<% @taglib prefix = " s " uri = " /struts-tags " %>

< html >

< head >

   < title > Authorizated User </ title >

</ head >

< body >

   < h1 > Your role is: < s:property value ="role" /></ h1 >

</ body >

</ html >
然後,創建tutorial.Roles初始化角色列表,代碼如下:
package tutorial;


import java.util.Hashtable;

import java.util.Map;


public class Roles {

   public Map < String, String > getRoles() {

     Map < String, String > roles = new Hashtable < String, String > ( 2 );

     roles.put( " EMPLOYEE " , " Employee " );

     roles.put( " MANAGER " , " Manager " );

     return roles;

   }

}
接下來,新建Login.jsp實例化tutorial.Roles,並將其roles屬性賦予<s:radio>標志,代碼如下:
<% @ page contentType = " text/html; charset=UTF-8 " %>

<% @taglib prefix = " s " uri = " /struts-tags " %>

< html >

< head >

   < title > Login </ title >

</ head >

< body >

   < h1 > Login </ h1 >

   Please select a role below:

   < s:bean id ="roles" name ="tutorial.Roles" />

   < s:form action ="Login" >

     < s:radio list ="#roles.roles" value ="'EMPLOYEE'" name ="role" label ="Role" />

     < s:submit />

   </ s:form >

</ body >

</ html >
創建Action類tutorial.Login將role放到session中,並轉到Action類tutorial.AuthorizatedAccess,代碼如下:
package tutorial;


import java.util.Map;


import org.apache.struts2.interceptor.SessionAware;


import com.opensymphony.xwork2.ActionSupport;


public class Login extends ActionSupport implements SessionAware {

   private String role;

   private Map session;


   public String getRole() {

     return role;

   }

    public void setRole(String role) {

     this .role = role;

   }


   public void setSession(Map session) {

     this .session = session;

   }

   @Override

   public String execute() {

     session.put( " ROLE " , role);

     return SUCCESS;

   }

}
最後,配置struts.xml文件,內容如下:
<! DOCTYPE struts PUBLIC

     "-//Apache Software Foundation//DTD Struts Configuration 2.0//EN"

     "http://struts.apache.org/dtds/struts-2.0.dtd" >

< struts >

   < include file ="struts-default.xml" />

   < package name ="InterceptorDemo" extends ="struts-default" >

     < interceptors >

       < interceptor name ="auth" class ="tutorial.AuthorizationInterceptor" />

     </ interceptors >

     < action name ="Timer" class ="tutorial.TimerInterceptorAction" >

       < interceptor-ref name ="timer" />

       < result > /Timer.jsp </ result >

     </ action >

     < action name ="Login" class ="tutorial.Login" >

       < result type ="chain" > AuthorizatedAccess </ result >

     </ action >

     < action name ="AuthorizatedAccess" class ="tutorial.AuthorizatedAccess" >

       < interceptor-ref name ="auth" />

       < result name ="login" > /Login.jsp </ result >

       < result name ="success" > /ShowRole.jsp </ result >

     </ action >

   </ package >

</ struts >
發布運行應用程序,在浏覽器地址欄中輸入:http://localhost:8080/Struts2_Interceptor/AuthorizatedAccess.action。由於此時,session還沒有鍵為“ROLE”的值,所以返回Login.jsp頁面,如圖2所示:
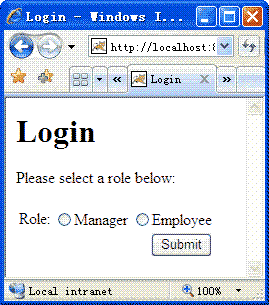
圖2 Login.jsp
選中Employee,點擊Submit,出現圖3所示頁面:
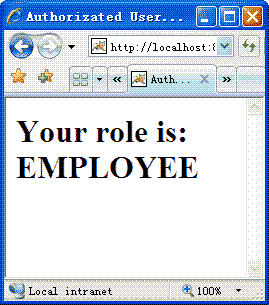
圖3 ShowRole.jsp
總結
攔截器是Struts 2比較重要的一個功能。通過正確地使用攔截器,我們可以編寫高可復用的代碼。