在Java中,GUI程序開發的目標之一是跨平台,而每種類型操作系統對屏幕的定義不一樣 ,所以Swing中引入了布局的概念,對子組件的位置和大小等信息進行定義。SWT中也采用了 布局方式,用戶可使用布局來控制組件中元素的位置和大小等信息。
另外,如果組件 沒有設置布局信息,也可以通過坐標進行相對定位。在介紹Control類的時候,其中有一個方 法“setBounds (int x, int y, int width, int height)”可以指定組件相對於 父組件的位置和組件的大小。在這種方式下,父組件大小和其他信息的改變不會對當前組件 有影響。復合組件常常包含多個控件,可以使用以下兩種方法安排這些控件。
(1) 絕對定位:為每個控件設置明確的 X 和 Y 位置(setBounds),並通過代碼設置一定的寬度 和高度。
(2)托管定位:每個控件的X、Y、寬度和高度都是通過 LayoutManager 設 置的。
在多數情況下,應該選擇使用 LayoutManagers,因為可以很容易地調整它們 來適應可變大小的 GUI。SWT 提供了一些常用的布局管理器供用戶使用;在布局管理器中, 每當重新設置復合組件的大小時,都需要進行定位。
布局管理器常常是專為某一個復 合組件設計的。一些布局管理器只使用它們自身的參數就可以控制,而另一些布局管理器還 需要其他參數(LayoutData),該參數是在設置布局管理器的復合組件中的每個控件上指定 的。SWT中常用的布局管理器有如下一些。
●FillLayout:子組件將以相同的大小填 充到父組件中。
● RowLayout:子組件將在父組件上一行或幾行顯示(設置相應的屬 性值,子組件會自動換行)。
●GridLayout:網格式布局,子組件可以指定占用父組 件中幾個格,以及組件填充哪幾個網格。
● FormLayout:可以通過FormAttachment以父組件或子組件的邊作為相對位置,進行精 確布局。
為組件添加布局信息的步驟如下。
1. 創建布局(Layout)類。
2. 通過窗口組件的setLayout方法設置相應的布局類。
3. 設置子組件的布局 信息。
當窗口組件設置了布局信息後,窗口組件顯示的時候將會調用相應的布局類對 窗口組件的子組件進行布局、定位和計算子組件大小的操作,從而使窗口組件以更好的方式 顯示在父組件中。下面將介紹Eclipse中提供的幾種常用的布局方式。
FillLayout布 局
FillLayout是非常簡單的一種布局方式,它會以同樣大小對父組件中的子組件進行 布局,這些子組件將以一行或一列的形式排列。
一般來說,用戶可以在任務欄、工具 欄中放置FillLayout布局,通過FillLayout布局對子組件進行定位,也可以當子組件只有一 個組件時,通過FillLayout布局填充整個父組件的空間。
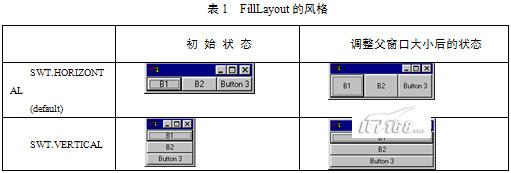
FillLayout的風格
FillLayout布局中,可以把子組件按水平或垂直的方式進行排列,這些風格是當創建 FillLayout實類時以參數形式指定的,如表1所示。
FillLayout布局實例
FillLayout是簡單而且很常用的布局,下面通過實例 展示FillLayout的布局效果,代碼如例程1所示。
例程1 FillLayoutSample.java
/**

* 為了節省篇幅,所有的import類已經被注 釋

* 讀者可以通過ctrl+shift+o快捷鍵,自動引入所依賴的類

* 如果有問題可 發郵件到ganshm@gmail.com

* */

public class FillLayoutSample {

Display display = new Display();

Shell shell = new Shell(display);

public FillLayoutSample() {

//新建FillLayout布局,設置子組件與水平方式排列

FillLayout fillLayout = new FillLayout(SWT.HORIZONTAL);

//指定子組件的 上、下邊距為多少像素

fillLayout.marginHeight = 25;

//指定子組件的左、右 邊距為多少像素

fillLayout.marginWidth = 25;

//指定子組件之間距離為多少 像素

fillLayout.spacing = 10;

//設定父組件的布局方式

shell.setLayout(fillLayout);

Button button1 = new Button(shell, SWT.PUSH);

button1.setText("button1");

Button button2 = new Button(shell, SWT.PUSH);

button2.setText("button number 2");

Button button3 = new Button(shell, SWT.PUSH);

button3.setText ("3");

shell.pack();

shell.open();

while (! shell.isDisposed()) {

if (!display.readAndDispatch()) {

display.sleep ();

}

}

display.dispose();

}

public static void main (String[] args) {

new FillLayoutSample();

}

}
程序中通過 marginHeight、marginWidth和spacing指定了邊距和子組件的間距,程序運行效果如圖1所示 。
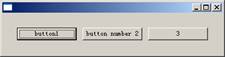
圖1 FillLayout布局實例
RowLayout布局
相對於FillLayout來說,RowLayout 比較靈活,功能也比較強。用戶可以設置布局中子元素的大小、邊距、換行及間距等屬性。
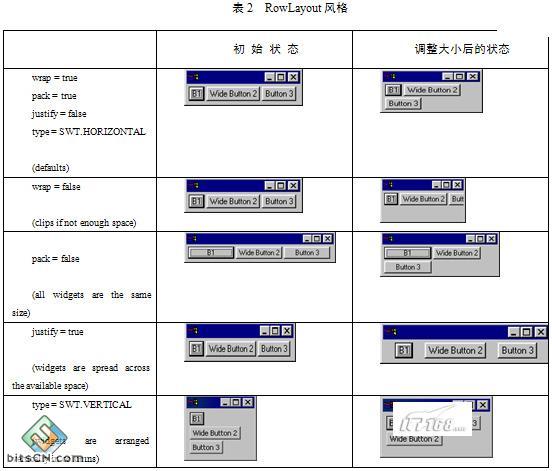
RowLayout的風格
RowLayout中可以相關的屬性設定布局的風格,用戶可以通 過“RowLayout.屬性”的方式設置RowLayout的布局風格,RowLayout中常用的屬 性如下。
●Wrap:表示子組件是否可以換行(true為可換行)。
●Pack:表 示子組件是否為保持原有大小(true為保持原有大小)。
●Justify:表示子組件是 否根據父組件信息做調整。
●MarginLeft:表示當前組件距離父組件左邊距的像素點 個數。
●MarginTop:表示當前組件距離父組件上邊距的像素點個數。
● MarginRight:表示當前組件距離父組件右邊距的像素點個數。
●MarginBottom:表 示當前組件距離父組件下邊距的像素點個數。
●Spacing:表示子組件之間的間距像 素點個數。
另外,RowLayout可以通過RowData設置每個子組件的大小,例如 “button.setLayoutData (new RowData(60, 60))”將設置buton的大小為 (60,60),RowLayout風格如表2所示。
RowLayout布局實例
RowLayout是很常用的布局,而且不太復雜,下面通過實例展 示RowLayout的布局效果,代碼如例程2所示。
例程2 RowLayoutExample.java
public class RowLayoutExample {

Display display;

Shell shell;

RowLayoutExample() {

display = new Display();

shell = new Shell(display);

shell.setSize(250, 150);

shell.setText("A RowLayout Example");

//新建RowLayout布局

RowLayout rowLayout = new RowLayout();

//子組件保持原有大小

rowLayout.pack = true;

//子組件可換行

rowLayout.wrap = true;

//根據父組件信息調整位置

rowLayout.justify = true;

//左邊距為30像素

rowLayout.marginLeft = 30;

//上邊距為30像素

rowLayout.marginTop = 30;

//設定父組件RowLayout布局

shell.setLayout(rowLayout);

final Text t = new Text(shell, SWT.SINGLE | SWT.BORDER);

final Button b = new Button(shell, SWT.BORDER);

final Button b1 = new Button(shell, SWT.BORDER);

//設置子組件大小

b1.setLayoutData(new RowData(60, 60));

b.setText("OK");

b1.setText("Cancel");

shell.open();

while (!shell.isDisposed()) {

if (!display.readAndDispatch())

display.sleep();

}

display.dispose();

}

public static void main(String[] argv) {

new RowLayoutExample();

}

}
程序中指定了邊距和子組件的間距,以及子組件大小的信息,程序運行效果如圖2所示。
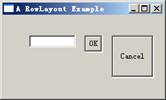
圖2 RowLayout布局實例
GridLayout布局
GridLayout 布局的功能非常強大 ,也是筆者常用的一種布局方式。GridLayout是網格式布局,它把父組件分成一個表格,默 認情況下每個子組件占據一個單元格的空間,每個子組件按添加到父組件的順序排列在表格 中。
GridLayout提供了很多的屬性,可以靈活設置網格的信息。另外,GridLayout 布局提供了GridData類,子組件可以設置相應的GridData,例如 “dogPhoto.setLayoutData(gridData)”,GridData可以設置每個組件當做單元 格的信息。
GridLayout的風格
GridLayout類提供了GridLayout 布局中劃分網 格的信息,主要通過以下幾個參數進行設置。
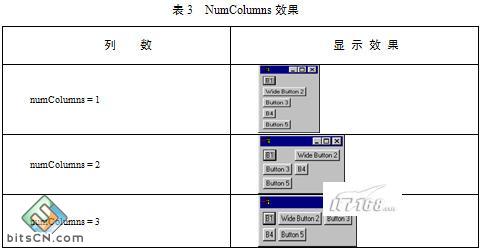
NumColumns:通過 “gridLayout.numColumns”屬性可以設置父組件中分幾列顯示子組件,如表3所 示。
MakeColumnsEqualWidth:通過“gridLayout. makeColumnsEqualWidth”屬性可以設置父組件中子組件是否有相同的列寬,當 MakeColumnsEqualWidth為true時表示每列的列寬相等。
●MarginLeft:表示當前組 件距離父組件左邊距的像素點個數。
●MarginRight:表示當前組件距離父組件右邊 距的像素點個數。
●MarginTop:表示當前組件距離父組件上邊距的像素點個數。
●MarginBottom:表示當前組件距離父組件下邊距的像素點個數。
● HorizontalSpacing:表示子組件的水平間距。
●VerticalSpacing:表示子組件的垂 直間距。
GridData的相關屬性
GridLayout布局的靈活之處在於它利用網格布局數據 GridData。通過GridData可以設置子組件在網格中的填充方式、大小邊距等信息,用戶可以 通過子組件的setLayoutData方法設置網格布局數據。
GridData可以控制子組件在網 格中的位置大小等相關顯示信息。GridData可以設置如下的一些屬性。
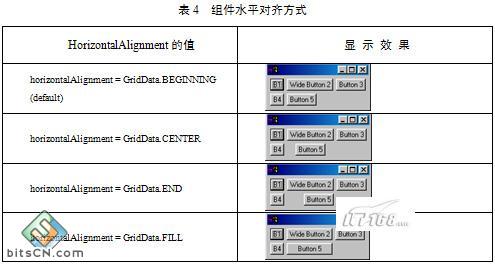
● HorizontalAlignment:表示水平對齊方式。水平對齊方式有如下幾種,如表4所示,其中 “Button5”按鈕顯示了水平對齊的方式。
●VerticalAlignment:表示子 組件的垂直對齊方式,值和水平方式一樣。
●HorizontalIndent:表示子組件水平偏 移多少像素。
此屬性和“horizontalAlignment = GridData.BEGINNING” 屬性一起使用。下面代碼設置“Button5”水平偏移4像素,如圖3所示。
GridData gridData = new GridData();

gridData.horizontalIndent = 4;

button5.setLayoutData(gridData);
HorizontalSpan:表示組件水平占 據幾個網格。
此屬性非常有用,當要設置一個組件占據幾個單元格時,需要設置 HorizontalSpan屬性。例如,下面代碼設置“Button5”按鈕水平占據兩個網格, 如圖4所示。
GridData gridData = new GridData();

gridData.horizontalAlignment = GridData.FILL;

gridData.horizontalSpan = 2;

button5.setLayoutData(gridData);
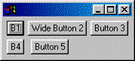
圖3 組件水平偏移
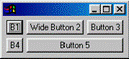
圖4 水平 占據網格
●VerticalSpan:表示組件垂直占據幾個網格。
● GrabExcessHorizontalSpace:表示當父組件大小改變時,子組件是否以水平方向搶占空間。
●GrabExcessVerticalSpace:表示當父組件大小改變時,子組件是否以垂直方向搶 占空間。
●WidthHint:表示子組件的寬度為多少像素(前提是未設置其他相關屬性 )。
●HeightHint:表示子組件的高度為多少像素(前提是未設置其他相關屬性)。
另外,GridData可以通過構造函數指定相應的屬性值,有興趣的讀者可以參考 GridData類的構造函數。
GridLayout 布局實例
為了更深入地理解GridLayout 布局,下面通過具體的實例演示如何構建一個比較復雜的布局窗口。通過本例的學習,讀者 可以比較好地掌握GridLayout布局,代碼如例程3所示。
例程3 ComplexGridLayoutExample.java
public class ComplexGridLayoutExample {

static Display display;

static Shell shell;

static Text dogName;

static Combo dogBreed;

static Canvas dogPhoto;

static Image dogImage;

static List categories;

static Text ownerName;

static Text ownerPhone;

public static void main(String[] args) {

display = new Display();

shell = new Shell(display);

shell.setText ("Dog Show Entry");

//新建GridLayout布局

GridLayout gridLayout = new GridLayout();

//把子組件分成3列顯示

gridLayout.numColumns = 3;

shell.setLayout(gridLayout);

new Label (shell, SWT.NONE).setText("Dog's Name:");

dogName = new Text (shell, SWT.SINGLE | SWT.BORDER);

//新建水平填充的GridData

GridData gridData = new GridData(GridData.HORIZONTAL_ALIGN_FILL);

//GridData的組件占 兩列顯示

gridData.horizontalSpan = 2;

dogName.setLayoutData (gridData);

new Label(shell, SWT.NONE).setText("Breed:");

dogBreed = new Combo(shell, SWT.NONE);

dogBreed.setItems(new String [] {"Collie", "Pitbull", "Poodle", "Scottie"});

dogBreed.setLayoutData(new GridData (GridData.HORIZONTAL_ALIGN_FILL));

Label label = new Label(shell, SWT.NONE);

label.setText("Categories");

label.setLayoutData (new GridData(GridData.HORIZONTAL_ALIGN_CENTER));

new Label(shell, SWT.NONE).setText("Photo:");

dogPhoto = new Canvas(shell, SWT.BORDER);

//gridData兩端填充

gridData = new GridData (GridData.FILL_BOTH);

//gridData最佳寬度和高度

gridData.widthHint = 80;

gridData.heightHint = 80;

//設置gridData的子組件垂直占3行

gridData.verticalSpan = 3;

dogPhoto.setLayoutData(gridData);

//添加畫 布的重畫事件

dogPhoto.addPaintListener(new PaintListener() {

public void paintControl(final PaintEvent event) {

if (dogImage != null) {

event.gc.drawImage(dogImage, 0, 0);

}

}

});

categories = new List(shell, SWT.MULTI | SWT.BORDER | SWT.V_SCROLL);

categories.setItems (new String [] {

"Best of Breed", "Prettiest Female", "Handsomest Male",

"Best Dressed", "Fluffiest Ears", "Most Colors",

"Best Performer", "Loudest Bark", "Best Behaved",

"Prettiest Eyes", "Most Hair", "Longest Tail",

"Cutest Trick"});

gridData = new GridData(GridData.HORIZONTAL_ALIGN_FILL | GridData.

VERTICAL_ALIGN_FILL);

gridData.verticalSpan = 4;

int listHeight = categories.getItemHeight() * 12;

Rectangle trim = categories.computeTrim(0, 0, 0, listHeight);

gridData.heightHint = trim.height;

categories.setLayoutData(gridData);

Button browse = new Button(shell, SWT.PUSH);

browse.setText("Browse...");

gridData = new GridData(GridData.HORIZONTAL_ALIGN_FILL);

gridData.horizontalIndent = 5;

browse.setLayoutData(gridData);

//添加 按鈕的選擇事件

browse.addSelectionListener(new SelectionAdapter() {

public void widgetSelected(SelectionEvent event) {

String fileName = new FileDialog(shell).open();

if (fileName != null) {

dogImage = new Image (display, fileName);

dogPhoto.redraw();

}

}

});

Button delete = new Button(shell, SWT.PUSH);

delete.setText("Delete");

gridData = new GridData(GridData.HORIZONTAL_ALIGN_FILL | GridData.

VERTICAL_ALIGN_BEGINNING);

gridData.horizontalIndent = 5;

delete.setLayoutData(gridData);

delete.addSelectionListener(new SelectionAdapter() {

public void widgetSelected(SelectionEvent event) {

if (dogImage != null) {

dogImage.dispose();

dogImage = null;

dogPhoto.redraw();

}

}

});

Group ownerInfo = new Group (shell, SWT.NONE);

ownerInfo.setText("Owner Info");

gridLayout = new GridLayout();

gridLayout.numColumns = 2;

ownerInfo.setLayout(gridLayout);

gridData = new GridData (GridData.HORIZONTAL_ALIGN_FILL);

gridData.horizontalSpan = 2;

ownerInfo.setLayoutData(gridData);

new Label(ownerInfo, SWT.NONE).setText ("Name:");

ownerName = new Text(ownerInfo, SWT.SINGLE | SWT.BORDER);

ownerName.setLayoutData(new GridData (GridData.FILL_HORIZONTAL));

new Label(ownerInfo, SWT.NONE).setText ("Phone:");

ownerPhone = new Text(ownerInfo, SWT.SINGLE | SWT.BORDER);

ownerPhone.setLayoutData(new GridData (GridData.FILL_HORIZONTAL));

Button enter = new Button(shell, SWT.PUSH);

enter.setText("Enter");

gridData = new GridData (GridData.HORIZONTAL_ALIGN_END);

gridData.horizontalSpan = 3;

enter.setLayoutData(gridData);

enter.addSelectionListener(new SelectionAdapter() {

public void widgetSelected(SelectionEvent event) {

System.out.println("\nDog Name: " + dogName.getText());

System.out.println("Dog Breed: " + dogBreed.getText());

System.out.println("Owner Name: " + ownerName.getText());

System.out.println("Owner Phone: " + ownerPhone.getText());

System.out.println("Categories:");

String cats[] = categories.getSelection();

for (int i = 0; i < cats.length; i++) {

System.out.println("\t" + cats[i]);

}

}

});

shell.pack();

shell.open();

while (!shell.isDisposed()) {

if (! display.readAndDispatch()) display.sleep();

}

if (dogImage != null) {

dogImage.dispose();

}

}

}
程序中構建了一個比較復雜 的窗口,設置了GridLayout的布局信息和相關的GridData網格數據信息,程序運行效果如圖5 所示。
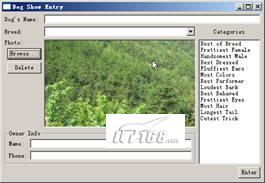
圖5 GridLayout布局實例
注意:每個GridData都必須有單獨的實例,幾個子組件不能 夠共用同一個GridData(即使幾個組件有相同屬性的GridData也必須新建幾個實例)。
自定義布局
在SWT中,用戶可以通過setLayout設置組件的布局信息。布局對 象會根據父組件的大小和子組件的布局信息計算出每個子組件的位置和大小,使整個布局空 間符合用戶的需求。下面將介紹如何創建自己的布局類,實現用戶自定義的布局。
Layout類
在SWT中,所有的布局類都繼承於Layout抽象類。Layout有兩個抽象 方法。
1. computeSize (Composite composite, int wHint, int hHint, boolean flushCache)

2. layout (Composite composite, boolean flushCache)
computeSize方法負責計算組件所有子組件所占的高度和寬度,並返回一個Point 類型的變量(width,height)。layout方法負責計算子組件的大小和位置,並按計算出來的 位置排列子組件。
創建自己的布局類
如果用戶希望組件按自己的方式進行布 局,可以創建自己的布局類,實現自己的布局。要實現自己的布局,用戶要繼承Layout類, 並實現layout方法和computeSize方法。下面將實現一個簡單的按列進行布局的布局類,在此 布局中,所有的子組件將按一列顯示,並且子組件的寬度相等,代碼如例程4所示。
例程4 ColumnLayout.java
public class ColumnLayout extends Layout {

public static final int MARGIN = 4;

public static final int SPACING = 2;

Point [] sizes;

int maxWidth, totalHeight;

protected Point computeSize(Composite composite, int wHint, int hHint,

boolean flushCache) {

Control children[] = composite.getChildren();

if (flushCache || sizes == null || sizes.length != children.length) {

initialize(children);

}

int width = wHint, height = hHint;

if (wHint == SWT.DEFAULT) width = maxWidth;

if (hHint == SWT.DEFAULT) height = totalHeight;

return new Point(width + 2 * MARGIN, height + 2 * MARGIN);

}

protected void layout(Composite composite, boolean flushCache) {

Control children[] = composite.getChildren();

if (flushCache || sizes == null || sizes.length != children.length) {

initialize(children);

}

Rectangle rect = composite.getClientArea();

int x = MARGIN, y = MARGIN;

//計算最大寬度

int width = Math.max(rect.width - 2 * MARGIN, maxWidth);

for (int i = 0; i < children.length; i++) {

int height = sizes[i].y;

//設置子組件 的位置

children[i].setBounds(x, y, width, height);

//計算當前組件的y軸 的坐標

y += height + SPACING;

}

}

void initialize(Control children[]) {

maxWidth = 0;

totalHeight = 0;

sizes = new Point [children.length];

for (int i = 0; i < children.length; i++) {

//計 算子組件的大小

sizes[i] = children[i].computeSize(SWT.DEFAULT, SWT.DEFAULT, true);

maxWidth = Math.max(maxWidth, sizes[i].x);

totalHeight += sizes [i].y;

}

totalHeight += (children.length - 1) * SPACING;

}

}
在ColumnLayout類中,通過layout方法對子組件重新計算位置,並設置子組件的 位置。為了驗證ColumnLayout類,下面通過ColumnLayoutTest類測試ColumnLayout類的效果 ,代碼如例程5所示。
例程5 ColumnLayoutTest.java
public class ColumnLayoutTest {

static Shell shell;

static Button button3;

public static void main (String[] args) {

Display display = new Display();

shell = new Shell (display);

shell.setLayout(new ColumnLayout());

new Button(shell, SWT.PUSH).setText("B1");

new Button(shell, SWT.PUSH).setText ("Very Wide Button 2");

(button3 = new Button(shell, SWT.PUSH)).setText("Button 3");

new Text(shell, SWT.NONE).setText ("text");

Button grow = new Button(shell, SWT.PUSH);

grow.setText("Grow Button 3");

// 添加選擇組件監聽器

grow.addSelectionListener(new SelectionAdapter() {

public void widgetSelected(SelectionEvent e) {

button3.setText("Extreemely Wide Button 3");

//組件大小改變後通知父組件進行重新布局

shell.layout ();

shell.pack();

}

});

Button shrink = new Button(shell, SWT.PUSH);

shrink.setText("Shrink Button 3");

shrink.addSelectionListener(new SelectionAdapter() {

public void widgetSelected(SelectionEvent e) {

button3.setText("Button 3");

//組件大小改變後通知父組件進行重新布局

shell.layout();

shell.pack ();

}

});

shell.pack();

shell.open();

while (! shell.isDisposed()) {

if (!display.readAndDispatch()) display.sleep();

}

}

}
當選擇“Grow Button 3”組件後,layout方法會 根據子組件的最大寬度調整所有子組件的寬度,程序運行效果如圖6所示。

原始大小
寬度改變後
圖6 自己定義布局
本節通過實例介紹了幾種常用的布局 方式,讀者可以通過這幾種布局方式實現SWT中大多數的布局需求。另外還有一種常用的布局 FormLayout,有興趣讀者可以自行研究,在這裡不一一介紹。
如果有某些比較特殊的 要求,讀者可以嘗試修改布局類,以適應相關的布局。讀者應該掌握如何設置組件相應的布 局信息,掌握如何使用幾種方式進行布局,特別是GridLayout布局方式。在有特殊需要的時 候要能夠修改布局類以適應自己的要求。