組件模型的關鍵考驗就是:能否從第三方供應商購買組件,並把它們插入應用程序?與可 購買可視 Swing 組件一樣,也可以購買 Java ServerFaces (JSF) 組件!需要一個好玩的日 歷?可以在開源實現和商業組件之間選擇。可以選擇購買一個,而不是自行開發復雜的基於 Web 的 GUI 組件。
JSF 擁有一個與 AWT 的 GUI 組件模型類似的組件模型。可以用 JSF 創建可重用組件。 但不幸的是,存在一個誤解:用 JSF 創建組件很困難。不要相信這些從未試過它的人們的 FUD!開發 JSF 組件並不困難。由於不用一遍又一遍重復相同的代碼,可以節約時間。一旦 創建了組件,就可以容易地把組件拖到任何 JSP、甚至任何 JSF 表單中,如果正在處理的站 點有 250 個頁面,這就很重要了。JSF 的大多數功能來自基類。因為所有的繁重工作都由 API 和基類完成,所以 JSF 把組件創建變得很容易。
貫穿這個系列,我一直在試圖幫助您克服造成許多 Java 開發人員逃避使用 JSF 技術的 FUD。我討論了對這項技術的基本誤解,介紹了它的底層框架和它最有價值的開發特性。有了 這些基礎工作之後,我認為您已經可以采取行動,開發自己的定制 JSF 組件了。使用 JSF 的東西,我敢保證要比您想像的要更加容易,而且從節約的時間和精力上來說,回報如此之 多,多得不能忽略。
這篇文章中的示例是用 JDK 1.5 和 Tomcat 開發的。請單擊頁面頂部的 示例代碼 下載 示例源代碼。注意,與以前的文章不同,這篇文章沒有關聯的 build 文件,因為我特意把它 留給您作為一個練習了。只要設置 IDE 或編譯器,把 /src 中的類編譯到 /webapp/WEB- INF/classes,並在 /webapp/WEB-INF/lib 中包含所有 JAR 文件(以及 servlet-api.jar 和 jsp-api.jar,它們包含在 Tomcat 中)。
JSF 組件模型
JSF 組件模型與 AWT GUI 組件模型類似。它有事件和屬性,就像 Swing 組件模型一樣。 它也有包含組件的容器,容器也是組件,也可以由其他容器包含。從理論上說,JSF 組件模 型分離自 HTML 和 JSP。JSF 自帶的標准組件集裡面有 JSP 綁定,可以生成 HTML 渲染。
JSF 組件的示例包括日歷輸入組件和 HTML 富文本輸入組件。您可能從來沒時間去編寫這 樣的組件,但是如果它們已經存在,那會如何呢?通過把常用功能變成商品,組件模型降低 了向 Web 應用程序添加更多功能的門檻。
組件的功能通常圍繞著兩個動作:解碼和編碼數據。解碼 是把進入的請求參數轉換成組 件的值的過程。編碼 是把組件的當前值轉換成對應的標記(也就是 HTML)的過程。
JSF 框架提供了兩個選項用於編碼和解碼數據。使用直接實現 方式,組件自己實現解碼 和編碼。使用委托實現 方式,組件委托渲染器進行編碼和解碼。如果選擇委托實現,可以把 組件與不同的渲染器關聯,會在頁面上以不同的方式渲染組件;例如多選列表框和一列復選 框。
因此,JSF 組件由兩部分構成:組件和渲染器。JSF 組件 類定義 UI 組件的狀態和行為 ;渲染器 定義如何從請求讀取組件、如何顯示組件 —— 通常通過 HTML 渲染。渲染器把組 件的值轉換成適當的標記。事件排隊和性能驗證發生在組件內部。
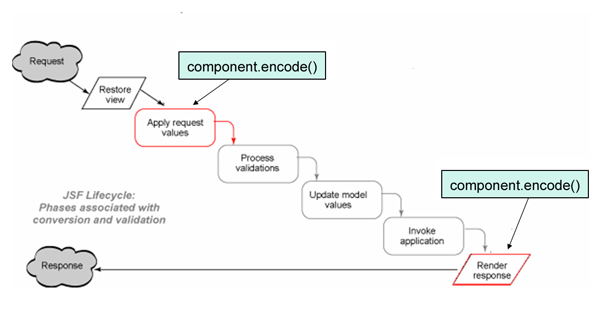
在圖 1 中可以看到數據編碼和解碼出現在 JSF 生命周期中的什麼階段(到現在,我希望 您已經熟悉 JSF 生命周期了)。
圖 1. JSF 生命周期和 JSF 組件
更多組件概念
所有 JSF 組件的基類是 UIComponent。在開發自己的組件時,需要繼承 UIComponentBase,它擴展了 UIComponent 並提供了 UIComponent 中所有抽象方法的默認實 現。
組件擁有雙親和標識符。每個組件都關聯著一個組件類型,組件類型用於在 face 的上下 文配置文件(faces-config.xml)中登記組件。可以用 JSF-EL (表達式語言)把 JSF 組件 綁定到受管理的 bean 屬性。可以把表達式關聯到組件上的任何屬性,這樣就允許用 JSF-EL 設置組件的屬性值。在創建使用 JSF-EL 綁定的組件屬性時,需要創建值綁定表達式。在調 用綁定屬性的 getter 方法時,除非 setter 方法已經設置了值,否則 getter 方法必須用 值綁定獲得值。
組件可以作為 ValueHolder 或 EditableValueHolder。ValueHolder 與一個或多個 Validator 和 Converter 相關聯;所以 JSF UI 組件也與 Validator 和 Converter 關聯( 請參閱 參考資料 獲得更多關於 JSF 驗證和轉換的內容。)
像表單字段組件這樣的組件擁有一個 ValueBinding,它必須綁定到 JavaBean 的讀寫屬 性。組件可以調用 getParent 方法訪問它們的雙親,也可以調用 getChildren 方法訪問它 們的子女。組件也可以有 facet 組件,facet 組件是當前組件的子組件,可以調用 getFacets 方法訪問它,這個方法返回一個映射。Facets 是著名的子組件。
這裡描述的許多組件的概念將會是接下來展示的示例的一部分,所以請記住它們!
JSF 樣式的 Hello World!
我們用一個又好又容易的示例來開始 JSF 組件的開發:我將展示如何渲染 Label 標記( 示例:<label>Form Test</label>)。
下面是我要采取的步驟:
擴展 UIComponent
創建一個類,擴展 UIComponent
保存組件狀態
用 faces-config.xml 登記組件
定義渲染器或者內聯地實現它
覆蓋 encode
覆蓋 decode
用 faces-config.xml 登記渲染器
創建定制標記,繼承 UIComponentTag
返回渲染器類型
返回組件類型
設置可能使用 JSF 表達式的屬性
Label 示例將演示 JSF 組件開發的以下方面:
創建組件
直接實現渲染器
編碼輸出
把定制標記與組件關聯
返回 圖 1,可以看到在這個示例中會有兩個生命周期屬性在活動。它們是 Apply Request Value 和 Render Response。
在圖 2 中,可以看到在 JSP 中如何使用 Label 標記的(<label>Form Test</label>)。
圖 2. 在 JSP 中使用 JSF 標記
第 1 步:擴展 UIComponent
第一步是創建一個組件,繼承 UIOutput,後者是 UIComponent 的子類。 除了繼承這個 類之外,我還添加了組件將會顯示的 label 屬性,如清單 1 所示:
清單 1. 繼承 UIComponent 並添加 label
import java.io.IOException;

import javax.faces.component.UIOutput;

import javax.faces.context.FacesContext;

import javax.faces.context.ResponseWriter;

public class LabelComponent extends UIOutput{

   private String label;

   public String getLabel() {

     return label;

   }

   public void setLabel(String label) {

     this.label = label;

   }

...
接下來要做的是保存組件狀態。JSF 通常通過會話、隱藏表單字段、cookies 等進行實際 的存儲和狀態管理。(這通常是用戶配置的設置)。要保存組件狀態,需要覆蓋組件的 saveState 和 restoreState 方法,如清單 2 所示:
清單 2. 保存組件狀態
  @Override

   public Object saveState(FacesContext context) {

     Object values[] = new Object[2];

     values[0] = super.saveState(context);

     values[1] = label;

     return ((Object) (values));

   }

   @Override

   public void restoreState(FacesContext context, Object state) {

     Object values[] = (Object[])state;

     super.restoreState(context, values[0]);

     label = (String)values[1];

   }
可以注意到,我使用的是 JDK 1.5。我對編譯器進行了設置,所以我必須指定 override 注釋,以便指明哪些方法要覆蓋基類的方法。這樣做可以更容易地標識出 JSF 的鉤子在哪。
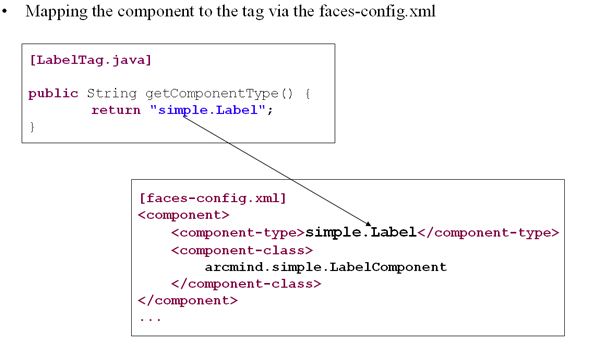
創建組件的最後一步是用 faces-config.xml 登記它,如下所示:
<faces-config>

  <component>

    <component-type>simple.Label</component-type>

    <component-class>

     arcmind.simple.LabelComponent

    </component-class>

  </component>

...
第 2 步:定義渲染器
下面要做的是內聯地定義渲染器的功能。稍後我會介紹如何創建獨立的渲染器。現在,先 從編碼 Label 組件的輸出、顯示 label 開始,如清單 3 所示:
清單 3. 編碼組件的輸出
public class LabelComponent extends UIOutput{

   ...

   public void encodeBegin(FacesContext context)

           throws IOException {

     ResponseWriter writer =

       context.getResponseWriter();

     writer.startElement("label", this);

             writer.write(label);

             writer.endElement("label");

             writer.flush();

   }

   ...

}
注意,響應寫入器(javax.faces.context.ResponseWriter)可以容易地處理 HTML 這樣 的標記語言。清單 3 的代碼輸出 <label> 元素體內的 label 的值。
下面顯示的 family 屬性用來把 Label 組件與渲染器關聯。雖然目前 Label 組件還不需 要這個屬性(因為還沒有獨立的渲染器),但是在這篇文章後面,在介紹如何創建獨立渲染 器的時候,會需要它。
public class LabelComponent extends UIOutput{

   ...

   public String getFamily(){

     return "simple.Label";

   }

   ...

}
插曲:研究 JSF-RI
如果正在使用來自 Sun Microsystems 的 JSF 參考實現(不是 MyFaces 實現),那麼就 不得不在組件創建代碼中添加下面一段:
public void encodeEnd(FacesContext context)

       throws IOException {

   return;

}

public void decode(FacesContext context) {

   return;

}
Sun 的 JSF RI 期望,在組件沒有渲染器的時候,渲染器會發送一個空指針異常。 MyFaces 實現不要求處理這個需求,但是在代碼中包含以上方法依然是個好主意,這樣組件 既可以在 MyFaces 環境中工作也可以在 JSF RI 環境中工作了。
第 3 步:創建定制標記
JSF 組件不是天生綁定到 JSP 上的。要連接起 JSP 世界和 JSF 世界,需要能夠返回組 件類型的定制標記(然後在 faces-context 文件中登記)和渲染器,如圖 3 所示。
圖 3. 連接 JSF 和 JSP
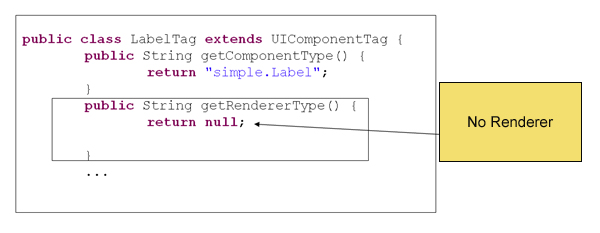
注意,由於沒有獨立的渲染器,所以可以給 getRendererType() 返回 null 值。還請注 意,必須已經把 label 屬性的值從定制標記設置到組件上,如下所示:
[LabelTag.java]

public class LabelTag extends UIComponentTag {

…

protected void setProperties(UIComponent component) {

   /* you have to call the super class */

   super.setProperties(component);

   ((LabelComponent)component).setLabel(label);

}
記住,Tag 設置從 JSP 到 Label 組件的綁定,如圖 4 所示。
圖 4. 綁定 JSF 和 JSP
現在要做的全部工作就是創建一個 TLD(標記庫描述符)文件,以登記定制標記,如清單 4 所示:
清單 4. 登記定制標記
[arcmind.tld]

<taglib>

  <tlib-version>0.03</tlib-version>

  <jsp-version>1.2</jsp-version>

  <short-name>arcmind</short-name>

  <uri>http://arcmind.com/jsf/component/tags</uri>

  <description>ArcMind tags</description>


  <tag>

    <name>slabel</name>

    <tag-class>arcmind.simple.LabelTag</tag-class>

    <attribute>

     <name>label</name>

     <description>The value of the label</description>

    </attribute>

  </tag>

...
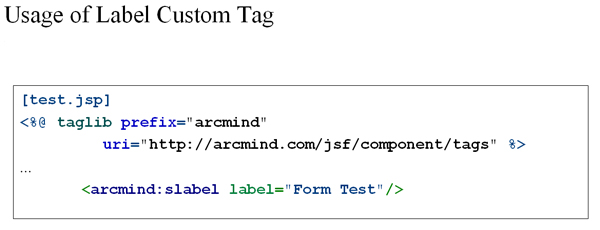
一旦定義了 TLD 文件,就可以開始在 JSP 中使用標記了,如下面示例所示:
[test.jsp]

<%@ taglib prefix="arcmind"

     uri="http://arcmind.com/jsf/component/tags" %>

       ...

   <arcmind:slabel label="Form Test"/>
現在就可以了 —— 開發一個簡單的 JSP 組件不需要更多了。但是如果想創建稍微復雜 一些的組件,針對更復雜的使用場景時該怎麼辦?請繼續往下看。
復合組件
在下一個示例中,我將介紹如何創建這樣一個組件(和標記),它可以記住最後一個人離 開的位置。Field 組件把多個組件的工作組合到一個組件中。復合組件是 JSF 組件開發的重 點,會節約大量時間!
Field 組件把標簽、文本輸入和消息功能組合到一個組件。Field 的文本輸入功能允許用 戶輸入文本。如果有問題(例如輸入不正確),它的標簽功能會顯示紅色,還會顯示星號(* )表示必需的字段。它的消息功能允許它在必要的時候寫出出錯消息。
Field 組件示例演示了以下內容:
UIInput 組件
處理值綁定和組件屬性
解碼來自請求參數的值
處理出錯消息
與 Label 組件不同,Field 組件使用獨立渲染器。如果為一個基於 HTML 的應用程序開 發組件,那麼不要費力使用獨立渲染器。這麼做是額外的無用功。如果正在開發許多 JSF 組 件,打算賣給客戶,而針對的客戶又不止一個,那麼就需要獨立的渲染器了。簡而言之,渲 染器適用於商業框架的開發人員,不適用於開發內部 Web 應用程序的應用程序開發人員。
了解代碼
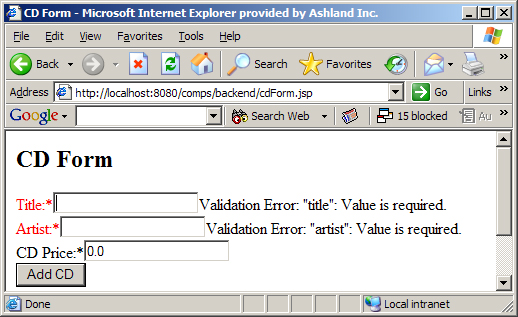
由於我已經介紹了創建組件、定義渲染器以及創建定制標記的基本步驟,所以這次我讓代 碼自己說話,我只點出幾個重要的細節。在清單 5 中,可以看到在典型的應用程序示例中如 何使用 Field 標記的:
清單 5. Field 標記
<f:view>

  <h2>CD Form</h2>


  <h:form id="cdForm">


   <h:inputHidden id="rowIndex" value="#{CDManagerBean.rowIndex}" />


     <arcmind:field id="title"

              value="#{CDManagerBean.title}"

              label="Title:"

              errorStyleClass="errorText"

              required="true" /> <br />


     <arcmind:field id="artist"

              value="#{CDManagerBean.artist}"

              label="Artist:"

              errorStyleClass="errorText"

              required="true" /> <br />


     <arcmind:field id="price"

              value="#{CDManagerBean.price}"

              label="CD Price:"

              errorStyleClass="errorText"

              required="true">

      <f:validateDoubleRange maximum="1000.0" minimum="1.0"/>

     </arcmind:field>
以上標記輸出以下 HTML:
<label style="" class="errorText">Artist*</label>

<input type="text" id="cdForm:artist "

    name=" cdForm:artist " />

Artist is blank, it must contain characters
圖 5 顯示了浏覽器中這些內容可能顯示的效果。
圖 5. Field 組件
清單 6 顯示了創建 Field 組件的代碼。因為這個組件負責輸入文本而不僅僅是輸出它( 像 Label 那樣),所以要從繼承 UIInput 開始,而不是從繼承 UIOutput 開始。
清單 6. Field 繼承 UIInput
package com.arcmind.jsfquickstart;

import javax.faces.component.UIInput;

import javax.faces.context.FacesContext;

/**

* @author Richard Hightower

*

*/

public class FieldComponent extends UIInput {

   private String label;

   @Override

   public Object saveState(FacesContext context) {

     Object values[] = new Object[2];

     values[0] = super.saveState(context);

     values[1] = label;

     return ((Object) (values));

   }

   @Override

   public void restoreState(FacesContext context, Object state) {

     Object values[] = (Object[])state;

     super.restoreState(context, values[0]);

     label = (String)values[1];

   }


   public FieldComponent (){

     this.setRendererType("arcmind.Field");

   }

   /**

   * @return Returns the label.

   */

   public String getLabel() {

     return label;

   }

   /**

   * @param label

   * The label to set.

   */

   public void setLabel(String label) {

     this.label = label;

   }


   @Override

   public String getFamily() {

     return "arcmind.Field";

   }

   public boolean isError() {

     return !this.isValid();

   }

}
可以注意到,代表片段中遺漏了編碼方法。這是因為編碼和解碼發生在獨立的渲染器中。 我稍後會介紹它。
值綁定和組件屬性
雖然 Label 組件只有一個屬性(JSP 屬性),可是 Field 組件卻有多個屬性,即 label 、errorStyle、errorStyleClass 和 value。label 和 value 屬性位於 Field 組件的核心 ,而 errorStyle 和 errorStyleClass 是特定於 HTML 的。因為這些屬性是特定於 HTML 的 ,所以不需要讓它們作為 Field 組件的屬性;相反,只是把它們作為組件屬性進行傳遞,只 有渲染器知道這些屬性。
像使用 Label 組件時一樣,需要用定制標記把 Field 組件綁定到 JSP,如清單 7 所示 :
清單 7. 為 FieldComponent 創建定制標記
/*

* Created on Jul 19, 2004

*

*/

package com.arcmind.jsfquickstart;

import javax.faces.application.Application;

import javax.faces.component.UIComponent;

import javax.faces.context.FacesContext;

import javax.faces.el.ValueBinding;

import javax.faces.webapp.UIComponentTag;

/**

* @author Richard Hightower

*

*/

public class FieldTag extends UIComponentTag {

   private String label;

   private String errorStyleClass="";

   private String errorStyle="";

   private boolean required;

   private String value="";


   /**

    * @return Returns the label.

    */

   public String getLabel() {

      return label;

   }

   /**

    * @param label The label to set.

    */

   public void setLabel(String label) {

      this.label = label;

   }

   /**

    * @see javax.faces.webapp.UIComponentTag#setProperties

    * (javax.faces.component.UIComponent)

    */

   @Override

   protected void setProperties(UIComponent component) {

      /* You have to call the super class */

      super.setProperties(component);

      ((FieldComponent)component).setLabel(label);

      component.getAttributes().put("errorStyleClass",

       errorStyleClass);

      component.getAttributes().put("errorStyle",errorStyle);

      ((FieldComponent)component).setRequired(required);


     FacesContext context = FacesContext.getCurrentInstance();

     Application application = context.getApplication();

     ValueBinding binding = application.createValueBinding(value);

     component.setValueBinding("value", binding);


   }

   /**

    * @see javax.faces.webapp.UIComponentTag#getComponentType()

    */

   @Override

   public String getComponentType() {

      return "arcmind.Field";

   }

   /**

    * @see javax.faces.webapp.UIComponentTag#getRendererType()

    */

   @Override

   public String getRendererType() {

      return "arcmind.Field";

   }

   /**

    * @return Returns the errorStyleClass.

    */

   public String getErrorStyleClass() {

      return errorStyleClass;

   }

   /**

    * @param errorStyleClass The errorStyleClass to set.

    */

   public void setErrorStyleClass(String errorStyleClass) {

      this.errorStyleClass = errorStyleClass;

   }


   /**

    * @return Returns the errorStyle.

    */

   public String getErrorStyle() {

      return errorStyle;

   }

   /**

    * @param errorStyle The errorStyle to set.

    */

   public void setErrorStyle(String errorStyle) {

      this.errorStyle = errorStyle;

   }

   /**

    * @return Returns the required.

    */

   public boolean isRequired() {

      return required;

   }

   /**

    * @param required The required to set.

    */

   public void setRequired(boolean required) {

      this.required = required;

   }


   /**

    * @return Returns the value.

    */

   public String getValue() {

      return value;

   }

   /**

    * @param value The value to set.

    */

   public void setValue(String value) {

      this.value = value;

   }

}
從概念上說,在上面的代碼和 Label 組件之間找不出太大區別。但是,在這個示例中, setProperties 方法有些不同:
protected void setProperties(UIComponent component) {

   /* You have to call the super class */

   super.setProperties(component);

   ((FieldComponent)component).setLabel(label);

   component.getAttributes().put("errorStyleClass",

    errorStyleClass);

   component.getAttributes().put("errorStyle",errorStyle);

   ((FieldComponent)component).setRequired(required);
雖然 label 屬性傳遞時的方式與前面的示例相同,但是 errorStyleClass 和 errorStyle 屬性不是這樣傳遞的。相反,它們被添加到 JSF 組件的屬性映射 中。Renderer 類會使用屬性映射去渲染類和樣式屬性。這個設置允許特定於 HTML 的代碼從組件脫離。
這個修訂後的 setProperties 方法實際的值綁定代碼也有些不同,如下所示。
protected void setProperties(UIComponent component) {

    ...


   FacesContext context = FacesContext.getCurrentInstance();

   Application application = context.getApplication();

   ValueBinding binding = application.createValueBinding(value);

   component.setValueBinding("value", binding);
這個代碼允許 Field 組件的 value 屬性綁定到後台 bean。出於示例的原因,我把 CDManagerBean 的 title 屬性綁定到 Field 組件,像下面這樣:value="# {CDManagerBean.title}。值綁定是用 Application 對象創建的。Application 對象是創建 值綁定的工廠。這個組件擁有保存值綁定的特殊方法,即 setValueBinding;可以有不止一 個值綁定。
獨立渲染器
最後介紹渲染器,但並不是說它不重要。獨立渲染器必須考慮的主要問題是解碼(輸入) 和編碼(輸出)。Field 組件做的編碼比解碼多得多,所以它的渲染器有許多編碼方法,而 只有一個解碼方法。在清單 8 中,可以看到 Field 組件的渲染器:
清單 8. FieldRenderer 擴展自 Renderer
package com.arcmind.jsfquickstart;

import java.io.IOException;

import java.util.Iterator;

import java.util.Map;

import javax.faces.application.FacesMessage;

import javax.faces.component.UIComponent;

import javax.faces.component.UIInput;

import javax.faces.context.FacesContext;

import javax.faces.context.ResponseWriter;

import javax.faces.convert.Converter;

import javax.faces.convert.ConverterException;

import javax.faces.el.ValueBinding;

import javax.faces.render.Renderer;

/**

* @author Richard Hightower

*

*/

public class FieldRenderer extends Renderer {

  @Override

  public Object getConvertedValue(FacesContext facesContext, UIComponent component,

   Object submittedValue) throws ConverterException {


   //Try to find out by value binding

   ValueBinding valueBinding = component.getValueBinding("value");

   if (valueBinding == null) return null;

   Class valueType = valueBinding.getType(facesContext);

   if (valueType == null) return null;

   if (String.class.equals(valueType)) return submittedValue;

   if (Object.class.equals(valueType)) return submittedValue;

   Converter converter = ((UIInput) component).getConverter();

   converter = facesContext.getApplication().createConverter(valueType);

   if (converter != null ) {

     return converter.getAsObject(facesContext, component, (String) submittedValue);

   }else {

     return submittedValue;

   }


   }

  @Override

   public void decode(FacesContext context, UIComponent component) {

     /* Grab the request map from the external context */

    Map requestMap = context.getExternalContext().getRequestParameterMap ();

     /* Get client ID, use client ID to grab value from parameters */

    String clientId = component.getClientId(context);

    String value = (String) requestMap.get(clientId);


     FieldComponent fieldComponent = (FieldComponent)component;

      /* Set the submitted value */

     ((UIInput)component).setSubmittedValue(value);

   }


  @Override

   public void encodeBegin(FacesContext context, UIComponent component)

     throws IOException {

     FieldComponent fieldComponent = (FieldComponent) component;

     ResponseWriter writer = context.getResponseWriter();

     encodeLabel(writer,fieldComponent);

     encodeInput(writer,fieldComponent);

     encodeMessage(context, writer, fieldComponent);

     writer.flush();

   }


   private void encodeMessage(FacesContext context, ResponseWriter writer,

    FieldComponent fieldComponent) throws IOException {

     Iterator iter = context.getMessages(fieldComponent.getClientId (context));

     while (iter.hasNext()){

      FacesMessage message = (FacesMessage) iter.next();

      writer.write(message.getDetail());

     }

   }

   private void encodeLabel(ResponseWriter writer, FieldComponent

    fieldComponent) throws IOException{

     writer.startElement("label", fieldComponent);

     if (fieldComponent.isError()) {

       String errorStyleClass = (String) fieldComponent.getAttributes ().get("errorStyleClass");

       String errorStyle = (String) fieldComponent.getAttributes().get ("errorStyle");

       writer.writeAttribute("style", errorStyle, "style");

       writer.writeAttribute("class", errorStyleClass, "class");

     }

     writer.write("" + fieldComponent.getLabel());

     if (fieldComponent.isRequired()) {

       writer.write("*");

     }

    writer.endElement("label");

   }


   private void encodeInput(ResponseWriter writer, FieldComponent

    fieldComponent) throws IOException{

     FacesContext currentInstance = FacesContext.getCurrentInstance();

     writer.startElement("input", fieldComponent);

     writer.writeAttribute("type", "text", "type");

     writer.writeAttribute("id", fieldComponent.getClientId (currentInstance), "id");

     writer.writeAttribute("name", fieldComponent.getClientId (currentInstance), "name");

     if(fieldComponent.getValue()!=null)

       writer.writeAttribute("value", fieldComponent.getValue().toString (), "value");

     writer.endElement("input");

   }

}
編碼和解碼
正如前面提到的,渲染器做的主要工作就是解碼輸入和編碼輸出。我先從解碼開始,因為 它是最容易的。 FieldRenderer 的 decode 方法如下所示:
@Override

public void decode(FacesContext context, UIComponent component) {

    /* Grab the request map from the external context */

   Map requestMap = context.getExternalContext().getRequestParameterMap ();

    /* Get client ID, use client ID to grab value from parameters */

   String clientId = component.getClientId(context);

   String value = (String) requestMap.get(clientId);


   FieldComponent fieldComponent = (FieldComponent)component;

    /* Set the submitted value */

   ((UIInput)component).setSubmittedValue(value);

}
Label 組件不需要進行解碼,因為它是一個 UIOutput 組件。Field 組件是一個 UIInput 組件,這意味著它接受輸入,所以 必須 進行解碼。decode 方法可以從會話、cookie、頭、 請求等處讀取值。在大多數請問下,decode 方法只是像上面那樣從請求參數讀取值。Field 渲染器的 decode 方法從組件得到 clientId,以標識要查找的請求參數。給定組件容器的路 徑,clientId 被計算成為組件的全限定名稱。而且,因為示例組件在表單中(是個容器), 所以它的 clientid 應當是 nameOfForm:nameOfComponent 這樣的,或者是示例中的 cdForm:artist、cdForm:price、cdForm:title。decode 方法的最後一步是把提交的值保存 到組件(稍後會轉換並驗證它,請參閱 參考資料 獲取更多關於驗證和轉換的內容)。
編碼方法沒什麼驚訝的。它們與 Label 組件中看到的類似。第一個方法 encodeBegin, 委托給三個幫助器方法 encodeLabel、encodeInput 和 encodeMessage,如下所示:
@Override

public void encodeBegin(FacesContext context, UIComponent component)

    throws IOException {

   FieldComponent fieldComponent = (FieldComponent) component;

   ResponseWriter writer = context.getResponseWriter();

   encodeLabel(writer,fieldComponent);

   encodeInput(writer,fieldComponent);

   encodeMessage(context, writer, fieldComponent);

   writer.flush();

}
encodeLabel 方法負責在出錯的時候,把標簽的顏色改成紅色(或者在樣式表中指定的其 他什麼顏色),並用星號 (*) 標出必需的字段,如下所示:
private void encodeLabel(ResponseWriter writer, FieldComponent fieldComponent) throws IOException{

   writer.startElement("label", fieldComponent);

   if (fieldComponent.isError()) {

      String errorStyleClass = (String) fieldComponent.getAttributes ().get("errorStyleClass");

      String errorStyle = (String) fieldComponent.getAttributes().get ("errorStyle");

      writer.writeAttribute("style", errorStyle, "style");

      writer.writeAttribute("class", errorStyleClass, "class");

   }

   writer.write("" + fieldComponent.getLabel());

   if (fieldComponent.isRequired()) {

      writer.write("*");

   }

   writer.endElement("label");

}
首先,encodeLabel 方法檢查是否有錯誤,如果有就輸出 errorStyle 和 errorStyleClass(更好的版本是只有在它們不為空的時候才輸出 —— 但是我把它留給您做 練習!)。然後幫助器方法會檢查組件是不是必需的字段,如果是,就輸出星號。 encodeMessages 和 encodeInput 方法做的就是這件事,即輸出出錯消息並為 Field 組件生 成 HTML 輸入的文本字段。
注意,神秘方法!
您可能已經注意到,有一個方法我還沒有介紹。這個方法就是這個類中的“黑馬”方法。 如果您閱讀 Renderer(所有渲染器都要擴展的抽象類)的 javadoc,您可能會感覺到這樣的 方法是不需要的,現有的就足夠了:這就是我最開始時想的。但是,您和我一樣,都錯了!
實際上,基類 Renderer 並不 自動調用 Renderer 子類的相關轉換器 —— 即使 Renderer 的 javadoc 和 JSF 規范建議它這樣做,它也沒做。MyFaces 和 JSF RI 擁有為它 們的渲染器執行這個魔術的類(特定於它們的實現),但是在核心 JSF API 中並沒有涉及這 項功能。
相反,需要使用方法 getConvertedValues 鎖定相關的轉換器並調用它。清單 9 顯示的 方法根據值綁定的類型找到正確的轉換器:
清單 9. getConvertedValues 方法
@Override

public Object getConvertedValue(FacesContext facesContext,

  UIComponent component, Object submittedValue) throws ConverterException {


   //Try to find out by value binding

   ValueBinding valueBinding = component.getValueBinding("value");

   if (valueBinding == null) return null;

   Class valueType = valueBinding.getType(facesContext);

   if (valueType == null) return null;

   if (String.class.equals(valueType)) return submittedValue;

   if (Object.class.equals(valueType)) return submittedValue;

   Converter converter = ((UIInput) component).getConverter();

   converter = facesContext.getApplication().createConverter(valueType);

   if (converter != null ) {

      return converter.getAsObject(facesContext, component, (String) submittedValue);

   }else {

      return submittedValue;

   }

}
清單 9 的代碼添加了 Render javadoc 和 JSF 規范都讓您相信應當是自動執行的功能, 而實際上並不是。另一方面,請注意如果沒有 獨立的 Renderer,就不需要 以上 (getConvertedValues)方法。UIComponentBase 類(Field 組件的超類)在直接渲染器的 情況下提供了這個功能。請接受我的建議,只在特別想嘗試或者在編寫商業框架的時候,才 考慮采用渲染器。在其他情況下,它們不值得額外的付出。
如果想知道如何把組件和渲染器關聯,那麼只要看看圖 6 即可。
圖 6. 把渲染器映射到組件
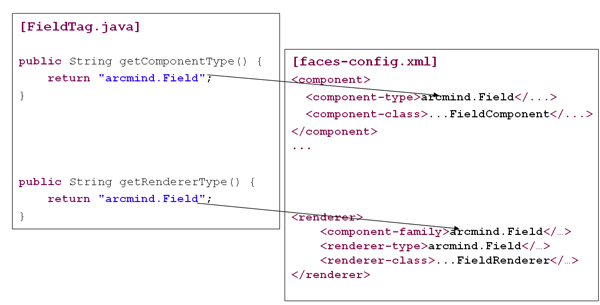
定制標記有兩個方法,分別返回組件類型和渲染器類型。這些方法用於查找配置在 faces-config.xml 中的正確的渲染器和組件。請注意(雖然圖中沒有)組件必須返回正確的 family 類型。
結束語
通過這些內容,您已經切實地了解了 JSF 組件開發的核心。當然,在這個領域還有許多 其他主題需要涉及 —— 包括發出組件事件、國際化組件、創建 UICommand 樣式的組件,以 及更多。請參閱 參考資料 獲得 JSF 的閱讀列表!
在編寫這篇文章的過程中,我遇到了 Renderer 的一個技術障礙,它使我發現了 getConvertedValues 方法的工作方式。盡管我以前遇到過 Converter 問題並處理過它,但 是那時我是在一個緊張的(生產)日程中做這件事的。在生產工作中進行的研究,不必像在 how-to 文章中做得那麼詳細;所以這一次,我必須不僅學習如何修補問題,還要學習弄清如 何 做對。通過這整個過程,我最終在非常深的層次上學會並體驗了 JSF 組件處理工作的方 式。所以,有時繞點彎路會看到優美的風景。
我希望在這個由四部分組成的系列中,您已經學到了關於使用 JSF 的優勢的充足知識, 以及它如何工作的基礎知識,還希望您會喜歡進一步深入這項技術。而且當您有時可能迷失 方向的時候,請不要陷入 FUD。相反,請記住我說過的:彎路會看到優美的風景,請繼續前 行。