java圖片驗證碼生成教程詳解。本站提示廣大學習愛好者:(java圖片驗證碼生成教程詳解)文章只能為提供參考,不一定能成為您想要的結果。以下是java圖片驗證碼生成教程詳解正文
起首,我們先來看當地若何生成圖片驗證碼的,再來寫輸入到網頁的驗證碼若何完成。
先來看最簡略的—完成的功效是,將一個字符串釀成圖片寫入到文件中
完成代碼:
package cn.hncu.img;

import java.awt.Graphics;
import java.awt.image.BufferedImage;
import java.io.FileNotFoundException;
import java.io.FileOutputStream;
import java.io.IOException;

import javax.imageio.ImageIO;
//該類包括一些用來查找 ImageReader 和 ImageWriter 和履行簡略編碼息爭碼的靜態便捷辦法。

import org.junit.Test;

public class ImgDemo {

 //進修若何把一個字符串釀成圖片寫到一個文件
 @Test
 public void ImgDemo1() throws FileNotFoundException, IOException{
  BufferedImage img = new BufferedImage(60, 30, BufferedImage.TYPE_INT_RGB);
  // 表現一個圖象,它具有分解整數像素的 8 位 RGB 色彩重量。
  Graphics g = img.getGraphics();
  g.drawString("Hello",10,20);
  //應用此圖形高低文確當前字體和色彩繪制由指定 string 給定的文本。最左邊字符的基線位於此圖形高低文坐標系的 (x, y) 地位處。
  g.dispose();////相似於流中的close()帶動flush()---把數據刷到img對象傍邊
  //釋放此圖形的高低文和它應用的一切體系資本。挪用 dispose 以後,就不克不及再應用 Graphics 對象。
  ImageIO.write(img, "JPG", new FileOutputStream("img/a.jpg"));
  //應用支撐給定格局的隨意率性 ImageWriter 將一個圖象寫入 File。
 }

}
成果:
下面誰人很簡略,對纰謬,我們看到的驗證碼都不是如許的,那好,我們給它加點攪擾線,配景色,字符和y坐標隨機生成。
有攪擾線、配景色的驗證碼-寫入文件
演示代碼:
package cn.hncu.img;

import java.awt.Color;
import java.awt.Font;
import java.awt.Graphics;
import java.awt.image.BufferedImage;
import java.io.FileNotFoundException;
import java.io.FileOutputStream;
import java.io.IOException;
import java.util.Date;
import java.util.Random;

import javax.imageio.ImageIO;
//該類包括一些用來查找 ImageReader 和 ImageWriter 和履行簡略編碼息爭碼的靜態便捷辦法。

import org.junit.Test;

public class ImgDemo {
 //把下面的字符串改成我們日常平凡用的驗證碼---生成幾個隨機數字,有配景色和攪擾線
 @Test
 public void ImgDemo2() throws FileNotFoundException, IOException{
  int width = 80;
  int height= 40;
  int lines = 10;
  BufferedImage img = new BufferedImage(width, height, BufferedImage.TYPE_INT_RGB);

  Graphics g = img.getGraphics();

  //設置配景色
  g.setColor(Color.white);
  g.fillRect(0, 0, width, height);//畫配景
  //填充指定的矩形。應用圖形高低文確當前色彩填充該矩形

  //設置字體
  g.setFont(new Font("宋體", Font.BOLD, 18));

  //隨機數字
  Date d = new Date();
  //System.out.println(d.getTime());
  Random r = new Random(d.getTime());
  for(int i=0;i<4;i++){
   int a = r.nextInt(10);//取10之內的整數[0,9]
   int y = 10+r.nextInt(20); //10~30規模內的一個整數,作為y坐標
   Color c = new Color(r.nextInt(255), r.nextInt(255), r.nextInt(255));
   g.setColor(c);
   g.drawString(""+a, 5+i*width/4, y);
  }
  //攪擾線
  for(int i=0;i<lines;i++){
   Color c = new Color(r.nextInt(255), r.nextInt(255), r.nextInt(255));
   g.setColor(c);
   g.drawLine(r.nextInt(width), r.nextInt(height), r.nextInt(width), r.nextInt(height));
  }

  g.dispose();//相似於流中的close()帶動flush()---把數據刷到img對象傍邊
  ImageIO.write(img, "JPG", new FileOutputStream("img/b.jpg"));

 }


}
演示成果:
最初來看一個可以扭轉和放縮的驗證碼-寫到圖片當地文件中
演示代碼:
package cn.hncu.img;

import java.awt.Color;
import java.awt.Font;
import java.awt.Graphics;
import java.awt.Graphics2D;
import java.awt.geom.AffineTransform;
import java.awt.image.BufferedImage;
import java.io.FileNotFoundException;
import java.io.FileOutputStream;
import java.io.IOException;
import java.util.Date;
import java.util.Random;

import javax.imageio.ImageIO;
//該類包括一些用來查找 ImageReader 和 ImageWriter 和履行簡略編碼息爭碼的靜態便捷辦法。

import org.junit.Test;

public class ImgDemo {
 @Test//可以扭轉和放縮的驗證碼
 public void ImgDemo3() throws FileNotFoundException, IOException{
  int width = 80;
  int height = 40;
  int lines = 10;
  BufferedImage img = new BufferedImage(width, height, BufferedImage.TYPE_INT_RGB);
  Graphics2D g2d = (Graphics2D)img.getGraphics();

  g2d.setFont(new Font("宋體", Font.BOLD, 20));


  Random r = new Random(new Date().getTime());

  //設置配景色
  g2d.setColor(new Color(r.nextInt(255), r.nextInt(255), r.nextInt(255)));
  g2d.drawRect(0, 0, width, height);//繪制指定矩形的邊框。
  g2d.setColor(new Color(r.nextInt(255), r.nextInt(255), r.nextInt(255)));
  g2d.fillRect(0, 0, width, height);//填充指定的矩形。

  for(int i=0;i<4;i++){
   String str = ""+r.nextInt(10);

   //處置扭轉
   AffineTransform Tx = new AffineTransform();
   Tx.rotate(Math.random(), 5+i*15, height-5);
   //用弧度丈量的扭轉角度,扭轉錨點的 X 坐標,扭轉錨點的 Y 坐標
   //Tx.scale(0.7+Math.random(), 0.7+Math.random());
   //x坐標偏向的縮放倍數,y坐標偏向的縮放倍數
   g2d.setTransform(Tx);
   Color c = new Color(r.nextInt(255), r.nextInt(255), r.nextInt(255));
   g2d.setColor(c);
   g2d.drawString(str, 2+i*width/4, height-13);
  }

  //攪擾線
  for(int i=0;i<lines;i++){
   Color c = new Color(r.nextInt(255), r.nextInt(255), r.nextInt(255));
   g2d.setColor(c);
   g2d.drawLine(r.nextInt(width), r.nextInt(height), r.nextInt(width), r.nextInt(height));
  }

  g2d.dispose();

  ImageIO.write(img, "JPG", new FileOutputStream("img/c.jpg"));
 }
}
演示成果:
上面就要開端演示前台的圖片驗證技巧了。
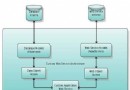
前台的圖片驗證技巧
這個項目標構造圖:
index.jsp:
<%@ page language="java" import="java.util.*" pageEncoding="utf-8"%>

<!DOCTYPE HTML PUBLIC "-//W3C//DTD HTML 4.01 Transitional//EN">
<html>
 <head>
 <script type="text/javascript">
  function changImg(){
   var img = document.getElementById("servletImg");
   var d = new Date();
   var time = d.getTime();//假如沒有這個
   //上面這一句不會起感化,由於閱讀器的緩存技巧,圖片其實不會刷新
   //img.src="/myHelloWeb/servlet/ImageServlet";
   img.src="/myHelloWeb/servlet/ImageServlet?"+time;
   //?號前面的器械是經由過程get方法傳遞的
  }

 </script>
 </head>

 <body>
 這是我的手動主頁!
 <br/>
 <img id="servletImg" src="/myHelloWeb/servlet/ImageServlet" /><a href="javascript:changImg()">看不清</a>
 </body>
</html>
web.xml:
<?xml version="1.0" encoding="UTF-8"?>
<web-app version="3.0"
 xmlns="http://java.sun.com/xml/ns/javaee"
 xmlns:xsi="http://www.w3.org/2001/XMLSchema-instance"
 xsi:schemaLocation="http://java.sun.com/xml/ns/javaee
 http://java.sun.com/xml/ns/javaee/web-app_3_0.xsd">
 <display-name></display-name>
 <servlet>
 <description>This is the description of my J2EE component</description>
 <display-name>This is the display name of my J2EE component</display-name>
 <servlet-name>ImageServlet</servlet-name>
 <servlet-class>cn.hncu.img.ImageServlet</servlet-class>
 </servlet>

 <servlet-mapping>
 <servlet-name>ImageServlet</servlet-name>
 <url-pattern>/servlet/ImageServlet</url-pattern>
 </servlet-mapping>
 <welcome-file-list>
 <welcome-file>index.jsp</welcome-file>
 </welcome-file-list>
</web-app>
ImageServlet.java
package cn.hncu.img;

import java.awt.Color;
import java.awt.Font;
import java.awt.Graphics;
import java.awt.image.BufferedImage;
import java.io.IOException;
import java.io.PrintWriter;
import java.util.Date;
import java.util.Random;

import javax.imageio.ImageIO;
import javax.servlet.ServletException;
import javax.servlet.http.HttpServlet;
import javax.servlet.http.HttpServletRequest;
import javax.servlet.http.HttpServletResponse;

public class ImageServlet extends HttpServlet {

 public void doGet(HttpServletRequest request, HttpServletResponse response)
   throws ServletException, IOException {
  doPost(request, response);
 }

 public void doPost(HttpServletRequest request, HttpServletResponse response)
   throws ServletException, IOException {
  //告知客戶端,輸入的格局
  response.setContentType("image/jpeg");

  int width = 80;
  int height = 40;
  int lines = 10;
  BufferedImage img = new BufferedImage(width, height, BufferedImage.TYPE_INT_RGB);

  Graphics g = img.getGraphics();

  //設置配景色
  g.setColor(Color.WHITE);
  g.fillRect(0, 0, width, height);

  //設置字體
  g.setFont(new Font("宋體", Font.BOLD, 20));

  //隨機數字
  Random r = new Random(new Date().getTime());
  for(int i=0;i<4;i++){
   int a = r.nextInt(10);
   int y = 10+r.nextInt(20);//10~30規模內的一個整數,作為y坐標

   Color c = new Color(r.nextInt(255),r.nextInt(255),r.nextInt(255));
   g.setColor(c);

   g.drawString(""+a, 5+i*width/4, y);
  }

  //攪擾線
  for(int i=0;i<lines;i++){
   Color c = new Color(r.nextInt(255),r.nextInt(255),r.nextInt(255));
   g.setColor(c);
   g.drawLine(r.nextInt(width), r.nextInt(height), r.nextInt(width), r.nextInt(height));
  }

  g.dispose();//相似於流中的close()帶動flush()---把數據刷到img對象傍邊

  ImageIO.write(img, "JPG", response.getOutputStream());
 }

}
演示成果:
上面這個是在index.jsp中:
假如是用這句:
img.src=”/myHelloWeb/servlet/ImageServlet”;
年夜家可以看看呼應頭:
再看看用這句的呼應頭:
img.src=”/myHelloWeb/servlet/ImageServlet?”+time;
多了個Date呼應!
由於時光一向在變,所以每次點看不清,都邑再向辦事器要求一次,而不會由於閱讀器的緩存,而不去要求了。
驗證碼就先到這裡停止啦。
以上就是本文的全體內容,願望對年夜家的進修有所贊助,也願望年夜家多多支撐。