VerifyCodeServlet.java類:
代碼如下:
package com.spring.controller;
import java.awt.Color;
import java.awt.Font;
import java.awt.Graphics2D;
import java.awt.image.BufferedImage;
import java.util.Random;
import javax.imageio.ImageIO;
import javax.servlet.ServletException;
import javax.servlet.ServletOutputStream;
import javax.servlet.http.HttpServlet;
import javax.servlet.http.HttpServletRequest;
import javax.servlet.http.HttpServletResponse;
import javax.servlet.http.HttpSession;
import org.springframework.stereotype.Controller;
import org.springframework.web.bind.annotation.RequestMapping;
import org.springframework.web.bind.annotation.RequestMethod;
@Controller
public class VerifyCodeServlet extends HttpServlet {
// 驗證碼圖片的寬度。
private int width = 60;
// 驗證碼圖片的高度。
private int height = 20;
// 驗證碼字符個數
private int codeCount = 4;
private int x = 0;
// 字體高度
private int fontHeight;
private int codeY;
char[] codeSequence = { 'A', 'B', 'C', 'D', 'E', 'F', 'G', 'H', 'I', 'J',
'K', 'L', 'M', 'N', 'O', 'P', 'Q', 'R', 'S', 'T', 'U', 'V', 'W',
'X', 'Y', 'Z', '0', '1', '2', '3', '4', '5', '6', '7', '8', '9' };
/**
* 初始化驗證圖片屬性
*/
public void initxuan() throws ServletException {
// 從web.xml中獲取初始信息
// 寬度
String strWidth ="80";
// 高度
String strHeight ="30";
// 字符個數
String strCodeCount = "4";
// 將配置的信息轉換成數值
try {
if (strWidth != null && strWidth.length() != 0) {
width = Integer.parseInt(strWidth);
}
if (strHeight != null && strHeight.length() != 0) {
height = Integer.parseInt(strHeight);
}
if (strCodeCount != null && strCodeCount.length() != 0) {
codeCount = Integer.parseInt(strCodeCount);
}
} catch (NumberFormatException e) {
}
x = width / (codeCount + 1);
fontHeight = height - 2;
codeY = height - 4;
}
@RequestMapping(value="xuan/verifyCode",method=RequestMethod.GET)
public void service(HttpServletRequest req, HttpServletResponse resp)
throws ServletException, java.io.IOException {
initxuan();
// 定義圖像buffer
BufferedImage buffImg = new BufferedImage(width, height,
BufferedImage.TYPE_INT_RGB);
Graphics2D g = buffImg.createGraphics();
// 創建一個隨機數生成器類
Random random = new Random();
// 將圖像填充為白色
g.setColor(Color.WHITE);
g.fillRect(0, 0, width, height);
// 創建字體,字體的大小應該根據圖片的高度來定。
Font font = new Font("Fixedsys", Font.PLAIN, fontHeight);
// 設置字體。
g.setFont(font);
// 畫邊框。
g.setColor(Color.BLACK);
g.drawRect(0, 0, width - 1, height - 1);
// 隨機產生160條干擾線,使圖象中的認證碼不易被其它程序探測到。
g.setColor(Color.BLACK);
for (int i = 0; i < 10; i++) {
int x = random.nextInt(width);
int y = random.nextInt(height);
int xl = random.nextInt(12);
int yl = random.nextInt(12);
g.drawLine(x, y, x + xl, y + yl);
}
// randomCode用於保存隨機產生的驗證碼,以便用戶登錄後進行驗證。
StringBuffer randomCode = new StringBuffer();
int red = 0, green = 0, blue = 0;
// 隨機產生codeCount數字的驗證碼。
for (int i = 0; i < codeCount; i++) {
// 得到隨機產生的驗證碼數字。
String strRand = String.valueOf(codeSequence[random.nextInt(36)]);
// 產生隨機的顏色分量來構造顏色值,這樣輸出的每位數字的顏色值都將不同。
red = random.nextInt(255);
green = random.nextInt(255);
blue = random.nextInt(255);
// 用隨機產生的顏色將驗證碼繪制到圖像中。
g.setColor(new Color(red, green, blue));
g.drawString(strRand, (i + 1) * x, codeY);
// 將產生的四個隨機數組合在一起。
randomCode.append(strRand);
}
// 將四位數字的驗證碼保存到Session中。
HttpSession session = req.getSession();
session.setAttribute("validateCode", randomCode.toString());
// 禁止圖像緩存。
resp.setHeader("Pragma", "no-cache");
resp.setHeader("Cache-Control", "no-cache");
resp.setDateHeader("Expires", 0);
resp.setContentType("image/jpeg");
// 將圖像輸出到Servlet輸出流中。
ServletOutputStream sos = resp.getOutputStream();
ImageIO.write(buffImg, "jpeg", sos);
sos.close();
}
}
ResultServlet.java:
代碼如下:
package com.spring.controller;
import java.io.IOException;
import java.io.PrintWriter;
import javax.servlet.ServletException;
import javax.servlet.http.HttpServletRequest;
import javax.servlet.http.HttpServletResponse;
import org.springframework.stereotype.Controller;
import org.springframework.web.bind.annotation.RequestMapping;
import org.springframework.web.bind.annotation.RequestMethod;
@Controller
public class ResultServlet {
@RequestMapping(value="resultServlet/validateCode",method=RequestMethod.POST)
public void doPost(HttpServletRequest request, HttpServletResponse response)
throws ServletException, IOException {
response.setContentType("text/html;charset=utf-8");
String validateC = (String) request.getSession().getAttribute("validateCode");
String veryCode = request.getParameter("c");
PrintWriter out = response.getWriter();
if(veryCode==null||"".equals(veryCode)){
out.println("驗證碼為空");
}else{
if(validateC.equals(veryCode)){
out.println("驗證碼正確");
}else{
out.println("驗證碼錯誤");
}
}
out.flush();
out.close();
}
}
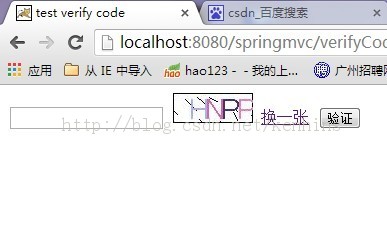
jsp頁面:
代碼如下:
<%@ page language="java" contentType="text/html; charset=UTF-8"
pageEncoding="UTF-8"%>
<!DOCTYPE html PUBLIC "-//W3C//DTD HTML 4.01 Transitional//EN" "http://www.w3.org/TR/html4/loose.dtd">
<html>
<head>
<meta http-equiv="Content-Type" content="text/html; charset=UTF-8">
<title>test verify code</title>
</head>
<body>
<input id="veryCode" name="veryCode" type="text"/>
<img id="imgObj" alt="" src="xuan/verifyCode"/>
<a href="#" onclick="changeImg()">換一張</a>
<input type="button" value="驗證" onclick="isRightCode()"/>
<div id="info"></div>
</body>
</html>
<script type="text/javascript">
function changeImg(){
var imgSrc = $("#imgObj");
var src = imgSrc.attr("src");
imgSrc.attr("src",chgUrl(src));
}
//時間戳
//為了使每次生成圖片不一致,即不讓浏覽器讀緩存,所以需要加上時間戳
function chgUrl(url){
var timestamp = (new Date()).valueOf();
urlurl = url.substring(0,17);
if((url.indexOf("&")>=0)){
urlurl = url + "×tamp=" + timestamp;
}else{
urlurl = url + "?timestamp=" + timestamp;
}
return url;
}
function isRightCode(){
var code = $("#veryCode").attr("value");
code = "c=" + code;
$.ajax({
type:"POST",
url:"resultServlet/validateCode",
data:code,
success:callback
});
}
function callback(data){
$("#info").html(data);
}
</script>
運行效果: