DispatcherServlet是Spring MVC的核心,按照傳統方式, 需要把它配置到web.xml中. 我個人比較不喜歡XML配置方式, XML看起來太累, 冗長繁瑣. 還好借助於Servlet 3規范和Spring 3.1的功能增強, 可以采用一種全新的,更簡潔的方式配置Spring MVC了. 下面按這種方式一個Hello World的MVC配置.
Step 1:先用eclipse創建一個Maven的WEB工程. pom.xml文件如下:
 1 <project xmlns="http://maven.apache.org/POM/4.0.0" xmlns:xsi="http://www.w3.org/2001/XMLSchema-instance" xsi:schemaLocation="http://maven.apache.org/POM/4.0.0 http://maven.apache.org/xsd/maven-4.0.0.xsd">
 2   <modelVersion>4.0.0</modelVersion>
 3   <groupId>ocr</groupId>
 4   <artifactId>ocr</artifactId>
 5   <version>0.0.1-SNAPSHOT</version>
 6   <packaging>war</packaging>
 7
 8     <properties>
 9         <project.build.sourceEncoding>UTF-8</project.build.sourceEncoding>
10         <javaee-api.version>7.0</javaee-api.version>
11         <spring.version>4.2.0.RELEASE</spring.version>
12         <junit.version>4.12</junit.version>
13     </properties>
14
15     <dependencies>
16          <dependency>
17               <groupId>javax</groupId>
18               <artifactId>javaee-api</artifactId>
19               <version>${javaee-api.version}</version>
20         </dependency>
21         <dependency>
22                 <groupId>junit</groupId>
23                 <artifactId>junit</artifactId>
24                 <version>${junit.version}</version>
25         </dependency>
26         <dependency>
27             <groupId>org.springframework</groupId>
28             <artifactId>spring-context</artifactId>
29             <version>${spring.version}</version>
30         </dependency>
31         <dependency>
32             <groupId>org.springframework</groupId>
33             <artifactId>spring-aop</artifactId>
34             <version>${spring.version}</version>
35         </dependency>
36         <dependency>
37             <groupId>org.springframework</groupId>
38             <artifactId>spring-webmvc</artifactId>
39             <version>${spring.version}</version>
40         </dependency>
41         <dependency>
42             <groupId>org.springframework</groupId>
43             <artifactId>spring-web</artifactId>
44             <version>${spring.version}</version>
45         </dependency>
46
47         <dependency>
48             <groupId>javax.servlet</groupId>
49             <artifactId>jstl</artifactId>
50             <version>1.2</version>
51         </dependency>
52
53         <dependency>
54             <groupId>commons-logging</groupId>
55             <artifactId>commons-logging</artifactId>
56             <version>1.1.3</version>
57         </dependency>
58     </dependencies>
59
60
61     <build>
62         <plugins>
63             <plugin>
64                 <artifactId>maven-compiler-plugin</artifactId>
65                 <version>3.3</version>
66                 <configuration>
67                     <source>1.7</source>
68                     <target>1.7</target>
69                 </configuration>
70             </plugin>
71             <plugin>
72                 <artifactId>maven-war-plugin</artifactId>
73                 <version>2.6</version>
74                 <configuration>
75                     <warSourceDirectory>WebContent</warSourceDirectory>
76                     <failOnMissingWebXml>false</failOnMissingWebXml>
77                 </configuration>
78             </plugin>
79         </plugins>
80     </build>
81 </project>
Step 2: 配置DispatcherServlet. 需要創建一個Web初始化類OcrWebAppInitializer, 繼承自AbstractAnnotationConfigDispatcherServletInitializer
 1 package com.chry.ocr.config;
 2
 3 import org.springframework.web.servlet.support.AbstractAnnotationConfigDispatcherServletInitializer;
 4
 5 public class OcrWebAppInitializer extends AbstractAnnotationConfigDispatcherServletInitializer {
 6
 7     @Override
 8     protected Class<?>[] getRootConfigClasses() {
 9         return new Class<?>[] { RootConfig.class };
10     }
11
12     @Override
13     protected Class<?>[] getServletConfigClasses() {
14         return new Class<?>[] { WebConfig.class };        //ָ指定Web配置類
15     }
16
17     @Override
18     protected String[] getServletMappings() {    //將DispatcherServlet映射到"/"
19         return new String[] { "/" };
20     }
21
22 }
Step 3: 配置Spring MVC視圖解析WebConfig.java, 需要要創建一個類繼承自WebMvcConfigurerAdapter
 1 package com.chry.ocr.config;
 2
 3 import org.springframework.context.annotation.Bean;
 4 import org.springframework.context.annotation.ComponentScan;
 5 import org.springframework.context.annotation.Configuration;
 6 import org.springframework.web.servlet.ViewResolver;
 7 import org.springframework.web.servlet.config.annotation.DefaultServletHandlerConfigurer;
 8 import org.springframework.web.servlet.config.annotation.EnableWebMvc;
 9 import org.springframework.web.servlet.config.annotation.WebMvcConfigurerAdapter;
10 import org.springframework.web.servlet.view.InternalResourceViewResolver;
11
12 @Configuration
13 @EnableWebMvc                                //啟動SpringMVC
14 @ComponentScan("com.chry.ocr.controller")            //啟動組件掃描
15 public class WebConfig extends WebMvcConfigurerAdapter {
16
17     //配置JSP視圖解析器
18     @Bean
19     public ViewResolver viewResolver() {
20         InternalResourceViewResolver resolver = new InternalResourceViewResolver();
21         resolver.setPrefix("WEB-INF/views/");
22         resolver.setSuffix(".jsp");
23         resolver.setExposeContextBeansAsAttributes(true);
24         return resolver;
25     }
26
27     //配置靜態資源的處理
28     @Override
29     public void configureDefaultServletHandling(DefaultServletHandlerConfigurer configurer) {
30         configurer.enable();        //對靜態資源的請求轉發到容器缺省的servlet,而不使用DispatcherServlet
31     }
32
33 }
Step 4: 配置RootConfig.java
 1 package com.chry.ocr.config;
 2
 3 import org.springframework.context.annotation.ComponentScan;
 4 import org.springframework.context.annotation.ComponentScan.Filter;
 5 import org.springframework.context.annotation.Configuration;
 6 import org.springframework.context.annotation.FilterType;
 7 import org.springframework.web.servlet.config.annotation.EnableWebMvc;
 8
 9 @Configuration
10 @ComponentScan( basePackages={"com.chry.ocr"},
11                 excludeFilters = { @Filter(type=FilterType.ANNOTATION,value=EnableWebMvc.class)}
12               )
13
14 public class RootConfig {
15
16 }
至此, 傳統方式中需要通過web.xml進行配置的東西就已將全部完成有上面三個java類(OcrWebAppInitializer, RootConfig, WebConfig)完成. 可以開始寫Controller和頁面代碼了
Step 5: 編寫一個HomeController.java, 它將輸出"hello World from Spring MVC"到home.jsp頁面
 1 package com.chry.ocr.controller;
 2
 3 import static org.springframework.web.bind.annotation.RequestMethod.*;
 4 import org.springframework.stereotype.Controller;
 5 import org.springframework.web.bind.annotation.RequestMapping;
 6 import org.springframework.web.bind.annotation.RequestMethod;
 7 import org.springframework.web.servlet.ModelAndView;
 8
 9 @Controller
10 public class HomeController {
11     @RequestMapping(value = "/", method=GET)
12     public ModelAndView home() {
13         String message = "Hello world from Spring MVC";
14         return new ModelAndView("home", "message", message);
15     }
16 }
Step 6: 編寫一個jsp頁面, 按照我們在視圖解析器和Controller裡面的配置,放在WEB-INF/views/home.jsp中
 1 <%@ page language="java" contentType="text/html; charset=ISO-8859-1" pageEncoding="UTF-8"%>
 2 <!DOCTYPE html PUBLIC "-//W3C//DTD HTML 4.01 Transitional//EN" "http://www.w3.org/TR/html4/loose.dtd">
 3 <html>
 4 <head>
 5 <title>Spring MVC Tutorial chry</title>
 6 <style type="text/css">
 7 </style>
 8 </head>
 9 <body>
10     <br>
11     <div style='text-align:center;'>
12         ${message}
13     </div>
14 </body>
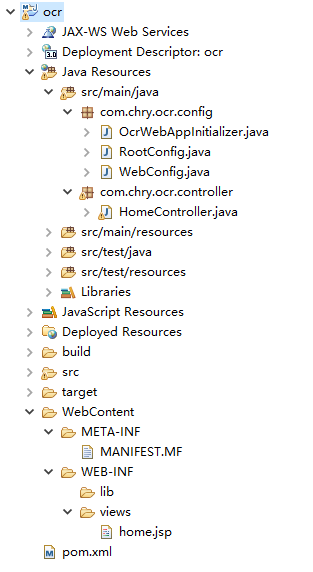
Step 7: 至此所有工作完成, 使用maven的"clean install"選項進行編譯打包後,在執行,訪問http://localhost:8080即可. 頁面效果和工程結構如下,工程裡面沒有web.xml