譯文鏈接:http://websystique.com/spring/spring-4-hello-world-example-annotation-tutorial-full-example/
這個教程將展示一個基於Spring注解配置的Spring 4 Hello world例子,解釋Spring 4的基本概念和使用方法。
同樣也會提供基於XML配置的示例作為兩者的一個比較,我們將創建一個基於maven工程,使用spring版本為4.0.6。
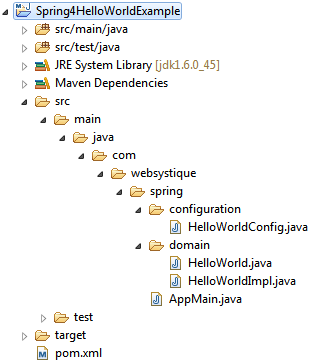
如下是本工程的最終結構目錄:
如果想要了解如何創建一個maven工程,請參考以下鏈接:Maven tutorial。裡面包含了詳細的步驟來說明如何創建maven工程。
那麼,接下來,就讓我們在以上目錄結構上添加具體內容吧。
我們可以通過pom.xml給maven工程添加所有依賴,如下:
<project xmlns="http://maven.apache.org/POM/4.0.0" xmlns:xsi="http://www.w3.org/2001/XMLSchema-instance"
  xsi:schemaLocation="http://maven.apache.org/POM/4.0.0 http://maven.apache.org/xsd/maven-4.0.0.xsd">

    <modelVersion>4.0.0</modelVersion>
    <groupId>com.websystique.spring</groupId>
    <artifactId>Spring4HelloWorldExample</artifactId>
    <version>1.0.0</version>
    <packaging>jar</packaging>

    <name>Spring4HelloWorldExample</name>

    <properties>
        <springframework.version>4.0.6.RELEASE</springframework.version>
    </properties>

    <dependencies>
        <dependency>
            <groupId>org.springframework</groupId>
            <artifactId>spring-core</artifactId>
            <version>${springframework.version}</version>
        </dependency>
        <dependency>
            <groupId>org.springframework</groupId>
            <artifactId>spring-context</artifactId>
            <version>${springframework.version}</version>
        </dependency>
    </dependencies>
    <build>
        <pluginManagement>
            <plugins>
                <plugin>
                    <groupId>org.apache.maven.plugins</groupId>
                    <artifactId>maven-compiler-plugin</artifactId>
                    <version>3.2</version>
                    <configuration>
                        <source>1.6</source>
                        <target>1.6</target>
                    </configuration>
                </plugin>
            </plugins>
        </pluginManagement>
    </build>

</project>
對於這個示例,我們只需要添加Spring core 和 Spring context依賴,其中spring注解是在spring-context裡定義的。
Spring提倡低耦合和基於接口編程。
所以,我們首先創建一個POJO接口和它的實現類,這個POJO將作為一個spring bean。
package com.websystique.spring.domain;

public interface HelloWorld {

    void sayHello(String name);
}
package com.websystique.spring.domain;

public class HelloWorldImpl implements HelloWorld{

    public void sayHello(String name) {
        System.out.println("Hello "+name);
    }

}
Spring配置類包含工程中要用到的一些bean的定義。@Configuration注解聲明這個類是一個Spring配置類,該類可以包含@Bean注解的方法,該方法創建bean交給spring容器管理。
package com.websystique.spring.configuration;

import org.springframework.context.annotation.Bean;
import org.springframework.context.annotation.Configuration;
import org.springframework.context.annotation.Description;

@Configuration
public class HelloWorldConfig {

    @Bean(name="helloWorldBean")
    @Description("This is a sample HelloWorld Bean")
    public HelloWorld helloWorld() {
        return new HelloWorldImpl();
    }

}
@Description是Spring 4引入的新注解,用於描述bean的定義
以上基於注解的配置與如下的Spring XML配置達到的效果一樣(我們把這個文件命名為helloworld-config.xml)
<beans xmlns="http://www.springframework.org/schema/beans"
    xmlns:xsi="http://www.w3.org/2001/XMLSchema-instance"
    xsi:schemaLocation="http://www.springframework.org/schema/beans http://www.springframework.org/schema/beans/spring-beans-4.0.xsd">

    <bean id="helloWorldBean" class="com.websystique.spring.domain.HelloWorldImpl">

</beans>
package com.websystique.spring;

import org.springframework.context.annotation.AnnotationConfigApplicationContext;
import org.springframework.context.support.AbstractApplicationContext;

import com.websystique.spring.configuration.HelloWorldConfig;
import com.websystique.spring.domain.HelloWorld;

public class AppMain {

    public static void main(String args[]) {
        AbstractApplicationContext context = new AnnotationConfigApplicationContext(HelloWorldConfig.class);
        HelloWorld bean = (HelloWorld) context.getBean("helloWorldBean");
        bean.sayHello("Spring 4");
        context.close();
    }

}
AnnotationConfigApplicationContext以我們的配置類(用@Configuration標注)作為入參創建spring應用上下文環境,在程序運行時注冊所有在配置類中定義的bean。一旦我們創建了AnnotationConfigApplicationContext對象,就可以通過其bean對象的方法執行一些操作。getBean方法從spring容器中得到指定的bean對象,並且可以調用該
HelloWorld bean = (HelloWorld) context.getBean("helloWorldBean");
bean.sayHello("Spring 4");
運行以上程序,會得到如下結果:
如果使用基於XML的配置,上面的main方法應該這樣寫:
package com.websystique.spring;

import org.springframework.context.support.AbstractApplicationContext;
import org.springframework.context.support.ClassPathXmlApplicationContext;

import com.websystique.spring.domain.HelloWorld;

public class AppMain {

    public static void main(String args[]) {
        AbstractApplicationContext context = new ClassPathXmlApplicationContext("helloworld-config.xml");
        HelloWorld bean = (HelloWorld) context.getBean("helloWorldBean");
        bean.sayHello("Spring 4");
        context.close();

    }

}
其中helloworld-config.xml文件是我們在步驟三中創建的,位於工程classpath下(如/src/main/resources)。
下篇文章,我們將會看到一個bean的自動檢測例子,該特性基於注解,可以自動找到應用環境中的所有bean,而不需要在配置類中一個個聲明它們。
http://websystique.com/?smd_process_download=1&download_id=778